How to Install Crown Molding on a Sloped Ceiling
Crown molding adds a touch of elegance and sophistication to any room. However, installing crown molding on a sloped ceiling, also known as a vaulted ceiling, presents unique challenges compared to a standard 90-degree intersection. The angles are no longer straightforward, requiring precise measurements, careful cuts, and a solid understanding of geometric principles. This article provides a comprehensive guide to successfully installing crown molding on a sloped ceiling, ensuring a professional and aesthetically pleasing result.
Before commencing the project, careful planning and preparation are essential. This involves gathering the necessary tools, understanding the specific angles involved, and selecting the appropriate type of crown molding. Rushing into the installation process without proper preparation can lead to errors, wasted materials, and a less-than-desirable outcome.
Key Point 1: Understanding the Geometry of Sloped Ceilings
The primary challenge when installing crown molding on a sloped ceiling arises from the non-standard angles created where the ceiling meets the wall. Unlike a typical 90-degree corner, a sloped ceiling forms an acute or obtuse angle. This necessitates calculating and cutting the crown molding at precise angles to ensure a seamless fit. Failure to accurately determine these angles will result in gaps and misaligned joints.
To understand the geometry, consider the following components:
- Wall Angle: This is the angle between the wall and a horizontal surface. It is typically 90 degrees but can vary slightly due to imperfections in the wall.
- Ceiling Angle: This is the angle between the sloped ceiling and a horizontal surface. This is the most crucial angle to measure accurately.
- Spring Angle: This is the angle at which the crown molding rests against the wall and ceiling. This angle is pre-determined by the profile of the crown molding itself.
Accurately measuring the ceiling angle is paramount. Several methods can be employed:
- Protractor: A protractor can be used for relatively shallow slopes. Place the protractor against the wall and measure the angle to the ceiling. Ensure the protractor is perfectly level to obtain an accurate reading.
- Angle Finder/Digital Protractor: These tools provide a more precise digital reading of the angle. They are particularly useful for steeper slopes where a standard protractor might be difficult to use.
- Bevel Gauge and Sliding T-Bevel: These tools can be used in conjunction to capture the angle. The bevel gauge is used to transfer the ceiling angle to the sliding T-bevel. The T-bevel can then be used to transfer the angle to the miter saw for accurate cutting.
- Online Angle Calculators: Several online calculators are available that can determine the necessary miter and bevel angles once the wall angle, ceiling angle, and spring angle are input. These calculators often require the spring angle to be known or estimated based on the crown molding profile.
Once the ceiling angle is determined, use the appropriate formula or calculator to determine the miter and bevel angles required for the crown molding cuts. It is crucial to double-check these calculations to minimize errors.
Key Point 2: Cutting Crown Molding for Sloped Ceilings
After determining the necessary angles, the next step is cutting the crown molding. This requires a miter saw capable of making both miter and bevel cuts. The process differs slightly depending on whether you are cutting an inside or outside corner.
Inside Corners: Inside corners are where two walls meet, forming an internal angle. When cutting crown molding for inside corners on a sloped ceiling, you will typically employ the "nested" cutting technique. This involves placing the crown molding upside down and backwards against the fence of the miter saw. The miter saw is then adjusted to the calculated miter and bevel angles. The left and right pieces for the inside corner will be mirror images of each other.
The precise method for nested cutting depends on the miter saw. Some miter saws have markings for crown molding settings, while others require more manual adjustments. Experiment with scrap pieces of crown molding to ensure accurate cuts before cutting the final pieces.
Outside Corners: Outside corners are where two walls meet, forming an external angle. Cutting crown molding for outside corners on a sloped ceiling also requires precise miter and bevel cuts. The same principles of angle calculation apply, but the cutting process is slightly different.
Similarly to inside corners, the "nested" cutting technique is used. Ensure the crown molding is placed upside down and backwards against the fence of the miter saw. The angles will be different from the inside corners and need to be calculated accurately. Again, test cuts are recommended.
Coping Inside Corners (Alternative Method): An alternative to mitering inside corners is coping. Coping involves cutting one piece of crown molding square and then using a coping saw to remove material from the second piece, allowing it to conform perfectly to the profile of the first piece. This method is more forgiving, especially when dealing with imperfect angles or slight variations in wall or ceiling surfaces. Coping requires more skill and time but can result in a tighter, more seamless joint.
Regardless of the cutting method chosen, always use sharp saw blades to ensure clean, precise cuts. Dull blades can cause splintering and tear-out, leading to a less professional finish.
Key Point 3: Installation Techniques and Best Practices
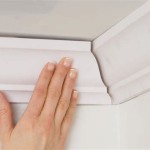
Once the crown molding is cut, the next step is installation. This involves securing the molding to the wall and ceiling using nails or screws. Proper installation techniques are crucial to ensure the molding is securely attached and the joints are seamless.
Securing the Molding: Crown molding is typically attached to wall studs and ceiling joists. Use a stud finder to locate these framing members. Pre-drilling pilot holes can prevent the wood from splitting, especially when working with harder woods. Use finish nails or screws to attach the molding. Countersink the nail or screw heads and fill the holes with wood filler for a smooth, seamless finish.
Dealing with Gaps: Despite careful measurements and cuts, small gaps may still appear at the joints. These gaps can be filled with paintable caulk. Apply the caulk evenly and smooth it out with a wet finger or a caulking tool. Choose a high-quality caulk that is flexible and paintable.
Using Scarf Joints: For long runs of crown molding, it may be necessary to join two pieces together. This is typically done using a scarf joint. A scarf joint is a angled cut made on both pieces of molding, allowing them to overlap and create a stronger, less visible joint. The angle of the scarf joint is typically between 30 and 45 degrees. Secure the scarf joint with wood glue and nails or screws.
Supporting the Molding: During installation, it is important to support the crown molding to prevent it from sagging or shifting. Use temporary supports, such as clamps or blocks of wood, to hold the molding in place while the adhesive and fasteners set.
Finishing Touches: After the crown molding is installed, it is time to apply the finishing touches. This includes filling nail holes with wood filler, sanding the filler smooth, and applying a coat of primer and paint. Choose a high-quality paint that is suitable for interior trim. Apply multiple thin coats of paint for a smooth, even finish.
Safety Precautions: Always wear safety glasses when cutting and installing crown molding. Use a ladder or scaffolding to reach high areas safely. Be aware of electrical wiring and plumbing when nailing or screwing into walls and ceilings.
In summary, installing crown molding on a sloped ceiling demands meticulous planning, accurate measurements, precise cuts, and adherence to best installation practices. By understanding the geometry involved, utilizing the appropriate tools and techniques, and paying close attention to detail, a professional and visually appealing result can be achieved. Careful attention to detail and a patient approach are key to successfully completing this challenging yet rewarding project.
Remember to always prioritize safety by wearing appropriate protective gear and taking necessary precautions when working with power tools and at heights. Taking the time to properly prepare and execute each step will ultimately result in a beautiful and enduring addition to the room.

Installing Crown Moulding On A Sloped Ceiling Doityourself Com Community Forums

Installing Crown Moulding Part Two Canadian Woodworking

Crown Moulding On Angled Ceiling Sawdust Girl

Crown Moulding On Angled Ceiling Sawdust Girl

Install Crown Molding Cathedral Vaulted Ceiling

Installing Crown Moulding On A Sloped Ceiling Doityourself Com Community Forums

Installing Crown Molding Around A Cathedral Ceiling Fine Homebuilding

Crown Molding On Angled Ceilings Makely

Installing Crown Moulding On A Sloped Ceiling

Install Crown Molding Cathedral Vaulted Ceiling
Related Posts