Essential Aspects of Installing a Harbor Breeze Ceiling Fan
Harbor Breeze ceiling fans are a popular choice for homeowners due to their stylish designs, energy efficiency, and affordability. Installing one can enhance the comfort and aesthetics of any room. However, proper installation is crucial to ensure safety and optimal performance.
Pre-Installation Considerations
Before you start installing your Harbor Breeze ceiling fan, make sure you gather the necessary tools and materials, including a screwdriver, electrical tape, wire cutters, and a ladder. It's also essential to read the manufacturer's instructions carefully and check your local building codes for specific requirements.
Safety Precautions
Working with electricity can be hazardous. Ensure your safety by turning off the power at the main electrical panel before starting any electrical work. If you're not comfortable working with electricity, consider hiring a qualified electrician.
Additionally, make sure your ceiling joists are sturdy enough to support the weight of the ceiling fan. If you have any doubts about the integrity of your ceiling, consult a structural engineer for advice.
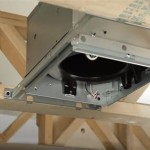
Mounting the Fan Bracket
The fan bracket is the base that will support the fan. Locate the electrical box in the ceiling and secure the bracket to the joists using the provided screws. Ensure the bracket is level and centered.
Wiring the Fan
Connect the wires from the ceiling fan to the corresponding wires in the electrical box. Black wires are typically connected to black, white to white, and green or bare copper to ground. Use wire nuts to secure the connections and wrap them in electrical tape for insulation.
If you're uncertain about the wiring, refer to the manufacturer's instructions or seek professional assistance from an electrician.
Assembling and Installing the Fan
After the wiring is complete, assemble the fan according to the manufacturer's instructions. This may involve attaching the downrod, canopy, and blades to the motor housing.
Once the fan is assembled, carefully lift it onto the mounting bracket and secure it using the provided screws. Make sure the fan is level and stable.
Balancing the Fan
Once the fan is installed, it's important to balance it to ensure smooth operation and prevent wobbling. Harbor Breeze ceiling fans typically come with a balancing kit that includes weights and instructions. Follow the manufacturer's instructions carefully to balance the fan.
Restoring Power and Testing
Turn the power back on at the main electrical panel and test the fan's operation. Check the fan's speed settings, oscillation, and lighting (if applicable). If any issues arise, refer to the manufacturer's troubleshooting guide or contact a qualified electrician.
By following these essential steps, you can successfully install a Harbor Breeze ceiling fan and enjoy its benefits for years to come.

How To Install A Harbor Breeze Ceiling Fan From

Harbor Breeze Ceiling Fan From Installation Steps Diy How To Replace Old

Harbor Breeze Cooperstown Ceiling Fan Install In 100 Yr Old Home

How To Install Harbor Breeze Saratoga Ceiling Fan

How To Install The Harbor Breeze 52 In Echolake Ceiling Fan

How To Install A Harbor Breeze Ceiling Fan From

Harbor Breeze Ceiling Fan From Installation Steps Diy How To Replace Old

Harbor Breeze Ceiling Fan Wiring Questions Doityourself Com Community Forums

Installing A 44 Harbor Breeze Vue Ceiling Fan

Harbor Breeze Ceiling Fan With Remote
Related Posts