Harbor Breeze Ceiling Fan: A Step-by-Step Guide to Changing the Light
Harbor Breeze ceiling fans offer a combination of style, functionality, and energy efficiency. One crucial aspect of maintaining your ceiling fan is changing the light when it burns out. In this comprehensive guide, we will provide a detailed walkthrough of the steps involved in changing the light in a Harbor Breeze ceiling fan, ensuring a safe and successful experience.
Step 1: Preparation and Safety
Before beginning, ensure that the power supply to your ceiling fan is turned off at the circuit breaker or fuse box. It's also essential to use a sturdy ladder or step stool that can securely support your weight. Additionally, wear safety glasses or goggles to protect your eyes from any falling debris.
Step 2: Removing the Light Fixture
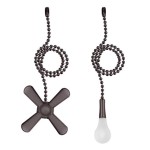
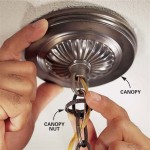
Locate the light fixture, which is typically held in place by screws or a locking mechanism. Using a screwdriver or pliers, carefully loosen or remove the securing screws or mechanisms. Once the light fixture is free, gently pull it down to detach it from the fan.
Step 3: Replacing the Light Bulbs
Most Harbor Breeze ceiling fans use standard incandescent or LED light bulbs. Identify the type of bulb used in your fixture and purchase a suitable replacement. Carefully remove the old bulb by unscrewing it. To install the new bulb, simply screw it into the socket.
Step 4: Reattaching the Light Fixture
Once the new light bulbs are in place, carefully place the light fixture back into the fan assembly. Ensure that it is securely aligned and seated. Tighten the securing screws or locking mechanisms to hold the fixture in place.
Step 5: Restoring Power and Testing
Return to the circuit breaker or fuse box and turn on the power supply. Operate the ceiling fan to verify that the light is functioning properly. If the light fails to turn on, recheck the connections and ensure that the light bulbs are securely installed.
Step 6: Additional Tips and Troubleshooting
Consider using energy-efficient LED bulbs to save on energy consumption and reduce bulb replacements. If the light flickers or dims, check the connections between the fixture and the fan assembly, as well as the wires leading to the power source.
In case of any difficulties, refer to the user manual provided with your Harbor Breeze ceiling fan or contact the manufacturer's customer support for assistance.

4 Ways To Replace A Light Bulb In Ceiling Fan Wikihow

Ceiling Fan Glass Cover Removal Light Bulb Dome

How To Remove Dome Globe Glass Light Replacement On Hampton Bay Ceiling Fan Windward Ii

Harbor Breeze Audiss 44 In Brushed Nickel Color Changing Indoor Ceiling Fan With Light 5 Blade The Fans Department At Com

Harbor Breeze Ceiling Fan Remote Program Dimmer And Conflict Fix

Harbor Breeze Oakham 70 In Broe Led Indoor Ceiling Fan With Light Remote 5 Blade The Fans Department At Com

How Do You Replace A Burned Out Light Bulb In Harbor Breeze Ceiling Fan Hunker

Harbor Breeze Orim 42 In 3 Blade Sd Ceiling Fan Steel Wood Brown Brushed Nickel 41134 Rona

Ceiling Fan Dome Removal

Harbor Breeze Cumberland 62 In Brushed Nickel Color Changing Indoor Ceiling Fan With Light Remote 6 Blade Com
Related Posts