Hanging a Ceiling Fan on a Slanted Ceiling: A Comprehensive Guide
Installing a ceiling fan can significantly enhance comfort in a room by improving air circulation and potentially reducing energy costs. However, hanging a ceiling fan on a slanted ceiling presents unique challenges compared to installations on a flat, level surface. This article provides a detailed guide to safely and effectively installing a ceiling fan on a slanted ceiling, ensuring both optimal performance and structural integrity.
The primary concern with slanted ceiling installations is ensuring the fan hangs level and operates without excessive wobbling or strain on the mounting hardware. Unlike a flat ceiling where the fan hangs directly down, a sloped surface requires specific adaptations to maintain proper balance and alignment. These adaptations typically involve using specialized mounting hardware, such as a downrod designed for angled ceilings and a compatible mounting bracket capable of accommodating the slope.
Before commencing any installation, it is crucial to prioritize safety. This includes disconnecting the power supply to the circuit at the breaker box. Furthermore, understanding local building codes and regulations pertaining to electrical work and ceiling fan installations is essential. Adherence to these regulations ensures the installation meets safety standards and avoids potential legal issues or complications during future inspections.
Determining the Ceiling Slope and Downrod Length
The first step in preparing for a slanted ceiling fan installation is accurately determining the ceiling slope. This is typically expressed as a pitch, which is the number of inches the ceiling drops vertically for every 12 inches of horizontal distance. A simple way to measure the pitch is to use a level and a measuring tape. Place the level against the ceiling, ensuring it is perfectly horizontal. Then, measure the vertical distance from the end of the level to the ceiling. This measurement represents the pitch.
Alternatively, a protractor or an angle finder can be used to directly measure the angle of the slope in degrees. This measurement is often required by manufacturers of ceiling fan mounting hardware to ensure compatibility and proper installation. Many online resources and mobile applications are available that can assist in converting between pitch and angle measurements.
Once the ceiling slope is known, the appropriate downrod length can be determined. The downrod is the metal pipe that connects the ceiling fan motor to the mounting bracket. The correct downrod length ensures that the fan blades are positioned at the optimal height for air circulation and clearance. Generally, it is recommended that the fan blades are at least 7 feet from the floor. For slanted ceilings, the required downrod length is usually longer than for flat ceilings due to the angle. Manufacturers typically provide charts or calculators to assist in determining the appropriate downrod length based on the ceiling slope and room height. It is crucial to consult these resources to avoid installing a fan that is too close to the ceiling or too low to the floor.
Factors influencing downrod length selection include the overall height of the ceiling, the desired aesthetic appearance, and the specific design of the ceiling fan. In rooms with very high ceilings, a longer downrod may be necessary to bring the fan blades down to a level where they can effectively circulate air. Conversely, in rooms with lower ceilings, a shorter downrod may be required to maintain adequate headroom. Certain fan designs may also dictate specific downrod lengths to ensure proper balance and performance.
Selecting the Appropriate Mounting Hardware
Selecting the correct mounting hardware is crucial for a safe and successful slanted ceiling fan installation. The most important component is the mounting bracket, which attaches to the ceiling joist and provides a secure anchor point for the fan. For slanted ceilings, a specialized mounting bracket designed for angled installations is required. These brackets typically feature a swivel mechanism or a ball-and-socket joint that allows the fan to hang level regardless of the ceiling slope.
In addition to the mounting bracket, it is also essential to ensure that the electrical box in the ceiling is rated for ceiling fan support. Standard electrical boxes are not designed to withstand the weight and vibration of a ceiling fan. A fan-rated electrical box is specifically designed to support the weight of the fan and prevent it from falling. These boxes are typically made of heavier gauge metal and are securely attached to the ceiling joist using screws or nails. If the existing electrical box is not fan-rated, it must be replaced with a suitable alternative.
When choosing mounting hardware, it is imperative to consider the weight of the ceiling fan. The mounting bracket and electrical box must be rated to support the weight of the fan and any additional accessories, such as light kits. Exceeding the weight capacity of the mounting hardware can lead to structural failure and potential safety hazards. Consult the manufacturer's specifications for both the ceiling fan and the mounting hardware to ensure compatibility and adequate weight support.
Furthermore, the mounting hardware should be compatible with the downrod length selected. The downrod must be securely attached to the mounting bracket and the fan motor to prevent wobbling or instability. Inspect all mounting hardware for any signs of damage or wear before installation. Replace any damaged components with new, high-quality parts to ensure a safe and reliable installation.
For certain types of ceiling construction, such as concrete or plaster, specialized mounting hardware may be necessary. Concrete ceilings typically require the use of concrete anchors to secure the mounting bracket. Plaster ceilings may require the use of toggle bolts or other fasteners that can provide a secure hold in the brittle plaster material. Consult with a qualified electrician or contractor to determine the appropriate mounting hardware for your specific ceiling type.
Steps for Installation and Ensuring Safety
Before initiating the installation process, it is essential to gather all necessary tools and materials. This includes a ladder, screwdriver, wire stripper, wire connectors, electrical tape, a level, and the ceiling fan assembly. Disconnect the power supply to the circuit at the breaker box to prevent electrical shock. Verify that the power is off using a non-contact voltage tester.
Begin by removing the existing light fixture or ceiling fan, if applicable. Carefully disconnect the wiring and lower the fixture to the ground. Inspect the existing electrical box to ensure that it is fan-rated and securely attached to the ceiling joist. If the box is not fan-rated, replace it with a suitable alternative.
Attach the mounting bracket to the electrical box, ensuring that it is securely fastened and level. Use the appropriate screws or bolts to secure the bracket to the box. For slanted ceilings, use a mounting bracket designed for angled installations. Ensure the swivel mechanism or ball-and-socket joint is properly aligned to allow the fan to hang level.
Assemble the ceiling fan according to the manufacturer's instructions. This typically involves attaching the fan blades to the motor housing and connecting the wiring. Carefully route the wiring through the downrod and attach the downrod to the fan motor. Secure the downrod to the mounting bracket, ensuring that it is properly aligned and locked in place.
Connect the wiring from the ceiling fan to the wiring in the electrical box, following the manufacturer's instructions and local electrical codes. Use wire connectors to securely join the wires and wrap them with electrical tape. Ensure that all connections are tight and properly insulated. Carefully tuck the wires into the electrical box, avoiding any sharp bends or kinks.
Raise the ceiling fan into position and attach it to the mounting bracket. Secure the fan to the bracket using the screws or bolts provided. Double-check that all connections are tight and secure. Use a level to ensure that the fan is hanging level, adjusting the swivel mechanism or ball-and-socket joint as needed.
Once the fan is securely mounted, install the fan blades and any light kits according to the manufacturer's instructions. Ensure that all blades are properly balanced and securely attached. Turn the power back on at the breaker box and test the fan to ensure that it is operating correctly. Check for any wobbling or unusual noises. If the fan wobbles, use the balancing kit provided by the manufacturer to adjust the blades and eliminate the wobble.
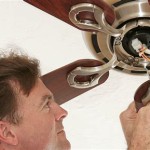
Consider hiring a qualified electrician to perform the installation. A professional electrician has the training and experience to ensure that the installation is done correctly and safely. This option is especially recommended for homeowners who are not comfortable working with electrical wiring or who have limited experience with ceiling fan installations. Furthermore, a professional installation often provides a warranty or guarantee on the workmanship, offering added peace of mind.
Finally, after the installation is complete, perform regular maintenance to ensure the fan continues to operate safely and efficiently. This includes periodically checking the mounting hardware for looseness, cleaning the fan blades to remove dust and debris, and lubricating the motor bearings as needed. Proper maintenance will extend the lifespan of the fan and prevent potential problems.

How To Install A Ceiling Fan On Sloped Lemon Thistle

How To Install A Ceiling Fan On Sloped Lemon Thistle

How To Choose A Ceiling Fan For Vaulted Ceilings Lightology

How To Choose A Ceiling Fan For Vaulted Ceilings Lightology

Fans On An Angle Installing Ceiling Angled Or Raked

Ensuring Proper Ceiling Fan Installation With Vaulted Ceilings

How To Find Ceiling Fans Slope Adapters And Downrods For Angled Ceilings Delmarfans Com

Ceiling Fans For Angled Ceilings

Hunter Vaulted Ceiling Fan Mount 22170 The Home Depot

Vaulted Ceiling Fans Sloped Lightology
Related Posts