Hanging a Ceiling Fan on Vaulted Walls in Singapore
Installing a ceiling fan on a standard flat ceiling is a relatively straightforward process. However, vaulted ceilings, with their sloped and angled surfaces, present unique challenges. This article will explore the process of hanging a ceiling fan on vaulted walls in Singapore, addressing essential considerations and providing practical guidance for a successful installation.
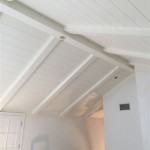
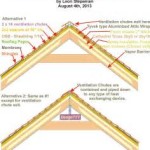
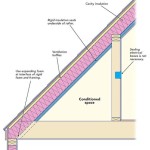
Assessing the Vaulted Ceiling
Before purchasing a ceiling fan, it's crucial to assess the specific characteristics of the vaulted ceiling. The angle of the slope significantly impacts the type of mounting hardware required. A shallow slope may allow for a standard downrod installation with a slight angle, while a steeper slope necessitates a specialized angled mount or a longer downrod to ensure adequate clearance between the fan blades and the ceiling. Measuring the angle of the slope is the first step. This can be accomplished using a protractor or a digital angle finder. Accurate measurement is critical for selecting the correct mounting hardware.
Additionally, the ceiling material must be considered. Common materials include drywall, plaster, or wood. Each material requires specific mounting techniques and hardware. For example, drywall might require the use of toggle bolts for secure anchoring, while wood allows for direct screwing into ceiling joists. Identifying the ceiling material is essential for ensuring proper and secure installation.
Finally, checking for existing electrical wiring at the desired fan location is essential. Most vaulted ceilings have an existing electrical box for a light fixture, which can often be repurposed for the fan. However, if no wiring exists, professional electrical assistance will be needed to run new wiring to the fan location. Working with electricity can be dangerous, and it's always recommended to consult a qualified electrician if you are unsure about any aspect of the electrical work.
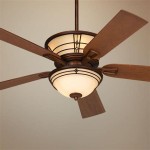
Choosing the Right Ceiling Fan and Mounting Hardware
Selecting the appropriate ceiling fan and mounting hardware is paramount for a safe and effective installation. For vaulted ceilings, specialized downrods are often required. These angled downrods compensate for the ceiling slope and ensure the fan hangs level and provides optimal airflow. The length of the downrod depends on both the ceiling height and the angle of the vault. Longer downrods are typically required for steeper slopes to maintain sufficient clearance between the fan blades and the ceiling. Consult the manufacturer's guidelines to determine the appropriate downrod length for your specific situation.
The ceiling fan's weight is another crucial factor. Heavier fans necessitate more robust mounting hardware to ensure secure attachment to the vaulted ceiling. Look for ceiling fans specifically designed for angled ceilings, as they often come with reinforced mounting systems. These systems typically include specialized brackets and hardware designed to handle the increased stress on the mounting point due to the angled installation.
Furthermore, consider the fan's airflow capacity and blade span. Larger rooms and higher ceilings generally require fans with a greater blade span and higher airflow ratings. Choosing a fan with adequate capacity ensures effective air circulation and optimal cooling. Consider the room's size and ceiling height when selecting a fan to ensure it can effectively cool the space.
Installation Process and Safety Precautions
Before commencing the installation, turn off the power to the circuit at the main electrical panel. This crucial safety step prevents electrical shocks during the installation process. Verify the power is off using a voltage tester to ensure complete safety.
Assemble the ceiling fan according to the manufacturer's instructions. This typically involves attaching the blades, installing the light kit (if included), and attaching the downrod. Once assembled, carefully lift the fan and attach it to the mounting bracket, ensuring all connections are secure. The mounting bracket should be securely attached to the ceiling joists or appropriate structural members within the vault. Using the correct screws and fasteners as specified by the manufacturer is crucial for a safe and secure installation.
Connect the wiring from the fan to the electrical wiring in the ceiling, ensuring proper wire connections. Consult a qualified electrician if you are unsure about any aspect of the electrical wiring. Once the wiring is complete, carefully secure the wiring connections and conceal them within the electrical box. After completing the electrical connections, attach the fan canopy to conceal the wiring and mounting hardware. Test the fan operation by turning the power back on at the main electrical panel. Verify all speeds and the light kit (if included) are functioning correctly.
Throughout the installation process, using appropriate safety equipment is crucial. This includes safety glasses to protect your eyes from debris and work gloves to provide a secure grip. Working on a stable ladder or platform is also essential, especially when working with higher vaulted ceilings. Always follow safety guidelines and consult with professionals when needed to ensure a safe and successful installation.

Ceiling Fan Installation Cost Singapore 2025 Handyman

How To Correctly Place Corner Ceiling Fans In Your Space 2024 Updated Weiken Interior Design

How To Correctly Place Corner Ceiling Fans In Your Space 2024 Updated Weiken Interior Design

Maximize Comfort With Corner Ceiling Fans In Singapore

Ceiling Fan Selection Mounting Guide

Ceiling Fan Installation Cost Singapore 2025 Handyman

Kdk Ceiling Fan Singapore 1 Wall Corner Replacement Installation Service In

How To Correctly Place Corner Ceiling Fans In Your Space 2024 Updated Weiken Interior Design

11 Best Ceiling Fans With Lights 2025 Bladeless Fan Sg

Review Of Kdk Ceiling Fan Part
Related Posts