Installing a flush mount ceiling light with a pull chain is a relatively simple task that can be completed in just a few minutes. The pull chain will make it easy to turn the light on and off without needing to reach up and flip a switch. With the right tools, you can have your new light in place in no time.
Tools Needed for Installation
Before you begin, make sure you have the necessary tools for the job. You’ll need a flathead screwdriver, a Phillips screwdriver, a drill, and a pair of pliers. You’ll also need the new light fixture, mounting hardware, and wire connectors.
Turn Off Power Before Starting
To avoid any potential electrical hazards, be sure to turn off the power to the area where you’ll be working. This can be done by switching off the circuit breaker or unscrewing the fuse associated with the area. If you are unsure which breaker or fuse to switch off, contact a qualified electrician.
Mount the New Fixture
Once the power is off, you can begin mounting the new light fixture. First, remove the existing light fixture. Begin by unscrewing the mounting screws on the sides of the existing light using a flathead screwdriver. Then, pull the fixture away from the ceiling. Once the fixture is out, you’ll be able to see the wiring.
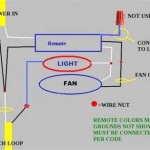
Connect the Wiring
Next, connect the wiring from the new light fixture to the wiring in the ceiling. Unscrew the wire connectors from the ceiling and attach the new light’s wiring to them. Be sure to match the correct wires to the correct connectors. Then, use the pliers to twist the connectors tightly and make sure the connections are secure.
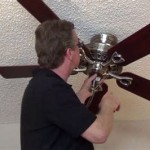
Install the New Fixture
Once the wiring is connected, you can install the new light fixture. Begin by drilling holes in the ceiling to mount the fixture. Then, attach the mounting hardware to the ceiling. Finally, attach the light fixture to the mounting hardware. Make sure that the pull chain hangs down from the fixture.
Turn the Power Back On
Once everything is connected and installed, you can turn the power back on. Flip the circuit breaker or screw the fuse back in. Then, test the light by pulling the chain and make sure it turns on and off correctly.
Conclusion
Installing a flush mount ceiling light with a pull chain is a relatively simple job that can be completed in a short amount of time. Be sure you have the proper tools and safety precautions before starting, and you’ll have your new light up and running in no time.


Related Posts