Everything You Need to Know About Ceiling Crown Molding Installation
Ceiling crown molding is a beautiful and elegant way to add character and sophistication to any room. But while it may look difficult, installing crown molding is actually a relatively straightforward project that can be completed in a few hours with the right tools and materials. Here's everything you need to know about ceiling crown molding installation:
Materials
In addition to the crown molding itself, you will need the following materials:
● Measuring tape
● Miter saw
● Caulk gun
● Caulking
● Nails or adhesive
● Hammer or nail gun
● Sandpaper
● Paint or stain (optional)
Step 1: Measure and Cut the Molding
The first step is to measure and cut the molding to fit the room. To do this, you will need to measure the length of each wall and then cut the molding to size using a miter saw. Miter cuts are angled cuts that allow the molding to fit together seamlessly at the corners.
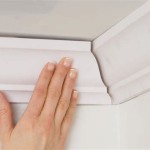
Step 2: Install the Crown Molding
Once the molding is cut to size, you can begin installing it. There are two common methods for installing crown molding: using nails or adhesive. If you are using nails, you will need to predrill holes in the molding before nailing it into place. If you are using adhesive, you will need to apply a bead of adhesive to the back of the molding and then press it into place.
Step 3: Caulk and Finish
Once the crown molding is installed, you will need to caulk the seams between the molding and the wall or ceiling. This will help to seal any gaps and prevent drafts. Once the caulk has dried, you can sand it smooth and then paint or stain it to match the rest of the room.
Tips for Installing Crown Molding
Here are a few tips for installing crown molding:
● Use a level to make sure that the molding is installed level.
● Be careful not to over-tighten the nails or screws.
● If you are using adhesive, make sure to apply it evenly to the back of the molding.
● Allow the caulk to dry completely before painting or staining it.

Foam Crown Molding Installation And Review

Installing Crown Moulding Part Two Canadian Woodworking

How To Install Crown Molding Homeserve Usa

How To Cut Crown Molding Acme Tools

Our Home From Scratch

How To Install Crown Molding Along The Ceiling Ask John Builder

How To Install Extra Thick Crown Molding Young House Love

Everything You Need To Know About Interior Molding Signature Home Services

Installing Crown Molding Your Diy Crowning Achievement

Crown Molding Made Easy Addicted 2 Decorating
Related Posts