DIY Beadboard Ceiling: An Alternative to Popcorn Removal
Popcorn ceilings, a once-popular architectural feature, are now often considered dated and undesirable. The textured surface, initially valued for its sound-dampening properties and ability to conceal imperfections, can detract from a room's aesthetic appeal. Removal of a popcorn ceiling, while a viable option, can be a messy, labor-intensive, and potentially hazardous undertaking, especially if the material contains asbestos. As an alternative, installing a beadboard ceiling offers a practical and aesthetically pleasing solution that covers the existing popcorn texture without the need for complete removal.
This article details the process of installing a beadboard ceiling as a DIY project, outlining the necessary materials, tools, and step-by-step instructions to achieve a professional-looking result. This approach is particularly appealing for homeowners seeking a cost-effective and less disruptive method of updating their living space. The finished beadboard ceiling provides a clean, classic look that can enhance the overall value and appeal of a home.
Assessing the Project and Preparing the Space
Before embarking on the beadboard ceiling installation, a thorough assessment of the existing ceiling is crucial. This involves inspecting the popcorn texture for any signs of damage, such as water stains or loose areas. Addressing these issues prior to installation is essential to ensure the long-term integrity of the new ceiling. Repairing any water damage prevents future mold growth and structural problems. Securing loose areas of the popcorn texture provides a stable base for the beadboard.
Next, determine the square footage of the ceiling area. This measurement is necessary for calculating the amount of beadboard, furring strips, and other materials required. It is always advisable to purchase a surplus of materials to account for cuts, waste, and potential errors during the installation process. Common beadboard panels are available in various sizes, typically 4 feet by 8 feet, or individual planks. Choose the size and style that best suits the room's dimensions and desired aesthetic.
Proper preparation of the room is paramount. This includes removing all furniture and fixtures from the space or covering them thoroughly with plastic sheeting. Protecting the floor with drop cloths is also essential to catch any debris or dust generated during the installation. Adequate ventilation is vital, especially when working with adhesives, paints, or sealants. Ensure the room is well-ventilated by opening windows or using a fan to circulate air. Safety glasses, a dust mask, and gloves should be worn throughout the project to protect against dust, debris, and chemical exposure.
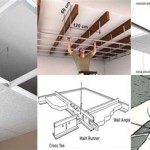
Installing Furring Strips
Furring strips are essential for creating a level and secure surface to which the beadboard panels will be attached. These strips, typically made of 1x3 or 1x4 lumber, are installed perpendicular to the direction the beadboard panels will run. The spacing between the furring strips should be determined based on the thickness of the beadboard material and the joist spacing of the original ceiling. A general guideline is to space the furring strips 16 to 24 inches apart.
Locate the ceiling joists using a stud finder. Mark the location of each joist with a pencil or chalk line. This will provide a guide for securing the furring strips. The furring strips must be securely fastened to the ceiling joists using wood screws that are long enough to penetrate through the furring strip, the popcorn ceiling, and into the joist. Use a level to ensure that the furring strips are installed straight and even. Shims may be necessary to level any uneven areas of the existing ceiling. Secure the shims with construction adhesive and screws.
When installing furring strips around light fixtures or other ceiling protrusions, plan accordingly. Create a framework of furring strips around these obstacles, ensuring that there is sufficient space to accommodate the beadboard panels. This will involve cutting the furring strips to the appropriate lengths and angles to fit around the fixtures. Precise measurements and cuts are crucial for achieving a professional-looking result.
Installing the Beadboard Panels
With the furring strips in place, the next step involves installing the beadboard panels. Begin by measuring and cutting the first panel to fit snugly against the walls or trim. Use a circular saw or jigsaw to make precise cuts. Accuracy is essential for creating a seamless and professional-looking ceiling. When cutting, ensure that the blade is sharp to prevent splintering or chipping of the beadboard material.
Apply construction adhesive to the back of the beadboard panel, focusing on areas that will be in direct contact with the furring strips. Position the panel against the furring strips and secure it in place with finishing nails or screws. Use a nail gun or drill to drive the fasteners through the beadboard and into the furring strips. Space the fasteners evenly along the length of the panel, typically every 6 to 8 inches. Countersink the nails or screws slightly below the surface of the beadboard to prevent them from interfering with the finishing process.
Continue installing the remaining beadboard panels, ensuring that each panel is aligned properly with the adjacent panels. Maintain a consistent gap between the panels to allow for expansion and contraction. This is particularly important in areas with high humidity or temperature fluctuations. Use shims or spacers to maintain a uniform gap. When cutting panels to fit around corners or obstacles, use a combination square and a utility knife to create accurate and clean cuts.
For the final rows of beadboard panels along the edges of the room, precise measuring and cutting are essential. These panels will likely need to be cut to fit the irregular shapes of the walls or ceiling. Use a template or a compass to trace the shape of the wall onto the beadboard panel. Cut the panel along the traced line using a jigsaw or coping saw. Install the final panels in the same manner as the previous panels, using construction adhesive and fasteners.
Finishing the Beadboard Ceiling
After the beadboard panels are installed, the finishing process involves filling any nail holes or gaps with wood filler. Apply the wood filler using a putty knife, ensuring that it is flush with the surface of the beadboard. Allow the wood filler to dry completely according to the manufacturer's instructions. Sand the filled areas smooth using fine-grit sandpaper. Remove any dust or debris with a tack cloth.
Caulk the perimeter of the beadboard ceiling where it meets the walls or trim. This will create a clean and professional-looking seal. Apply the caulk evenly using a caulking gun. Smooth the caulk bead with a wet finger or a damp sponge. Remove any excess caulk with a clean cloth. Allow the caulk to dry completely before painting or priming.
Apply a primer to the beadboard ceiling. This will help to seal the wood and provide a uniform surface for the paint. Use a high-quality primer that is specifically designed for use on wood. Apply the primer evenly using a brush or roller. Allow the primer to dry completely according to the manufacturer's instructions. Sand the primed surface lightly with fine-grit sandpaper to remove any imperfections.
Apply two coats of paint to the beadboard ceiling. Use a high-quality paint that is specifically designed for use on ceilings. Apply the paint evenly using a brush or roller. Allow each coat of paint to dry completely before applying the next coat. Maintain a consistent wet edge to prevent lap marks. Consider using a paint with a matte or eggshell finish to minimize glare. Clean up any spills or drips immediately with a damp cloth.
Reinstall any light fixtures or other ceiling fixtures that were removed during the installation process. Ensure that the fixtures are properly wired and secured. Test the fixtures to ensure that they are functioning correctly. Clean the beadboard ceiling with a mild detergent and water. Use a soft cloth or sponge to avoid damaging the painted surface. The finished beadboard ceiling provides a clean, classic look that can enhance the appearance of any room, successfully concealing the popcorn texture without the arduous task of its removal.

Diy Beadboard Ceiling Tutorial Easy And Inexpensive Custom Treatment

Diy Beadboard Ceiling Tutorial Easy And Inexpensive Custom Treatment

How To Cover Popcorn Ceiling With Beadboard Planks Diy Tutorial

Diy Beadboard Ceiling Tutorial Easy And Inexpensive Custom Treatment

How To Cover Popcorn Ceiling With Beadboard Planks Diy Hometalk

Simple And Beautiful Beadboard Ceiling This Is How We Did It

How To Install Beadboard Ceiling Panels The Easy Way

How To Cover Popcorn Ceiling 8 Creative Ways Making Maanita

From Popcorn To Beadboard Ceiling In Just Hours Decorative Tiles Inc

The Best Way To Cover Popcorn Ceilings With Beadboard Shoe Makes New
Related Posts