Creating The Perfect Ceiling Design With Fake Beams And Lights
Ceilings are often overlooked areas in interior design, yet they present a significant opportunity to enhance the overall aesthetic and ambiance of a space. A well-designed ceiling can dramatically alter the perception of room size, add architectural interest, and even influence the mood. Integrating fake beams and lighting offers a versatile and cost-effective approach to achieving a visually stunning and functional ceiling design.
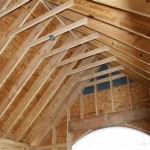
Fake beams, also known as faux beams, are lightweight, manufactured alternatives to solid wood beams. They provide the same rustic or traditional aesthetic without the significant weight, cost, and structural support requirements associated with real timber. Available in a variety of materials, including polyurethane, fiberglass, and high-density foam, fake beams can be customized with different textures, finishes, and colors to complement any interior style. When combined thoughtfully with lighting, they create depth, warmth, and visual intrigue on the ceiling.
Lighting plays a pivotal role in accentuating the architectural features of a space and creating the desired atmosphere. Integrating lighting into a ceiling design that incorporates fake beams can highlight the beams themselves, illuminate the room evenly, or create dramatic focal points. The choice of lighting fixtures, their placement, and their intensity all contribute to the overall impact of the design.
Careful planning and execution are crucial when creating a ceiling design with fake beams and lights. This involves considering the room's dimensions, existing architectural style, desired aesthetic, and functional needs. The following key points should be carefully considered during the design process:
Selecting the Appropriate Beam Material and Style
The choice of material for fake beams significantly impacts their appearance, durability, and ease of installation. Polyurethane beams are a popular choice due to their lightweight nature, realistic wood grain texture, and resistance to moisture and insects. They are relatively easy to cut and install, making them suitable for DIY projects. Fiberglass beams offer enhanced strength and durability, making them a good option for larger spans or areas prone to impact. High-density foam beams are the most affordable option and are suitable for purely decorative applications.
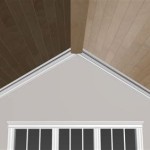
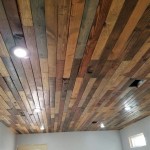
The style of the fake beams should complement the existing architectural style of the space. For a rustic or farmhouse aesthetic, beams with a rough-hewn texture and dark stain are ideal. For a more modern or contemporary look, smooth, clean-lined beams with a light or neutral finish work well. Consider the beam profile, which can range from simple rectangular shapes to more elaborate curved or arched designs. The size of the beams should also be proportionate to the room's dimensions. Overly large beams can overwhelm a small space, while too-small beams may appear insignificant in a large room.
Color is also an important factor. Darker beams tend to draw the eye upward and create a sense of intimacy, while lighter beams can brighten a room and make it appear larger. The beam finish can range from a matte to a glossy sheen, depending on the desired effect. Consider how the beam color and finish will interact with the existing wall colors, furniture, and flooring.
Proper measurement is essential. Accurately measure the length and width of the ceiling to determine the required number and length of beams. Consider the spacing between beams, which should be consistent and proportional to the room's dimensions. A general rule of thumb is to space beams approximately 4 to 8 feet apart, depending on the beam size and the desired look. Make a detailed sketch or digital rendering of the ceiling design to visualize the placement of the beams and lighting fixtures.
Integrating Lighting Effectively
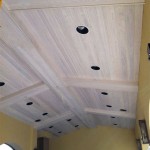
Lighting is a critical element in accentuating the beauty of fake beams and creating the desired ambiance. There are several options for integrating lighting into a ceiling design with fake beams, each offering a different aesthetic and functional purpose. Recessed lighting, also known as can lights, is a popular choice for providing general illumination. These lights are installed flush with the ceiling surface and can be strategically placed to highlight the beams or illuminate specific areas of the room. Spotlights or track lighting can be used to create dramatic focal points or highlight artwork or architectural details.
Pendant lights are decorative fixtures that hang from the ceiling and can be used to add visual interest and character to the space. They can be suspended between beams or hung directly from the beams themselves. Chandeliers provide a more formal and elegant look and can be used to create a grand focal point in a dining room or living room. LED strip lighting can be concealed along the top of the beams to create a soft, ambient glow that highlights the texture and shape of the beams. This is an excellent way to add a touch of drama and sophistication to the ceiling design.
Consider the color temperature of the light bulbs. Warm white light (2700K-3000K) creates a cozy and inviting atmosphere, while cool white light (4000K-5000K) is more energizing and suitable for task lighting. Dimmable lighting allows for adjusting the light intensity to create different moods and atmospheres. Incorporating a dimmer switch provides flexibility and allows for customizing the lighting to suit different activities and preferences. Wiring considerations are crucial for safe and effective lighting integration. Consult with a qualified electrician to ensure that the wiring is installed correctly and meets all safety codes.
Think about the location of electrical outlets and the need for additional wiring. It may be necessary to install new wiring or relocate existing outlets to accommodate the lighting fixtures. The placement of the lighting fixtures should be carefully planned to ensure that the light is evenly distributed and that there are no dark spots or glare. Consider the angle of the light beams and how they will interact with the beams and other architectural features.
Installation Techniques and Best Practices
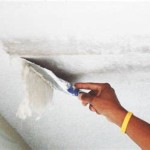
Proper installation is crucial for ensuring the longevity and aesthetic appeal of the ceiling design. It is essential to follow the manufacturer's instructions carefully and use the appropriate tools and materials. Before starting the installation process, ensure that the ceiling surface is clean, dry, and level. Any imperfections in the ceiling surface should be repaired before installing the beams.
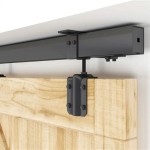
Determine the best method for attaching the beams to the ceiling. This may involve using construction adhesive, screws, or a combination of both. For heavier beams, it may be necessary to install support brackets to provide additional stability. When using construction adhesive, apply a generous amount to the back of the beam and press it firmly against the ceiling surface. Use clamps or temporary supports to hold the beam in place until the adhesive has fully cured. When using screws, pre-drill pilot holes to prevent the wood from splitting. Use screws that are long enough to penetrate the ceiling joists or studs.
Conceal the seams between beams by using caulk or wood filler that matches the beam color. Sand the caulk or wood filler smooth and then apply a finish that matches the beam finish. Carefully cut the beams to the desired length using a saw. Use a miter saw for making accurate angled cuts. When installing beams around corners or other architectural features, take precise measurements and make accurate cuts to ensure a seamless fit.
When installing recessed lighting, carefully cut the holes in the ceiling using a drywall saw or hole saw. Ensure that the holes are the correct size for the recessed lighting fixtures. When installing pendant lights or chandeliers, ensure that the ceiling fixture is securely attached to the ceiling joists or studs. Use a ceiling medallion to conceal the wiring and create a more finished look. When installing LED strip lighting, carefully adhere the strips to the top of the beams using the adhesive backing. Ensure that the strips are evenly spaced and that there are no gaps or sags. Conceal the wiring for the LED strip lighting by running it through conduits or channels.
Prioritize safety by wearing appropriate safety gear, such as safety glasses and gloves. Use a ladder or scaffolding to reach the ceiling safely. If working with electricity, turn off the power at the circuit breaker before starting any electrical work. It is also advisable to consult with a qualified professional for complex installations or electrical work. This ensures that the installation is done correctly and safely.
Regular maintenance is necessary to keep the ceiling design looking its best. Dust the beams regularly using a soft cloth or vacuum cleaner with a brush attachment. Clean any spills or stains immediately using a mild detergent and water. Inspect the beams periodically for any signs of damage or wear. Repair any cracks or chips in the beams using wood filler or caulk. Reapply the finish to the beams as needed to maintain their appearance. Replace any burnt-out light bulbs promptly to ensure that the lighting is functioning properly. Inspect the wiring periodically for any signs of damage or fraying. Consult with a qualified electrician if you notice any electrical problems.
By carefully considering these key points and following best practices, it is possible to create a stunning and functional ceiling design with fake beams and lights. The result will be a space that is not only visually appealing but also adds value and character to the home.

Diy Faux Ceiling Beams American Farmhouse Style

Diy Faux Ceiling Beams With Love Mercedes

10 Statement Wooden False Ceiling Ideas For Your Home Hippo Homes

Diy Faux Ceiling Beams American Farmhouse Style

Diy Faux Ceiling Beams With Love Mercedes

Vaulted Ceiling Beams With Laminate Wood Jenna Sue Design

Beamed Ceiling Ideas 11 Designs That Celebrate Beautiful Beams

Faux Wood Beams Affordable Alternative Nelcos

They Ll Never Know It S Not Real

24 Profile Light Ceiling Design Ideas To Suit N Homes
Related Posts