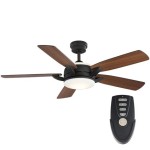
Common Ceiling Fan Problems in English Rooms
Ceiling fans are a common feature in many English homes, offering a cost-effective and energy-efficient solution for circulating air and providing both cooling in the summer and warmth in the winter. However, like all mechanical devices, ceiling fans are prone to various problems that can affect their performance and lifespan. Understanding these common issues can help homeowners identify and address them promptly, ensuring optimal functionality and preventing more significant damage.
This article will explore some of the most frequent ceiling fan problems encountered in English rooms, providing insights into their causes and potential solutions. These issues range from simple fixes that homeowners can address themselves to more complex repairs that require the expertise of a qualified electrician.
Wobbling and Imbalance
One of the most prevalent complaints regarding ceiling fans is wobbling. A wobbling fan can be noisy, visually distracting, and may even pose a safety risk if the wobbling is severe enough to loosen the fan from its mounting. The primary cause of wobbling is an imbalance in the fan blades. This imbalance can arise from several factors.
Uneven blade weight is a common contributor. Over time, dust accumulation on the blades can become uneven, adding weight to certain blades and causing them to droop slightly. Similarly, if the blades are made of wood or other materials susceptible to moisture absorption, they may warp or expand unevenly, leading to an imbalance. Minor manufacturing imperfections in the blades themselves can also contribute to weight disparities.
Another potential cause is loose blade screws. If the screws that attach the blades to the motor housing are not properly tightened, the blades can shift slightly, creating an imbalance and contributing to wobbling. Regular inspection and tightening of these screws is a preventative measure that can often resolve the issue.
A bent blade arm, also known as a blade iron, can also cause a wobble. These arms connect the blades to the motor. If one or more of these arms is bent, even slightly, it can throw off the balance of the entire fan. Bending can happen due to accidental impact, especially during cleaning or moving furniture. It can be difficult to straighten the blade arm perfectly, and replacement might be necessary.
The mounting bracket itself could be the source of the instability. If the bracket is not properly secured to the ceiling joist or electrical box, the entire fan can wobble. This is particularly common if the original installation was not performed correctly or if the electrical box is not rated to support the weight of the fan. Ensuring the bracket is firmly attached to a suitable support structure is crucial for stability.
Solutions to a wobbling fan often involve a process of elimination. Start by cleaning the blades thoroughly to remove any accumulated dust or debris. Ensure each blade is cleaned equally on both sides. Next, tighten all screws connecting the blades to the motor housing. Check the blade arms for any bends or damage. If a blade arm is bent, it may need to be replaced. Using a blade balancing kit, which typically includes small weights that can be attached to the blades, can help fine-tune the balance and reduce or eliminate wobbling. Follow the instructions provided with the kit to identify the appropriate location for the weights.
Dim or Flickering Lights
Many ceiling fans incorporate lighting fixtures, adding to their functionality. However, lighting problems, such as dimness or flickering, are a common complaint. Several factors can contribute to these issues.
Incorrect bulb wattage is a frequent culprit. Using bulbs with a wattage that exceeds the fan's specified maximum wattage can overload the circuit and cause the lights to dim or flicker. Always check the fan's documentation or the label on the light fixture to determine the correct bulb wattage.
Loose bulb connections can also lead to flickering. Over time, vibrations from the fan's operation can loosen the bulbs in their sockets, interrupting the electrical connection. Tightening the bulbs securely in their sockets is a simple fix that often resolves the problem. Always ensure the fan is switched off at the circuit breaker before attempting to adjust or replace any bulbs.
A faulty light kit or light switch is a more complicated issue. The light kit itself may contain a malfunctioning component, such as a ballast or dimmer switch. Similarly, the wall switch connected to the fan may be faulty, causing the lights to flicker or dim. Inspecting the light switch for signs of damage or wear and testing the light kit with a different power source can help determine the source of the problem. Repair or replacement by a qualified electrician may be required.
Compatibility issues between the light bulbs and the fan's dimmer switch can cause problems, particularly when using LED bulbs. Not all LED bulbs are compatible with all dimmer switches. Using incompatible bulbs can lead to flickering, buzzing, or reduced dimming range. Consult the fan's documentation or the bulb manufacturer's recommendations to ensure compatibility.
Voltage fluctuations in the home's electrical system can also affect the lights in a ceiling fan. If the voltage supplied to the fan is unstable, the lights may flicker or dim intermittently. This issue can be caused by problems with the electrical wiring or appliances that draw a large amount of power. Consulting with an electrician to assess the electrical system and address any voltage fluctuations is advisable.
Older fans that use fluorescent lights may experience flickering due to the ballast failing. The ballast regulates the voltage to the fluorescent bulb. A failing ballast often causes the bulb to flicker and sometimes make a buzzing sound. Replacement of the ballast might be a viable option, or upgrading to an LED light kit may be more cost-effective in the long run.
Motor Problems and Reduced Airflow
The motor is the heart of the ceiling fan, and any problems with the motor can significantly affect its performance. Reduced airflow is often a sign that the motor is not functioning correctly. Several factors can contribute to motor problems and reduced airflow.
Overheating is a common cause of motor malfunction. If the motor is running too hot, it can damage the internal components and reduce its efficiency. Overheating can be caused by a lack of lubrication, excessive dust accumulation, or a faulty capacitor. Ensure the fan is properly lubricated according to the manufacturer's instructions and that the vents are free of dust and debris. A qualified electrician can diagnose and replace a faulty capacitor.
Dust accumulation can significantly hinder the motor's performance. Dust can clog the motor's vents, preventing proper ventilation and causing it to overheat. Regularly cleaning the fan, including the motor housing and vents, is essential for maintaining optimal performance. Use a vacuum cleaner with a brush attachment or a soft cloth to remove dust and debris.
Worn-out motor bearings can also contribute to reduced airflow and noise. The bearings allow the motor to rotate smoothly. Over time, the bearings can wear out, causing friction and reducing the motor's efficiency. Worn-out bearings often produce a grinding or squealing noise. Replacing the bearings can be a complex repair best left to a qualified electrician. In some cases, replacing the entire fan might be more cost-effective.
A malfunctioning start capacitor is a frequent cause of motor problems. The start capacitor provides the initial surge of power needed to start the motor. If the capacitor is faulty, the motor may struggle to start or run at a reduced speed. Replacing the capacitor is a relatively simple repair that can often restore the fan's performance. However, it is essential to disconnect the power before working on the fan's electrical components and to consult with a qualified electrician if you are not comfortable performing the repair yourself.
Incorrect blade pitch can also reduce airflow. The blade pitch is the angle at which the blades are set. If the blade pitch is too shallow, the fan will not move as much air. Ensure the blades are set at the correct angle according to the fan's manufacturer's specifications.
The direction of blade rotation impacts airflow. Ensure that the fan is rotating in the correct direction for the season. In summer, the blades should rotate counterclockwise to create a downdraft that cools the room. In winter, the blades should rotate clockwise at a low speed to circulate warm air trapped near the ceiling. Most fans have a switch on the motor housing that allows you to change the direction of rotation.

How To Troubleshoot Your Ceiling Fan The Home Depot

Improving Ventilation In Your Home

Ceiling Fan Rpm Meaning Factors Affecting Sped Crompton

Why Is My Ceiling Fan Not Responding To The Remote Home Improvement Stack Exchange

Which Direction Should Your Ceiling Fan Spin In Winter We Verify

Differences Between Ventilation Fan Vs Exhaust

How To Replace A Ceiling Fan Ask This Old House

Oscillating Fan How To Choose The Best One For Your Home Morrisdirect Co Morris Direct

How Do Remote Controlled Fans Work Crompton Greaves Consumer Electricals Limited

20 Best 𝐏𝐎𝐏 𝐂𝐞𝐢𝐥𝐢𝐧𝐠 𝐃𝐞𝐬𝐢𝐠𝐧𝐬 For Hall With 2 Fans
Related Posts