Common Ceiling Fan Problems in English Homes
Ceiling fans are a ubiquitous feature in many English homes, providing both cooling and aesthetic appeal. Their relatively simple mechanical design belies the potential for a range of issues that can arise over time. Understanding these common problems, their causes, and potential solutions can save homeowners time, money, and frustration. Effective problem solving often involves identifying the symptom, diagnosing the root cause, and implementing the appropriate repair or replacement.
The functionality of a ceiling fan is dependent on several key components, including the motor, blades, wiring, switch, and mounting hardware. Malfunctions in any of these areas can lead to decreased performance, unusual noises, or complete failure. Regular maintenance and timely repairs are crucial for extending the lifespan of a ceiling fan and ensuring its efficient operation.
Wobbling or Unbalanced Fan Blades
One of the most frequently encountered issues with ceiling fans is wobbling. This instability can manifest as a noticeable shake during operation, leading to both annoyance and potential damage to the fan's mounting and surrounding ceiling. Wobbling is almost invariably caused by unbalanced fan blades. Blades can become unbalanced due to a number of factors, including dust accumulation, warped blade materials, and loose screws.
Dust accumulation is a common culprit, as dust tends to collect unevenly on the blades. This creates a weight imbalance, which exacerbates the wobble. The solution is straightforward: carefully clean all fan blades, ensuring that they are free of dust and debris. Use a damp cloth for effective cleaning and avoid excessive moisture, which could damage the blade material.
Warped fan blades are another source of imbalance. Environmental factors, such as humidity and temperature fluctuations, can cause blades to slightly warp or bend over time. This distortion can significantly impact the fan's balance. Inspect the blades visually for any signs of warping. If warping is detected, replacing the affected blades is generally the most effective solution. Replacement blades should be of the same size, weight, and material as the originals to maintain proper balance.
Loose screws connecting the blades to the motor housing are a frequent cause of wobbling. Over time, vibrations during operation can loosen these screws, leading to instability. Regularly inspect the screws and tighten them as needed. Use a screwdriver that fits the screw heads properly to avoid stripping the threads. If the screw threads are damaged, consider replacing the screws with new ones of the same size and type.
If cleaning the blades, checking for warpage, and tightening the screws do not resolve the wobbling issue, a balancing kit can be used. These kits typically include small weights that can be attached to the blades to counter the imbalance. Follow the instructions provided with the balancing kit to determine the appropriate placement of the weights. Experiment with different positions until the wobbling is minimized or eliminated.
Noisy Operation
Ceiling fans are designed to operate quietly, providing a gentle breeze without generating excessive noise. However, several issues can cause a fan to become noisy, disrupting the peace and quiet of the home. Common sources of noise include motor issues, loose components, and blade friction.
The motor is the heart of the ceiling fan, and any problems within the motor can result in noticeable noise. Worn-out bearings are a frequent cause of motor noise. Bearings are responsible for smooth rotation of the motor shaft, and as they wear down, they can produce grinding or squealing sounds. Replacing the bearings may be possible, but it is often more cost-effective to replace the entire motor, particularly for older fans.
Loose components, such as screws, wiring connections, or the fan housing itself, can vibrate and create rattling or buzzing noises. Thoroughly inspect all components of the fan, paying particular attention to the screws that secure the motor housing to the mounting bracket and the blades to the motor. Tighten any loose screws and ensure that all wiring connections are secure. Check the fan housing for any signs of looseness or damage. If the housing is loose, it may be necessary to reinforce it with additional screws or by using a sealant to dampen vibrations.
Blade friction can occur when the blades rub against the motor housing or other parts of the fan. This friction can generate scratching or scraping noises. Visually inspect the blades to ensure that they are properly aligned and not rubbing against any other components. If necessary, gently adjust the position of the blades to eliminate the friction. Ensure there is adequate clearance between the blades and the motor housing or light fixture.
Another potential source of noise is the speed control unit. Dimmer switches or rheostats used to control fan speed can sometimes generate a buzzing sound, particularly at lower speed settings. This is often due to the switch's incompatibility with the fan motor. Replacing the dimmer switch with a fan-rated speed control unit can often resolve this issue. Fan-rated controls are specifically designed to work with ceiling fan motors and minimize buzzing or humming.
Failure to Start or Inconsistent Speed
A ceiling fan that fails to start or operates at inconsistent speeds presents a significant inconvenience. These issues can stem from electrical problems, motor malfunctions, or switch failures. Troubleshooting these problems requires careful examination of the wiring, motor, and speed control components.
Electrical problems are a primary suspect when a ceiling fan fails to start. Check the circuit breaker or fuse that supplies power to the fan. A tripped breaker or blown fuse indicates an overload or short circuit in the wiring. Reset the breaker or replace the fuse, and then attempt to start the fan. If the breaker trips or the fuse blows again, it indicates a more serious electrical problem that requires professional attention.
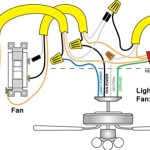
Loose or faulty wiring connections can also prevent the fan from starting or cause it to operate at inconsistent speeds. Carefully inspect all wiring connections in the fan housing, switch box, and junction box. Ensure that all wires are securely connected using wire connectors and that there are no signs of frayed or damaged insulation. If any wires are loose or damaged, tighten or replace them as necessary. It is critical to disconnect the power supply before working on any electrical wiring.
Motor malfunctions are another potential cause of starting or speed problems. A capacitor in the motor is often used to provide the initial surge of power needed to start the fan. A failed capacitor can prevent the fan from starting altogether. Replacing the capacitor can often restore the fan's functionality. However, motor replacement may be the only option if the motor itself is damaged.
Switch failures, particularly in the speed control unit, can lead to inconsistent speed or complete failure to start. The switch may be malfunctioning if the fan only operates at certain speeds or if it does not respond to switch changes. Replacing the switch is a relatively simple repair that can often resolve these issues. Use a switch that is specifically designed for ceiling fans and rated for the appropriate voltage and amperage.
Light Fixture Problems
Many ceiling fans incorporate light fixtures, adding to their functionality and aesthetic appeal. However, these light fixtures are also subject to common problems, such as flickering, failure to illuminate, or difficulty dimming. These issues can be caused by bulb problems, wiring issues, or problems with the light fixture components themselves.
Bulb problems are the most common cause of lighting issues. Ensure that the bulb is properly installed and securely screwed into the socket. Try replacing the bulb with a new one of the same type and wattage. If the bulb continues to flicker or fail to illuminate, investigate other potential causes.
Wiring issues within the light fixture can also lead to problems. Check the wiring connections to the bulb socket and the light fixture itself. Ensure that all connections are secure and that there are no signs of frayed or damaged wires. Pay particular attention to the neutral wire, as a loose or broken neutral wire can cause flickering or complete failure of the light.
Problems with the light fixture components, such as the socket or dimmer switch, can also cause lighting issues. The socket may be corroded or damaged, preventing proper contact with the bulb. The dimmer switch may be malfunctioning, causing flickering or difficulty dimming the light. Replacing the socket or dimmer switch can often resolve these problems. Ensure that the replacement parts are compatible with the light fixture and the ceiling fan.
In some instances, the issue is simply the type of bulb being used. LED bulbs can be particularly susceptible to flickering if the dimmer switch is not compatible. Using a dimmer switch designed for LED bulbs may resolve the issue.
Remote Control Issues
Many modern ceiling fans are equipped with remote controls, offering convenient operation from anywhere in the room. However, remote controls can be prone to problems, such as failure to respond, intermittent operation, or limited functionality. These issues can stem from battery problems, signal interference, or receiver malfunctions.
Battery problems are the most common cause of remote control issues. Replace the batteries with fresh ones of the correct type and voltage. Ensure that the batteries are installed correctly, with the positive and negative terminals aligned properly. Even if the batteries appear to be working, it is recommended to replace them as a first step in troubleshooting.
Signal interference from other electronic devices can disrupt the communication between the remote control and the fan's receiver. Devices such as televisions, cordless phones, and other remote controls can operate on similar frequencies, causing interference. Try moving the fan's receiver away from other electronic devices or changing the channel on the remote control and receiver, if possible.
Receiver malfunctions are another potential cause of remote control problems. The receiver is located inside the fan housing and is responsible for receiving signals from the remote control. If the receiver is damaged or malfunctioning, it may not respond to the remote control or may operate intermittently. Replacing the receiver is often the only solution for this type of problem.
Synchronization problems can also occur between the remote and receiver. This can happen if the remote has been reset or the battery removed for an extended period. Consult the fan's user manual for instructions on how to synchronize the remote control with the receiver. The synchronization process typically involves pressing a specific button on the remote control while the fan is powered on.

Ceiling Fan Wikipedia

Ceiling Fan Rpm Meaning Factors Affecting Sped Crompton

Should The Ceiling Fan Switch Be Up Or Down

How To Replace An Old Ceiling Fan Full Installation Wiring Guide Builds By Maz

How To Replace A Ceiling Fan Ask This Old House

Which Direction Should Your Ceiling Fan Spin In Winter We Verify

Ceiling Fan Sd Problem Solved How To Repalce The Capacitor

Ceiling Fan Size Guide Blades And Airflow Valuelights Blog

Fan Buy Best Fans In At S Crompton

Fan Buy Best Fans In At S Crompton
Related Posts