Can You Put Crown Molding on a Vaulted Ceiling? A Comprehensive Guide
The question of whether crown molding can be installed on a vaulted ceiling is a common one among homeowners looking to add architectural detail and visual interest to their living spaces. The answer, in short, is yes, crown molding can be successfully applied to vaulted ceilings. However, the process is more complex than installing it on a standard, level ceiling, requiring careful planning, precise cuts, and a thorough understanding of angles and installation techniques. This article will explore the nuances of installing crown molding on vaulted ceilings, outlining the considerations, challenges, and best practices for achieving a professional and aesthetically pleasing result.
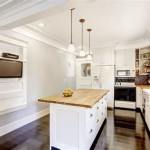
Vaulted ceilings, characterized by their upward sloping planes, offer a sense of spaciousness and grandeur to a room. The addition of crown molding can further enhance this effect, drawing the eye upwards and creating a more refined and polished appearance. However, the varying angles inherent in vaulted ceilings present unique challenges. Unlike the consistent 90-degree angles found in typical room corners, vaulted ceilings introduce compound angles that must be accurately calculated and precisely cut to ensure a seamless and visually appealing installation.
The material selection for crown molding intended for vaulted ceilings is also a crucial consideration. Traditional wood molding, while offering a classic and elegant look, can be more challenging to work with due to its susceptibility to expansion and contraction with changes in humidity and temperature. This is especially relevant in areas with significant seasonal variations, as movement in the wood can lead to gaps and cracks in the molding over time. Alternatives such as polyurethane or PVC molding offer greater stability and resistance to moisture, making them suitable choices for vaulted ceilings, particularly in bathrooms or kitchens where humidity levels are typically higher. The choice of material should also consider the overall aesthetic of the room and the desired level of detail in the molding.
Understanding the Geometry of Vaulted Ceilings
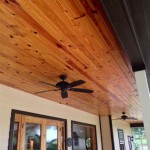
Before embarking on a crown molding installation project on a vaulted ceiling, a thorough understanding of the ceiling's geometry is essential. Vaulted ceilings come in various forms, including cathedral ceilings, A-frame ceilings, and barrel-vaulted ceilings, each with its own unique angular characteristics. Cathedral ceilings, for example, typically feature two sloping planes that meet at a central ridge, while A-frame ceilings resemble an inverted "V" shape. Barrel-vaulted ceilings, on the other hand, have a curved, arch-like appearance.
Accurately determining the angles at which the ceiling planes meet is critical for making precise cuts in the crown molding. This can be achieved using a protractor, a digital angle finder, or a combination square. For more complex vaulted ceiling designs, it may be necessary to consult with a professional carpenter or architect to obtain accurate measurements and ensure proper calculations. The angles must be measured at each corner where the crown molding will be installed, as variations in the ceiling's construction can lead to inconsistencies in the angles from one corner to another.
Once the angles have been determined, they must be translated into compound miter saw settings for cutting the crown molding. Compound miter saws allow for both bevel and miter cuts, which are necessary to create the precise angles required for fitting the molding into the corners of the vaulted ceiling. There are various online calculators and resources available that can assist in determining the appropriate miter and bevel settings based on the measured ceiling angles and the specific profile of the crown molding being used. It is important to double-check these calculations and test the cuts on scrap pieces of molding before cutting the actual pieces to be installed.
Furthermore, consider the spring angle of the crown molding. The spring angle refers to the angle at which the molding sits against the wall and ceiling when installed. This angle is typically specified by the manufacturer and is crucial for determining the correct miter and bevel settings. Using the wrong spring angle in the calculations can result in cuts that do not properly align with the corners of the vaulted ceiling.
Techniques for Cutting and Installing Crown Molding on Vaulted Ceilings
The process of cutting and installing crown molding on vaulted ceilings demands precision and patience. Unlike installing crown molding on a standard ceiling where the corners are typically 90 degrees, vaulted ceilings require compound miter cuts to accommodate the varying angles. It is recommended to start with the longest, most straightforward runs of molding first, gradually working towards the more complex corners and intersections.
When cutting the molding, it is essential to use a sharp blade and make clean, precise cuts. A dull blade can cause splintering and inaccurate cuts, which can compromise the overall appearance of the installation. It is also important to support the molding properly while cutting to prevent it from shifting or moving during the cut. This can be achieved using extension wings or supports on the miter saw.
For inside corners, the molding pieces must be coped. Coping involves cutting away the back of one piece of molding to match the profile of the adjacent piece, creating a seamless joint. This technique is particularly useful for vaulted ceilings, as it allows for slight variations in the angles to be accommodated without compromising the appearance of the joint. Coping can be done using a coping saw or a jigsaw with a fine-tooth blade. Sanding the coped joint after cutting can help to refine the fit and create a smoother transition.
Installing the crown molding requires secure attachment to the wall and ceiling. This can be achieved using a combination of construction adhesive and finish nails. The construction adhesive provides a strong initial bond, while the finish nails hold the molding in place while the adhesive cures. It is important to use nails that are long enough to penetrate the framing members behind the drywall or plaster. A pneumatic nail gun is often used to drive the nails quickly and efficiently. When nailing, be careful not to damage the molding or the surrounding surfaces. Countersinking the nails slightly and filling the holes with wood filler can create a seamless finish.
For longer runs of crown molding, it may be necessary to use scarf joints to join two pieces of molding together. Scarf joints are angled cuts that allow the two pieces of molding to overlap and create a less visible seam. These joints should be placed over framing members whenever possible to provide additional support. Applying construction adhesive to the scarf joint and clamping the pieces together until the adhesive cures can help to create a strong and durable bond.
Addressing Common Challenges and Considerations
Installing crown molding on vaulted ceilings presents several common challenges that homeowners should be aware of before starting the project. One of the most significant challenges is dealing with walls and ceilings that are not perfectly straight or level. This is particularly common in older homes where the original construction may have been less precise. These imperfections can make it difficult to achieve a seamless and professional-looking installation.
To address this challenge, it may be necessary to use shims to correct for any discrepancies in the wall or ceiling. Shims are thin pieces of wood or plastic that can be inserted behind the molding to create a level and consistent surface. The shims can be glued or nailed to the wall or ceiling before the molding is installed. It is important to use a level to ensure that the shims are properly positioned and that the molding is perfectly straight.
Another common challenge is dealing with gaps between the molding and the wall or ceiling. These gaps can be caused by imperfections in the wall or ceiling, or by inaccurate cuts in the molding. To fill these gaps, caulk can be used. Caulk is a flexible sealant that can be applied to the gaps using a caulking gun. It is important to use a paintable caulk so that it can be painted to match the color of the molding and the surrounding surfaces. A smooth and consistent bead of caulk should be applied, and any excess caulk should be wiped away with a damp cloth.
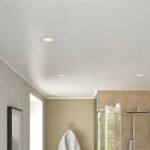
Lighting is another crucial consideration when installing crown molding on vaulted ceilings. The placement of lighting fixtures can significantly impact the appearance of the molding. Recessed lighting, for example, can highlight the molding and create a dramatic effect. However, it is important to ensure that the lighting fixtures are properly positioned so that they do not cast harsh shadows on the molding. Cove lighting, which is installed behind the molding and shines upwards onto the ceiling, can also be used to create a soft and ambient light.
Finally, safety should always be a top priority when working on a crown molding installation project. Working at heights can be dangerous, so it is important to use a sturdy ladder or scaffolding. Wear safety glasses to protect your eyes from dust and debris, and wear gloves to protect your hands from splinters and cuts. If you are not comfortable working at heights or using power tools, it is best to hire a professional carpenter to complete the project. A professional will have the experience, tools, and expertise to ensure that the crown molding is installed safely and correctly.

Does Crown Molding Look Good In A Home With Vaulted Ceilings That Are Pitched At An Angle Between 8 And 14 Walls Quora

How To Install Crown Molding On Vaulted Or Cathedral Ceilings The Joy Of Moldings

Crown Molding On Angled Ceilings Makely

Can You Put Crown Molding On A Vaulted Ceiling Hometalk

Crown Molding On A Vaulted Ceiling

Installing Crown Molding On A Vaulted Ceiling Pro Construction Guide

Installing Crown Moulding Part Two Canadian Woodworking

How To Install Crown Molding On A Vaulted Cathedral Ceiling Without Transition Piece

Does Crown Molding Look Good In A Home With Vaulted Ceilings That Are Pitched At An Angle Between 8 And 14 Walls Quora

Vaulted Ceiling With Crown Molding
Related Posts