Can You Paint a Gold Ceiling Fan With Light and Remote?
Painting a ceiling fan, even one with integrated lighting and a remote control receiver, is a feasible DIY project. However, careful preparation and execution are crucial for a professional-looking result and to avoid damaging the fan's functionality. This article explores the process, potential challenges, and key considerations for painting a gold ceiling fan with light and remote.
Key Considerations Before Painting
Before embarking on this project, several factors warrant consideration:
- Fan Material: Different materials require different paint types. Metal fans are common, but some are made of wood, plastic, or composite materials. Identify the fan material to select the appropriate primer and paint.
- Existing Finish: A glossy finish will require sanding to ensure proper paint adhesion. Rusted or corroded metal surfaces necessitate thorough cleaning and rust removal before priming.
- Gold Paint Type: Various gold paint finishes exist, including metallic, matte, and satin. Consider the desired aesthetic and the surrounding decor when choosing.
Preparing the Workspace and Fan for Painting
Proper preparation is paramount for a successful outcome. This stage involves protecting the surrounding area and dismantling the fan.
- Protecting the Area: Cover the floor and any furniture beneath the fan with drop cloths or newspapers. Secure the coverings with painter's tape to prevent displacement.
- Turning Off the Power: Before touching the fan, turn off the power at the breaker box. This critical safety step prevents electrical shock.
- Disassembling the Fan: Carefully remove the fan blades, light kit, and any decorative elements. Keep all screws and small parts organized in labeled bags or containers.
- Cleaning the Fan Components: Thoroughly clean all surfaces to be painted with a degreasing cleaner. Rinse with clean water and allow to dry completely.
Priming and Painting the Fan Components
Priming ensures better paint adhesion and provides a uniform base for the gold paint.
- Applying Primer: Apply a thin, even coat of primer specifically designed for the fan's material. Multiple thin coats are preferable to one thick coat, which can drip and create an uneven surface.
- Sanding Between Coats: Lightly sand between primer coats with fine-grit sandpaper to create a smooth surface for the next coat.
- Painting the Fan: Once the primer is dry, apply the gold paint using thin, even coats. Allow each coat to dry completely before applying the next.
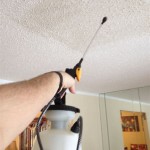
- Painting Technique: Use smooth, consistent strokes to avoid brush marks. For a more even finish, consider using spray paint, ensuring adequate ventilation and following the manufacturer's instructions.
Reassembling the Ceiling Fan
After the paint has fully cured, reassemble the fan with meticulous care.
- Handling Painted Components: Handle the painted parts gently to avoid scratches or smudges.
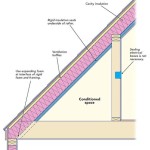
- Reattaching Components: Carefully reattach the fan blades, light kit, and other components, ensuring all screws and connectors are secured properly.
- Testing the Fan: After reassembly, restore power to the circuit and test the fan's operation, including the light and remote control functionality.
Troubleshooting Potential Issues
Occasionally, issues can arise during or after painting. Here are some common problems and solutions:
- Uneven Paint Finish: This can be caused by insufficient sanding or applying paint too thickly. Sand down the uneven areas and apply another thin coat of paint.
- Paint Drips: Drips occur when applying too much paint at once. Sand down the drips and reapply a thin coat.
- Malfunctioning Remote: If the remote control stops working, ensure the receiver is properly connected and that the batteries are functioning. If the problem persists, consult the fan's manual or contact the manufacturer.
Maintaining the Painted Finish
Preserving the newly painted finish requires regular cleaning and care.
- Regular Dusting: Dust the fan blades and light kit regularly with a soft cloth or duster to prevent dirt buildup.
- Cleaning: Periodically clean the fan with a mild detergent and water solution. Avoid abrasive cleaners, which can damage the paint.
- Touch-ups: Minor scratches or chips can be touched up with matching gold paint.

Leeaglegry 20 Small Ceiling Fans With Lights Remote App Control Low Profile Gold Fan For Bedroom 6 Sd And Timer Function Modern Flush Mount Light

Antoine 36 In Modern Indoor Retractable Blade Ceiling Fan With Led Light And Remote Control Gold Crystal Hd Fsd 01 The Home Depot

Matrix Decor 65 In Led Indoor Gold Ceiling Fan With Remote Dc Motor And Reversible Blades Three Color Temperature Md F8261110v The Home Depot

Breezary 65 In Gold Color Changing Integrated Led Indoor Ceiling Fan With Light And Remote 8 Blade The Fans Department At Com

Breezary 65 In Gold Color Changing Indoor Ceiling Fan With Light And Remote 6 Blade The Fans Department At Com

Lamober Aaron 65 In Integrated Led Indoor White Blade Gold Ceiling Fans With Light And Remote Control Included Zy230inc12 Wh The Home Depot

Dextrus 52 Inch Tropical Ceiling Fans With Light And Remote Fan Memory Function 3 Sd Lights Colors Changing 6 Blades Energy Efficient For Outdoor Indoor Com

Home Decorators Collection Baxtan 56 In Indoor Brushed Gold Ceiling Fan With Warm White Integrated Led Remote Included Am731a Cb The Depot

Breezary 65 In Gold Color Changing Integrated Led Indoor Ceiling Fan With Light And Remote 8 Blade The Fans Department At Com

52 Mayna Modern Flush Mount Reversible Ceiling Fan With Led Lighting And Remote Control Parrotuncle
Related Posts