Best Way to Install Beadboard Ceiling
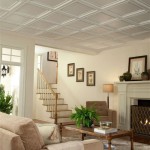
Beadboard ceilings offer a classic, textured aesthetic that can elevate the look of any room. They are a popular choice for adding character to kitchens, bathrooms, porches, and even living rooms. However, a successful beadboard ceiling installation requires careful planning, proper preparation, and precise execution. This article details the optimal method for installing beadboard ceilings, ensuring a professional and long-lasting result.
Before embarking on the installation process, it's crucial to understand the different types of beadboard available. Primarily, beadboard comes in two forms: individual planks and large sheets. Individual planks offer a more traditional look, mimicking the appearance of individually installed boards. Sheets, on the other hand, are faster to install and create fewer seams. The choice between the two depends on personal preference, budget, and the desired level of detail.
Furthermore, beadboard is available in various materials, including wood, MDF (Medium-Density Fiberboard), and PVC. Wood beadboard provides a natural and authentic feel but requires more maintenance and is susceptible to moisture damage. MDF is a cost-effective alternative that can be painted or primed. PVC beadboard is waterproof, making it ideal for bathrooms and other high-moisture areas.
Planning and Preparation: Foundation for Success
The planning stage is critical for a seamless beadboard ceiling installation. This involves accurately measuring the ceiling area, determining the amount of beadboard needed, accounting for waste, and assessing the existing ceiling structure. A detailed plan will prevent costly mistakes and ensure a smooth installation process.
Accurate measurements are paramount. Measure the length and width of the ceiling at multiple points to account for any irregularities. Use the longest measurements to calculate the total square footage required. When ordering beadboard, add at least 10% to the total square footage to account for cuts and waste. This buffer will prevent running short on materials and allow for adjustments during installation.
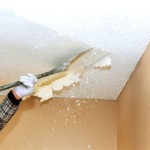
Prior to installing the beadboard, thoroughly inspect the existing ceiling. Identify any imperfections, such as cracks, sagging, or water damage. Address these issues before proceeding. Repair any cracks with joint compound and sand smooth. If the ceiling is sagging, consider reinforcing it with furring strips or additional drywall. Water damage must be repaired to prevent mold growth and structural issues. Addressing pre-existing problems will ensure a stable and level surface for the beadboard.
Furring strips are essential for creating a level surface and providing a secure attachment point for the beadboard. These are typically 1x3 or 1x4 lumber strips installed perpendicular to the ceiling joists. The spacing of the furring strips depends on the thickness of the beadboard and the spacing of the joists. In most cases, spacing the furring strips 16 inches on center is sufficient. Secure the furring strips to the ceiling joists using screws long enough to penetrate the joists by at least 1 inch. Use a level to ensure the furring strips are straight and even.
Proper ventilation is crucial, especially in bathrooms. Ensure adequate ventilation by installing or upgrading the existing exhaust fan. This will help prevent moisture buildup and prolong the life of the beadboard ceiling.
Installation Techniques: Achieving a Professional Finish
The actual installation of the beadboard requires precision and attention to detail. Whether using individual planks or sheets, the process involves cutting the beadboard to size, attaching it to the furring strips, and concealing the seams.
Cutting the beadboard accurately is essential for a professional-looking result. Use a miter saw or circular saw with a fine-tooth blade to minimize splintering. Measure carefully and mark the cutting lines with a pencil. When cutting individual planks, it’s often easier to cut several at a time. For sheets, a straight edge and utility knife can be used for scoring and snapping the beadboard.
The method of attachment depends on the type of beadboard and the desired look. Individual planks are typically attached using finish nails or construction adhesive. Apply a bead of construction adhesive to the back of each plank and then secure it to the furring strips with finish nails. Ensure the nails are driven flush with the surface of the beadboard. Use a nail set to countersink the nails slightly and then fill the holes with wood filler. For sheets, construction adhesive and screws are recommended. Apply adhesive to the back of the sheet and then secure it to the furring strips with screws. Space the screws every 6-8 inches along the edges and in the field.
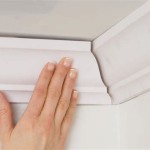
Concealing the seams is crucial for creating a seamless appearance. When using individual planks, stagger the seams to avoid creating a noticeable line across the ceiling. When using sheets, apply joint compound to the seams and sand smooth. Several coats of joint compound may be necessary to achieve a smooth and even surface. Consider using corner bead along the perimeter of the ceiling to create a clean and professional finish. This involves measuring and cutting the corner bead to fit, applying adhesive or nails to secure it, and then covering it with joint compound.
Maintaining consistent alignment is critical for a professional-looking installation. Use a level and straight edge to ensure the beadboard is perfectly aligned as it is being installed. Slight misalignments can become very noticeable over a larger area.
Finishing and Sealing: Protecting Your Investment
Once the beadboard is installed, the final step involves finishing and sealing the surface. This protects the beadboard from moisture damage and enhances its appearance. The specific finishing method depends on the type of beadboard and the desired look.
Priming is essential, particularly with MDF beadboard. Apply a high-quality primer to the entire surface of the beadboard. This will create a smooth and even surface for the paint and help to seal the material. Allow the primer to dry completely before proceeding to the next step.
Painting is the most common finishing method for beadboard ceilings. Choose a high-quality paint that is appropriate for the material. For wood beadboard, use a paint that is designed for wood surfaces. For MDF beadboard, use a paint that is designed for MDF. For PVC beadboard, use a paint that is designed for plastic surfaces. Apply two coats of paint, allowing each coat to dry completely before applying the next. Use a brush or roller to apply the paint, ensuring even coverage. Consider using a paint sprayer for a smoother and more professional finish.
Sealing is particularly important in bathrooms and other high-moisture areas. Apply a clear sealant to the painted surface to protect the beadboard from moisture damage. This will help prevent warping, cracking, and peeling. Choose a sealant that is specifically designed for use in bathrooms and kitchens. Apply the sealant according to the manufacturer's instructions.
Caulking is essential for sealing gaps and creating a watertight seal. Apply caulk to the perimeter of the ceiling where it meets the walls. This will prevent moisture from seeping behind the beadboard and causing damage. Choose a caulk that is paintable and mildew-resistant. Apply the caulk smoothly and evenly, and then wipe away any excess with a damp cloth.
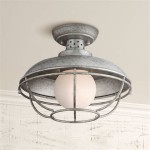
Lighting fixtures require special consideration. Recessed lighting is a popular choice for beadboard ceilings. Before installing the beadboard, plan the location of the recessed lights and cut the appropriate holes in the beadboard. Ensure the recessed lights are properly sealed to prevent moisture from entering the ceiling cavity. Consider using decorative trim around the light fixtures to enhance the overall appearance of the ceiling. The selection of appropriate lighting fixture is integral to the overall aesthetic cohesion of the completed project.

How To Install A Beadboard Ceiling Pine And Prospect Home

Diy Beadboard Ceiling Tutorial Easy And Inexpensive Custom Treatment

Diy Beadboard Ceiling Tutorial Easy And Inexpensive Custom Treatment

How To Install A Beadboard Ceiling Pine And Prospect Home

How To Install A Beadboard Paneled Ceiling The Kim Six Fix

How To Install A Beadboard Ceiling Pine And Prospect Home

How To Install Beadboard Panels On A Ceiling And Why We Ll Never Do It Again The Lake Land

How To Install A Wood Plank Ceiling Young House Love

Installing Bead Board Ceiling Sand And Sisal

How To Install Beadboard Panels On A Ceiling And Why We Ll Never Do It Again The Lake Land
Related Posts