If you’re looking for a unique way to add style and character to your home, a DIY beadboard ceiling is a great way to go. Beadboard is an attractive material that can be used for a variety of applications, including ceilings. Not only does it look great, but it is also relatively easy to install and can be done with minimal effort. In this article, we will explore some of the best DIY beadboard ceiling ideas and how you can get started with your own project.
What Is Beadboard?
Beadboard is a type of wood paneling that is composed of thin strips of wood, usually pine, that have been grooved and shaped into a pattern. It is usually installed vertically, but it can also be installed horizontally. Beadboard is often used in bathrooms, kitchens, and other areas of the home where a decorative yet durable material is needed.
Benefits of Installing Beadboard Ceiling
Beadboard ceilings provide a number of benefits for the home. They are relatively easy to install and can be done with minimal effort. They are also very affordable and can be used to instantly transform the look of any room. Additionally, beadboard is durable and will last for years with proper care. Finally, beadboard is a great way to add texture and interest to any room.
Tools Needed for DIY Beadboard Ceiling Installation
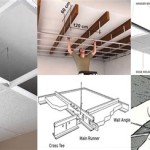
Before you begin your DIY beadboard ceiling project, you will need to make sure you have the right tools on hand. You will need a tape measure, a level, a drill, a saw, a hammer, nails, and wood screws. Additionally, you may need a router or other woodworking tools if you are creating intricate patterns. Depending on the type of beadboard you are using, you may also need additional supplies or tools.
Step-by-Step Guide to Installing a Beadboard Ceiling
Installing a beadboard ceiling is relatively simple and can be done with minimal effort. First, you will need to measure the area where you plan to install the beadboard. Next, cut the panels to fit the area and then nail them to the ceiling joists. Finally, fill in any gaps or seams with wood filler and paint or stain the beadboard to your desired finish.
Tips for DIY Beadboard Ceiling Installation
When installing a beadboard ceiling, it’s important to take your time and measure twice before cutting. Additionally, it’s important to make sure the beadboard is installed as level as possible. Finally, make sure to use the appropriate fasteners to ensure the beadboard is securely in place.
Conclusion
Installing a beadboard ceiling is a great way to add style and character to any room. With a few basic tools and some patience, you can easily complete this project with minimal effort. We hope this article has provided you with some great DIY beadboard ceiling ideas to help get you started. Good luck!


Related Posts