A Guide to Installing Wood Plank Ceilings
Wood plank ceilings offer a blend of rustic charm and modern sophistication, making them a popular choice for homeowners looking to add character and warmth to their living spaces. Unlike traditional drywall ceilings, wood plank ceilings introduce texture, visual interest, and a natural element that can significantly enhance the ambiance of a room. This guide provides a comprehensive overview of the installation process, covering everything from preparation and material selection to the actual installation and finishing touches. Successfully installing a wood plank ceiling requires careful planning, meticulous execution, and adherence to building codes and safety protocols.
Before embarking on the installation, it is crucial to assess the existing ceiling structure. Determine the ceiling's material, condition, and overall integrity. If the existing ceiling is drywall, it will typically provide a suitable surface for attaching the furring strips necessary for securing the wood planks. However, if the ceiling is damaged, uneven, or structurally unsound, repairs or reinforcement may be necessary. Addressing any structural issues before installation is paramount to ensuring the long-term stability and aesthetic appeal of the wood plank ceiling.
Accurate measurements are critical for estimating the amount of material required. Measure the length and width of the ceiling area to calculate the total square footage. Account for waste by adding an extra percentage (typically 10-15%) to the total square footage. This will ensure a sufficient quantity of wood planks to complete the project, even with cuts and imperfections. Careful planning and material calculation can prevent delays and minimize costs associated with ordering additional materials.
Key Point 1: Preparation and Planning
Effective planning is the cornerstone of a successful wood plank ceiling installation. Begin by thoroughly inspecting the existing ceiling for any signs of damage, such as water stains, cracks, or sagging. These issues must be addressed before proceeding with the installation. Water leaks, for example, should be repaired to prevent future damage to the wood planks. Cracks can be filled with joint compound and sanded smooth to create a level surface.
Next, determine the direction in which the wood planks will be installed. This decision will influence the appearance of the ceiling and the placement of the furring strips. Typically, wood planks are installed perpendicular to the joists. However, depending on the room's dimensions and desired aesthetic, alternative orientations may be considered.
Creating a detailed installation plan is essential. This plan should include a layout of the furring strips, the spacing between the strips, and the placement of the wood planks. Using a laser level to establish a consistent plane for the furring strips and planks will ensure a professional and aesthetically pleasing result. The plan should also outline the materials required, including the type and quantity of wood planks, furring strips, fasteners, and any necessary tools.
Acclimatizing the wood planks to the room's temperature and humidity is a crucial step to prevent warping or movement after installation. Store the planks in the room where they will be installed for several days before beginning the project. This will allow the wood to adjust to the environmental conditions, minimizing the risk of expansion or contraction post-installation.
Gather all necessary tools and materials before starting the installation. Essential tools include a measuring tape, laser level, stud finder, drill, screws or nails, saw (circular saw or miter saw), safety glasses, and a dust mask. Having all the necessary tools readily available will streamline the installation process and minimize interruptions. Securing the appropriate personal protective equipment, such as safety glasses and a dust mask, is equally important for ensuring personal safety throughout the project.
Ensure adequate lighting in the work area. Proper illumination is essential for accurate measurements, precise cuts, and safe execution of the installation. Use work lights to supplement existing lighting, especially in dimly lit areas. Sufficient lighting will improve visibility and reduce the risk of errors or accidents.
Key Point 2: Installing Furring Strips
Furring strips are essential for creating a level and stable surface for attaching the wood planks. These strips are typically made of wood and are installed perpendicular to the ceiling joists. The spacing between the furring strips will depend on the thickness and width of the wood planks being used. Consult the manufacturer's recommendations for the appropriate spacing.
Locate the ceiling joists using a stud finder. Mark the location of each joist clearly on the ceiling. The furring strips will be attached to these joists, providing a secure anchor for the entire wood plank ceiling. Accuracy in locating the joists is critical for ensuring the structural integrity of the installation.
Attach the furring strips to the ceiling joists using screws or nails. Ensure that the fasteners are long enough to penetrate the furring strips, the existing ceiling material, and securely fasten into the joists. Use a level to ensure that each furring strip is aligned horizontally. Any inconsistencies in the leveling of the furring strips will be reflected in the final appearance of the wood plank ceiling.
If the ceiling is uneven, use shims to level the furring strips. Shims are thin pieces of wood or plastic that can be inserted between the furring strips and the ceiling joists to correct any discrepancies in height. Use a level to check the alignment of each furring strip and adjust the shims accordingly. This step is crucial for creating a perfectly level surface for the wood planks.
When installing furring strips around obstacles, such as light fixtures or pipes, carefully measure and cut the strips to fit around these obstructions. Ensure that the furring strips are securely attached to the ceiling joists, even in areas where they need to be cut or modified. The structural integrity of the furring strip framework is essential for supporting the weight of the wood planks.
Inspect the installed furring strips to ensure that they are level, securely attached, and properly spaced. Make any necessary adjustments before proceeding with the installation of the wood planks. Correcting any errors at this stage will prevent problems later in the installation process.
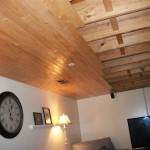
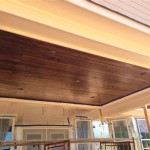
Key Point 3: Installing Wood Planks
Once the furring strips are installed and leveled, the installation of the wood planks can begin. Start by determining the starting point for the planks. This will typically be along one of the room's perimeter walls. Ensure that the first plank is aligned perfectly straight, as this will serve as a reference point for the remaining planks. Use a laser level to verify the straightness of the first plank.
Attach the wood planks to the furring strips using nails or screws. Choose fasteners that are appropriate for the thickness and density of the wood planks. Drive the fasteners in at an angle to provide maximum holding power. Concealed fasteners, such as trim nails, can be used for a more seamless appearance. Consider using a nail gun for faster and more consistent fastener placement.
Maintain consistent spacing between the wood planks. This spacing will create a visible seam that adds to the rustic aesthetic of the ceiling. Use spacers to ensure uniform spacing between the planks. These spacers can be made of wood or plastic and should be of the desired thickness for the seams. Consistent spacing is essential for creating a visually appealing and professional-looking ceiling.
When cutting the wood planks to fit around obstacles or at the end of a row, use a saw to make precise cuts. Measure the required length and angle carefully before cutting the plank. A miter saw is ideal for making accurate and clean cuts, especially for angled cuts. Take your time and double-check your measurements to avoid mistakes. A miscut plank can result in wasted material and delays in the installation process.
Stagger the seams between the rows of wood planks. This will create a more visually interesting and structurally sound ceiling. Avoid aligning the seams in adjacent rows, as this can weaken the ceiling and create an undesirable appearance. Staggering the seams will distribute the weight evenly and enhance the overall aesthetic appeal.
As you install each row of wood planks, check for alignment and stability. Ensure that the planks are securely attached to the furring strips and that the spacing between the planks is consistent. Make any necessary adjustments before moving on to the next row. Careful attention to detail throughout the installation process will result in a high-quality and long-lasting wood plank ceiling.

Diy Tongue And Groove Ceiling Wood Planks Jenna Sue Design

How To Install A Wood Look Plank Ceiling

How To Install A Wood Look Plank Ceiling

Diy Tongue And Groove Ceiling Wood Planks Jenna Sue Design

Diy Wood Plank Ceiling Life On Shady Lane

How To Install A Wood Ceiling Bathroom Remodel Part 9

Diy Wood Plank Ceiling Life On Shady Lane

Installing Wood Ceilings Cost Compared To Drywall Ecohome

Ceiling Installation Overview Ceilings Armstrong Residential

Diy Wood Plank Ceiling Life On Shady Lane
Related Posts