A Guide to Ceiling Panels Woodworking
Ceiling panels offer a unique blend of aesthetic appeal and functional benefits in interior design. Woodworking techniques applied to ceiling panel creation allow for customization in terms of style, material, and dimensions, resulting in spaces that are both visually striking and acoustically enhanced. This guide explores the essential aspects of woodworking for ceiling panels, covering design considerations, material selection, construction techniques, and installation processes.
Design Considerations for Wood Ceiling Panels
The initial stage of any woodworking project involves careful consideration of the design. For ceiling panels, the design must align with the overall architectural style of the space while taking into account specific functional requirements. This includes factors such as room size, natural light availability, and desired acoustic properties.
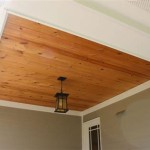
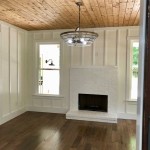
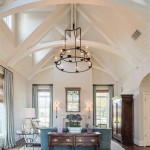
Panel Style: The aesthetic style of the panels can range from traditional styles such as tongue-and-groove or coffered designs to more modern and minimalist approaches featuring sleek, flat panels or geometric patterns. The choice of style significantly impacts the spatial perception and perceived warmth of the room. Consider the existing elements in the room and choose a panel design that complements the furniture, wall color, and flooring.
Panel Size and Layout: The dimensions of the individual panels and their arrangement on the ceiling play a crucial role in defining the visual rhythm of the room. Larger panels can create a sense of expansiveness, while smaller panels offer the opportunity for intricate patterns and detailing. The layout should consider the structural integrity of the ceiling and the placement of lighting fixtures and other ceiling-mounted components. A well-planned layout can minimize wastage of material and simplify the installation process.
Acoustic Properties: Wood, by its nature, possesses sound-dampening qualities. The design can be further optimized to enhance acoustic performance by incorporating features such as perforations, grooves, or strategically placed sound-absorbing materials behind the panels. This is particularly important in spaces such as home theaters, recording studios, or open-plan living areas where noise control is a priority. The density and thickness of the wood used will also influence its sound absorption capabilities. Consult with an acoustic engineer if precise acoustic performance is required.
Lighting Integration: The design must account for the integration of lighting fixtures. Recessed lighting, pendant lights, and track lighting can all be incorporated into a ceiling panel design to create a layered and dynamic lighting scheme. The placement of lighting fixtures should be strategically planned to highlight the texture and patterns of the wood panels, adding depth and visual interest to the ceiling. Consider using dimmable lighting to control the ambience and create different moods within the space.
Material Selection for Wood Ceiling Panels
The choice of wood species is a critical decision that affects the appearance, durability, and cost of the ceiling panels. Each wood possesses unique characteristics that must be considered in relation to the design and functional requirements of the project.
Hardwoods vs. Softwoods: Hardwoods, such as oak, maple, and cherry, are generally more durable and resistant to dents and scratches than softwoods, like pine and cedar. However, hardwoods are typically more expensive and can be more challenging to work with. Softwoods are often a more cost-effective option for large-scale projects, and their lighter weight can make them easier to install. The choice between hardwood and softwood depends on the desired aesthetic, the budget, and the level of wear and tear the panels are expected to withstand.
Considerations for Wood Stability: Wood is a hygroscopic material, meaning it absorbs and releases moisture from the surrounding environment. This can cause the wood to expand and contract, potentially leading to warping or cracking. To minimize these issues, it is essential to select wood that has been properly kiln-dried to a moisture content appropriate for the intended environment. Quarter-sawn lumber is also more stable than plain-sawn lumber, as it is less prone to cupping and warping. Proper acclimatization of the wood to the installation environment before construction is crucial.
Finishing and Treatment Options: The choice of finish can significantly impact the appearance and durability of the wood ceiling panels. Options include stains, varnishes, lacquers, and oils. Stains can enhance the natural grain pattern of the wood or alter its color to match the desired aesthetic. Varnishes and lacquers provide a protective coating that resists moisture and scratches. Oils penetrate the wood and provide a natural, matte finish. The chosen finish should be compatible with the type of wood used and should be applied according to the manufacturer's instructions. Consider the VOC content of the finish and opt for low-VOC options to minimize environmental impact and improve air quality.
Sustainability: In an increasingly environmentally conscious world, selecting sustainably sourced wood is a responsible choice. Look for wood that is certified by organizations such as the Forest Stewardship Council (FSC), which ensures that the wood comes from responsibly managed forests. Using reclaimed wood is another sustainable option that adds character and history to the ceiling panels while reducing the demand for new timber. Consider the long-term environmental impact of the materials used and choose options that minimize your carbon footprint.
Construction Techniques for Wood Ceiling Panels
The construction of wood ceiling panels requires precision woodworking skills and the use of appropriate tools and techniques. The specific methods employed will depend on the design of the panels and the desired level of craftsmanship.
Cutting and Shaping: Precise cutting and shaping are essential for creating panels that fit together seamlessly and achieve the desired aesthetic. A table saw is indispensable for making accurate straight cuts, while a miter saw is used for cutting angles and creating intricate patterns. Power routers can be used to create decorative edges and profiles. Hand tools such as chisels and planes may be necessary for fine-tuning the shape and achieving a smooth surface. Invest in high-quality blades and bits to ensure clean cuts and minimize splintering.
Joining Techniques: The method used to join the individual pieces of wood together is crucial for the structural integrity and appearance of the panels. Common joining techniques include tongue-and-groove, rabbet joints, and mortise-and-tenon joints. Tongue-and-groove joints are particularly well-suited for creating seamless surfaces, while rabbet joints offer a simple and effective way to join pieces at right angles. Mortise-and-tenon joints provide exceptional strength and are often used in more elaborate panel designs. The choice of joining technique will depend on the design, the type of wood used, and the desired level of durability.
Assembly and Finishing: Once the individual pieces have been cut, shaped, and joined, the panels can be assembled. Use clamps to hold the pieces together while the glue dries. Ensure that all joints are aligned properly and that the panels are flat and square. After the glue has dried, sand the panels smooth and apply the chosen finish. Multiple coats of finish may be necessary to achieve the desired level of protection and appearance. Allow each coat to dry completely before applying the next. Proper sanding and finishing are essential for creating a professional-looking and durable product.
Creating Custom Details: Adding custom details such as moldings, carvings, or inlays can elevate the appearance of the ceiling panels and create a unique and personalized design. Moldings can be used to frame the panels or to add decorative accents. Carvings can add texture and depth to the surface. Inlays can be used to create intricate patterns or to incorporate contrasting materials. These details require advanced woodworking skills and specialized tools, but they can significantly enhance the aesthetic appeal of the ceiling panels.
Installation of Wood Ceiling Panels
The installation process is a critical step in ensuring the long-term performance and appearance of the wood ceiling panels. Proper installation techniques are essential for creating a structurally sound and visually appealing ceiling.
Substrate Preparation: Ensure that the ceiling substrate is clean, level, and structurally sound. Remove any loose debris or old finishes. If the ceiling is uneven, it may be necessary to install furring strips to create a level surface for the panels. The furring strips should be securely attached to the joists or studs using screws or nails. The spacing of the furring strips will depend on the size and weight of the panels. Proper substrate preparation is crucial for preventing sagging or warping of the ceiling panels.
Panel Attachment Methods: There are several methods for attaching wood ceiling panels to the substrate, including screws, nails, and adhesive. Screws provide the most secure attachment and are recommended for larger or heavier panels. Nails are a faster method of attachment but may not provide as much holding power. Adhesive can be used in conjunction with screws or nails to provide additional support. The choice of attachment method will depend on the type of panels, the ceiling substrate, and the desired level of security. Use appropriate fasteners that are compatible with the type of wood and the ceiling substrate.
Addressing Expansion and Contraction: Wood is a natural material that is subject to expansion and contraction due to changes in humidity and temperature. To accommodate these movements, it is essential to leave small gaps between the panels and along the perimeter of the ceiling. These gaps will allow the wood to expand and contract without causing stress or damage to the panels. Cover the gaps with moldings or trim to create a finished and professional look. Consider using flexible caulking to seal the gaps and prevent air leakage.
Safety Considerations: Working with woodworking tools and materials can be hazardous if proper safety precautions are not taken. Always wear safety glasses to protect your eyes from flying debris. Use hearing protection when operating noisy power tools. Wear a dust mask or respirator when sanding or cutting wood to prevent inhalation of dust particles. Work in a well-ventilated area to avoid exposure to harmful fumes from finishes and adhesives. Follow all safety instructions provided by the tool manufacturers. Disconnect power tools before making any adjustments or changing blades. Store tools and materials in a safe and organized manner.

Ceiling Panels How To Install A Beam And Panel Diy

How To Install A Wood Paneled Ceiling Homebuilding Remodeling Guide

Ceiling Panels How To Install A Beam And Panel Diy

How To Put Up A Wood Ceiling Using Tongue And Groove Planks Ron Hazelton

How To Install A Wood Paneled Ceiling Homebuilding Remodeling Guide

How To Diy A Wood Slat Ceiling That Will Leave You And Your Guests In Awe Venture Into The Woods

Diy Reclaimed Wood Ceiling So Pretty Wildfire Interiors

How To Diy A Wood Slat Ceiling That Will Leave You And Your Guests In Awe Venture Into The Woods

Direct Mount Wood Based Ceiling Panel System 2024 02 25 Walls Ceilings

An Easy Approach To Coffered Ceilings Fine Homebuilding
Related Posts