Installing a Ceiling Fan on a Sloped Ceiling: A Comprehensive Guide
Installing a ceiling fan on a sloped ceiling presents unique challenges compared to a standard horizontal surface. The primary concern is ensuring the fan hangs correctly and operates efficiently, without wobbling or causing stress on the mounting system. This article provides a detailed overview of the processes, materials, and considerations involved in successfully installing a ceiling fan on a sloped ceiling.
Before commencing the installation, it is crucial to assess the ceiling's slope. This is typically measured in degrees or as a pitch (rise over run). The steeper the slope, the more critical the selection of the appropriate mounting hardware becomes. Most ceiling fan manufacturers specify the maximum allowable slope for their fans. Exceeding this limit can compromise the fan's performance and safety, potentially leading to premature failure or even hazardous conditions.
Safety is paramount throughout the entire installation process. Before beginning any work, ensure the power to the circuit is turned off at the breaker. Double-check that the circuit is dead using a voltage tester. Working with electricity involves inherent risks, and prioritizing safety significantly minimizes the potential for accidents.
Selecting the Appropriate Mounting Hardware
The most critical component for a sloped ceiling fan installation is the downrod. A standard downrod, designed for flat ceilings, is insufficient for a sloped surface. A specifically designed sloped ceiling adapter or a longer downrod coupled with a compatible mounting bracket is required. These adapters allow the fan to hang vertically even on a sloped surface. The length of the downrod is also crucial. It should be long enough to provide adequate clearance between the fan blades and the ceiling, typically at least 12 inches, to ensure optimal airflow.
When selecting a downrod, consider the aesthetic impact as well. Downrods are available in various finishes and lengths, allowing for customization to match the fan and the room's decor. However, prioritize functionality and safety over aesthetics. Ensure the chosen downrod is compatible with the fan model and rated for the fan's weight, especially for larger or heavier fans. Verify the downrod meets or exceeds all relevant safety standards and regulations.
In addition to the downrod, carefully inspect the junction box. The junction box must be specifically rated for ceiling fan support. Standard lighting fixture boxes are often inadequate and can fail under the weight and vibrations of a rotating ceiling fan. Replace an inadequate junction box with one designed for ceiling fans. These boxes are typically reinforced and securely attached to the ceiling joists to provide a stable and safe mounting point.
Furthermore, consider the wiring. Ensure there is sufficient wire length available for making connections. If the existing wiring is too short, it may be necessary to extend it using appropriate wire connectors and junction boxes. All wiring connections should be secure and conform to electrical codes. Using improperly sized or poorly connected wiring can create a fire hazard.
Preparing the Sloped Ceiling for Installation
Before installing the mounting bracket, it is essential to properly prepare the ceiling surface. This involves locating the ceiling joist and ensuring it is structurally sound. Use a stud finder to locate the joist. Once located, verify its integrity by drilling a small pilot hole to ensure it is solid wood and not rotted or damaged.
If the existing junction box is not properly attached to the joist, it must be secured. This may involve adding additional support bracing between the joist and the box. The goal is to create a solid and stable mounting point that can withstand the weight and vibrations of the ceiling fan. Secure the mounting bracket to the joist using lag screws or other appropriate fasteners. Ensure the screws are long enough to penetrate deeply into the joist, providing a secure hold.
For steeper slopes, a sloped ceiling adapter may be necessary. This adapter provides a level mounting surface for the fan, regardless of the ceiling's angle. Follow the manufacturer's instructions for installing the adapter. Typically, the adapter is attached to the joist, and then the mounting bracket is attached to the adapter.
Once the mounting bracket is securely installed, address the wiring. Pull the wires through the center of the bracket, ensuring there is sufficient length for making connections to the fan's wiring. Inspect the wiring for any damage or wear. Replace any damaged wiring before proceeding with the installation.
Consider the aesthetic presentation of the wiring. While functionality is the priority, strive to conceal the wiring as much as possible. Use wire clips or ties to neatly organize the wires and prevent them from hanging down or being visible. This contributes to a more professional and aesthetically pleasing installation.
Installing the Ceiling Fan and Testing Functionality
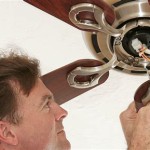
With the mounting bracket securely installed and the wiring prepared, the next step is to assemble the ceiling fan. Follow the manufacturer's instructions for assembling the fan blades, motor housing, and light kit (if applicable). Be sure to use the correct screws and fasteners and tighten them securely.
Once the fan is assembled, carefully lift it up to the mounting bracket. Connect the wiring according to the manufacturer's instructions. Typically, this involves connecting the black (hot) wire, the white (neutral) wire, and the green (ground) wire. Use wire connectors to ensure secure and insulated connections. Tuck the wires neatly into the junction box, being careful not to pinch or damage them.
Attach the fan to the mounting bracket, following the manufacturer's instructions. This typically involves sliding the fan's downrod into the bracket and securing it with a pin or set screw. Ensure the fan is securely attached and does not wobble. Double-check all connections and fasteners to ensure they are tight and secure.
After the fan is securely mounted, restore power to the circuit breaker. Turn on the fan and test its functionality. Check that the fan blades rotate smoothly and quietly. Verify that the light kit (if applicable) is working properly. Test all fan speeds and settings to ensure they are functioning correctly.
If the fan wobbles, it may be necessary to balance the blades. Most ceiling fans come with a balancing kit that includes small weights that can be attached to the blades to correct imbalances. Follow the instructions included with the balancing kit to properly balance the fan. This may involve some trial and error to find the optimal placement for the weights.
Carefully inspect the installation after testing. Look for any signs of loose connections, wobbling, or unusual noises. If any problems are detected, address them immediately. Ignoring minor issues can lead to more serious problems down the road.
Finally, consult the fan's manual for regular maintenance recommendations. Periodic cleaning and tightening of screws can help ensure the fan operates safely and efficiently for many years. Properly installed and maintained, a ceiling fan on a sloped ceiling can provide comfortable air circulation and stylish illumination to any room.

How To Install A Ceiling Fan On Sloped Lemon Thistle

How To Install A Ceiling Fan On Sloped Lemon Thistle

How To Find Ceiling Fans Slope Adapters And Downrods For Angled Ceilings Delmarfans Com

How To Choose A Ceiling Fan For Vaulted Ceilings Lightology

Ensuring Proper Ceiling Fan Installation With Vaulted Ceilings

Fans On An Angle Installing Ceiling Angled Or Raked

How To Choose A Ceiling Fan For Vaulted Ceilings Lightology

How To Install A Fan On Steep Ceiling Faro Barcelona

Ceiling Fans For Angled Ceilings

Hunter Fans How To Install Your Ceiling Fan Cpo S
Related Posts