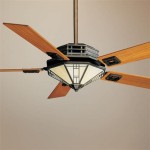
How To Install A Ceiling Fan On An Angled Ceiling
Installing a ceiling fan on an angled ceiling requires careful planning and execution compared to a standard flat ceiling installation. The sloped surface introduces additional considerations for safety, balance, and aesthetics. This article provides a detailed guide on how to properly install a ceiling fan on an angled ceiling, ensuring optimal functionality and longevity.
Before commencing the installation, it is crucial to assess the specific angle of the ceiling and the weight of the chosen ceiling fan. This information dictates the necessary hardware and installation techniques. Incorrect implementation can lead to instability, noise, and potential safety hazards. A thorough understanding of electrical safety is paramount; if unsure, consulting a qualified electrician is highly recommended.
Preparation and Safety Precautions
Prior to starting the installation process, several preparatory steps are essential. First and foremost, turn off the electrical power to the circuit at the breaker box. This is a non-negotiable safety measure. Verify the power is off using a non-contact voltage tester before proceeding with any wiring. Neglecting this step can result in severe electric shock.
Next, gather all necessary tools and materials. These typically include a ceiling fan rated for angled ceilings, an angled mounting bracket (if not included with the fan), a drill with appropriate drill bits, a stud finder, wire strippers, wire connectors (wire nuts), screwdrivers (Phillips and flathead), a level, a measuring tape, safety glasses, and work gloves. Having all tools readily available streamlines the installation process and minimizes interruptions.
Carefully unpack the ceiling fan components and refer to the manufacturer's instructions. Each fan model may have slight variations in assembly and installation procedures. Familiarizing oneself with the specific instructions for the chosen fan will prevent errors and ensure proper installation. Account for all the parts mentioned in the manual. Missing parts will create a delay and require a trip to the store.
Use a stud finder to locate the ceiling joist or support beam. Ideally, the mounting bracket should be secured directly to a solid joist. This provides the necessary structural support to safely hold the weight of the fan. If a joist is not accessible or adequately positioned, a fan-rated brace or support box may be required. These are designed to span between two joists and provide a secure mounting point.
Wear safety glasses throughout the entire installation process to protect the eyes from debris. Work gloves will also improve grip and protect hands from sharp edges or splinters. Following these safety precautions minimizes the risk of injury during the installation.
Installing the Angled Mounting Bracket
The mounting bracket is the crucial interface between the ceiling fan and the angled ceiling. The type of bracket required depends on the angle of the ceiling. Most ceiling fan manufacturers offer specific mounting kits designed for angled installations. These kits typically include a bracket that can be adjusted to accommodate various ceiling pitches.
If the fan does not come with an angled mounting bracket, it will be necessary to purchase one separately. When selecting a bracket, ensure that it is rated for the weight of the ceiling fan. Overloading the bracket can lead to failure and potential hazards. The angle rating of the bracket should also match or exceed the angle of the ceiling. Using a bracket with an insufficient angle rating can result in improper fan alignment and stability issues.
Once the appropriate bracket is chosen, position it on the ceiling, aligning it with the previously located joist or support brace. Use the provided screws to securely fasten the bracket to the joist. Ensure that the screws are long enough to penetrate the joist sufficiently but not so long as to protrude through the other side. If using a fan-rated brace, follow the brace manufacturer's instructions for attachment to the joists.
A crucial step is to ensure that the mounting bracket is perfectly level. An unlevel bracket will cause the ceiling fan to wobble and potentially create noise issues. Use a level to verify the bracket's alignment, making adjustments as needed. Some angled mounting brackets have built-in leveling mechanisms that simplify this process. Tighten all screws securely after verifying the level alignment.
For ceilings with a steeper angle, a longer downrod might be needed to ensure adequate clearance between the fan blades and the ceiling. This prevents the fan blades from hitting the ceiling and also improves airflow. Measure the distance from the ceiling to the desired fan blade height and select a downrod length that provides sufficient clearance. The downrod also helps in ensuring the stability of the fan on an angled ceiling.
Wiring the Ceiling Fan
After the mounting bracket is securely installed, the next step is to connect the electrical wiring. Before handling any wires, double-check that the power to the circuit is switched off at the breaker box. Never assume the power is off; always verify using a non-contact voltage tester.
Identify the wires in the ceiling electrical box. Typically, there will be a black (hot) wire, a white (neutral) wire, and a green or bare copper (ground) wire. The ceiling fan will have corresponding wires. The color coding may vary slightly depending on the fan manufacturer, so carefully consult the wiring diagram provided with the fan.
Using wire strippers, carefully strip about ¾ inch of insulation from the ends of each wire. Connect the corresponding wires using wire connectors (wire nuts). Twist the wires together tightly and then screw on the wire connector. Ensure that the connection is secure and that no bare wire is exposed. A loose wire connection can create a fire hazard.
The ground wire is particularly important for safety. Connect the ground wire from the ceiling electrical box to the ground wire on the ceiling fan. This provides a path for electrical current in the event of a fault, preventing electric shock. Double check that the ground connection is well tightened.
Once the wiring connections are complete, carefully tuck the wires into the electrical box. Ensure that the wires are not pinched or stressed, as this can damage the insulation and create a potential hazard. Replace the canopy or cover plate over the electrical box, concealing the wires. Secure the canopy to the mounting bracket according to the fan manufacturer's instructions.
Assembling and Installing the Fan Motor and Blades
With the wiring complete and the canopy in place, the next step is to assemble and install the fan motor and blades. The assembly process varies depending on the specific ceiling fan model, so refer to the manufacturer's instructions for detailed guidance. Typically, the motor housing slides onto the downrod and is secured with screws or bolts.
Carefully lift the fan motor assembly and insert the downrod into the mounting bracket. Rotate the assembly until it locks into place. Some mounting brackets have a ball-and-socket joint that allows the fan to hang freely while adjustments are made. Ensure that the fan hangs securely and does not wobble.
Attach the fan blades to the motor housing. The blades are typically attached using screws. Tighten the screws securely, but avoid over-tightening, as this can damage the blades. Ensure that all the blades are aligned properly and are securely attached. A loose blade can cause the fan to vibrate and create noise.
After the blades are installed, install any light fixtures or other accessories that came with the ceiling fan. Follow the manufacturer's instructions for wiring and attaching these accessories. Double check that all connections are secure and that all components are properly aligned.
Finally, restore power to the circuit at the breaker box. Test the ceiling fan to ensure that it operates correctly. Verify that the fan spins smoothly and quietly and that the light fixture (if any) functions properly. If the fan wobbles, re-check the blade alignment and tighten any loose screws. If the problem persists, consult the fan manufacturer's troubleshooting guide or contact a qualified electrician.

How To Install A Ceiling Fan On Sloped Lemon Thistle

How To Install A Ceiling Fan On Sloped Lemon Thistle

How To Find Ceiling Fans Slope Adapters And Downrods For Angled Ceilings Delmarfans Com

Fans On An Angle Installing Ceiling Angled Or Raked

How To Choose A Ceiling Fan For Vaulted Ceilings Lightology

Hunter Fans How To Install Your Ceiling Fan Cpo S

Vaulted Sloped Ceiling Adapter For Modern Fan Company Fans Stardust

How To Choose A Ceiling Fan For Vaulted Ceilings Lightology

Ceiling Fans For Angled Ceilings

How To Install A Ceiling Fan On Sloped Lemon Thistle
Related Posts