How to Change an LED Ceiling Light Fixture
LED ceiling light fixtures offer energy efficiency, longevity, and a variety of aesthetic options for illuminating interior spaces. Upgrading to or replacing an existing LED fixture can modernize a room and reduce energy consumption. This article provides a comprehensive guide on how to safely and effectively change an LED ceiling light fixture.
Prior to commencing any electrical work, safety precautions are paramount. Failure to adhere to safety guidelines can result in serious injury or death. Always disconnect the power supply to the fixture at the circuit breaker. Verify the power is off using a non-contact voltage tester before proceeding. It is advisable to have a second person present during the process, especially for individuals with limited electrical experience.
This guide is intended for individuals with a basic understanding of electrical wiring. If there is any doubt regarding competence or understanding of the instructions, consult a qualified electrician. Electrical codes and regulations vary by location; ensure compliance with all applicable codes before undertaking any electrical work.
Preparing for the Installation
Proper preparation streamlines the installation process and ensures a successful outcome. Gathering the necessary tools and materials before starting saves time and prevents unnecessary interruptions. This also allows for a thorough inspection of the new fixture and associated components before the old fixture is removed.
Required tools and materials typically include:
*Non-contact voltage tester: To verify that the power is off.
*Screwdrivers (flathead and Phillips head): For removing and installing screws.
*Wire strippers/cutters: To strip and cut wires as needed.
*Wire connectors (wire nuts): To safely connect wires.
*Electrical tape: For insulation and securing wire connections.
*Pliers: For gripping and bending wires.
*Ladder or step stool: To safely reach the ceiling fixture.
*Safety glasses: To protect eyes from debris.
*Gloves: To protect hands from electrical shock and sharp edges.
*New LED ceiling light fixture: Ensure it is the correct size and type for the intended location.
*Mounting hardware: Included with the new fixture, or purchased separately if needed.
*Pencil: For marking locations for drilling.
*Drill (optional): For drilling pilot holes for screws.
After gathering the necessary tools and materials, carefully unpack the new LED ceiling light fixture. Inspect all components for any damage that may have occurred during shipping. Refer to the manufacturer's instructions for specific details regarding the fixture's installation. Read the instructions thoroughly before starting any work. This will familiarize you with the fixture's design, wiring connections, and any specific installation requirements.
Next, determine the suitability of the new fixture for the existing electrical box in the ceiling. The fixture must be compatible with the box's size and weight rating. If the existing box is not suitable, it will need to be replaced with an appropriate one. Consider the location of the fixture and ensure that it is properly supported by the ceiling structure. If the ceiling is not structurally sound, additional support may be required.
Removing the Old Fixture
The safe and methodical removal of the old fixture is crucial to prevent damage to the wiring or the ceiling. Before physically touching the old fixture, double-check with the non-contact voltage tester to ensure that the power is completely off. Even if the circuit breaker is switched off, it is essential to verify the absence of voltage as a precautionary measure.
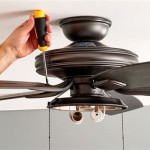
Begin by removing the light bulb or bulbs from the old fixture. This reduces the weight of the fixture and makes it easier to handle. Next, loosen and remove any screws, nuts, or other fasteners that are holding the fixture to the ceiling. Be prepared to support the fixture as you remove the last fastener, as it may be heavy and could fall. Lower the fixture carefully and rest it on a stable surface.
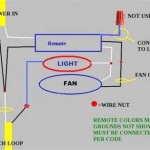
With the fixture lowered, carefully disconnect the wiring connections. Typically, there will be three wires: a black (hot) wire, a white (neutral) wire, and a green or bare copper (ground) wire. Use wire strippers to carefully remove the wire connectors (wire nuts) from each wire. Untwist the wires and separate them carefully. Take note of which wire connects to which color. It is often helpful to take a photograph of the wiring configuration before disconnecting anything. This photo can be used as a reference when connecting the new fixture.
Inspect the wires for any damage, such as frayed insulation or corrosion. If any damage is present, use wire strippers to cut back the wires to a point where the insulation is intact. If the wires are too short to reach the new fixture, they will need to be extended using wire connectors and additional lengths of wire. Always use the same gauge of wire for extensions.
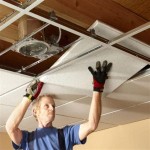
Once the wires are disconnected, remove the old mounting bracket from the electrical box. This bracket is typically attached to the box with screws. If the bracket is corroded or damaged, it should be replaced with a new one. Inspect the electrical box itself for any damage. If the box is cracked or broken, it should also be replaced.
Installing the New Fixture
The installation of the new LED ceiling light fixture involves securely mounting the fixture and making the necessary electrical connections. The process is generally the reverse of the removal process, but it's important to follow the manufacturer's instructions carefully.
Begin by attaching the new mounting bracket to the electrical box. Use the screws provided with the fixture or new screws of the correct size and type. Ensure that the bracket is securely attached to the box and that it is properly aligned with the ceiling. If necessary, drill pilot holes for the screws to make installation easier.
Next, connect the wiring. Match the wires from the fixture to the corresponding wires in the electrical box. Typically, the black wire from the fixture connects to the black wire in the box, the white wire from the fixture connects to the white wire in the box, and the green or bare copper wire from the fixture connects to the green or bare copper wire in the box. Use wire connectors (wire nuts) to securely connect the wires. Twist the wires together tightly before screwing on the wire connector. Make sure that no bare wire is exposed outside the wire connector.
After connecting the wires, wrap each connection with electrical tape to provide additional insulation and secure the wire connectors. Carefully tuck the wires back into the electrical box, ensuring that they are not pinched or stressed. Position the new fixture over the mounting bracket and align the mounting holes. Secure the fixture to the bracket with the screws, nuts, or other fasteners provided. Tighten the fasteners firmly, but do not overtighten them, as this could damage the fixture or the ceiling.
Once the fixture is securely mounted, install any decorative trim or covers according to the manufacturer's instructions. These trim pieces typically snap into place or are secured with screws. Double-check all connections and ensure that the fixture is properly aligned and level. Restore power to the circuit at the circuit breaker. Turn on the light switch to test the fixture. If the fixture does not turn on, immediately turn off the power at the circuit breaker and recheck all wiring connections to ensure they are secure and correctly matched.

How To Replace Led Ceiling Light Leng8021

Easy Ways To Replace An Led Recessed Light Bulb 13 Steps

How To Remove And Replace A Recessed Led Ceiling Light

How To Replace A Ceiling Light Led Fixture

Project Green House 1 Led Replacement Lighting For Circular Fluorescent Tubes Davidjb Com Python Technology Web Linux And More By David Beitey

How To Change A Led Ceiling Light Handyman Singapore

Flush Mount Ceiling Light Fixture How To Change A Bulb Remove The Glass Cover

Led Light Fixtures Flickering The Causes And Solutions To Problem

Dey 14 Inch Dimmable Led Flush Mount Ceiling Light Fixture 30w With Remote Control Round Modern Lights 3000k 5000k 3 Color Changeable Com

Modern Led Ceiling Light Fixture 6 Rings Flush Mount Lights Dimmable Color Change Chandelier With Remote Memory Timer 60w Lamp For Bedroom Dining Kitchen Living Room Shein
Related Posts