How to Replace an LED Flush Mount Ceiling Light Fixture
Replacing a flush mount LED ceiling light fixture is a common home improvement task that can significantly update a room's aesthetic and improve its energy efficiency. Modern LED fixtures offer long lifespans and reduced electricity consumption compared to older incandescent or fluorescent models. While it may seem daunting, with the right tools, preparation, and a systematic approach, replacing a flush mount LED fixture is a manageable project for most homeowners. This article provides a comprehensive guide to ensure a safe and successful installation.
Safety First: Disconnecting Power and Preparing the Work Area
Prior to commencing any electrical work, safety is paramount. The most crucial step is to disconnect the power supply to the light fixture at the circuit breaker. Locate the circuit breaker that controls the lighting in the room where the fixture is to be replaced. Flip the breaker to the “OFF” position. To ensure the power is completely off, use a non-contact voltage tester. Touch the tester to the existing light fixture; if the tester indicates voltage, double-check that the correct breaker has been switched off.
Once the power is confirmed to be off, prepare the work area. Clear any furniture or obstructions from beneath the fixture to allow for comfortable and safe access. Protect the flooring with a drop cloth or old sheet to prevent damage from falling debris. Gather all necessary tools and materials within easy reach. These typically include:
*A new LED flush mount ceiling light fixture.
*Screwdrivers (both flathead and Phillips head).
*Wire strippers.
*Wire connectors (wire nuts).
*Non-contact voltage tester.
*Electrical tape.
*Pliers (optional, for manipulating wires).
*A ladder or step stool (stable and appropriate height).
*Safety glasses.
*Work gloves.
Having all necessary tools readily available prevents interruptions and minimizes the risk of accidents during the installation process.
Removing the Old Fixture
With the power safely disconnected and the work area prepared, the next step is to remove the existing light fixture. The specific removal process will vary slightly depending on the type and design of the old fixture, but the general principles remain the same.
First, detach the globe or diffuser covering the light bulbs. This may involve unscrewing retaining screws, twisting the globe to release it from its housing, or carefully prying it off if it's held in place by clips. Once the globe is removed, carefully remove the light bulbs. If the bulbs are incandescent, allow them to cool completely before handling them to avoid burns.
Next, locate the screws or fasteners that secure the fixture to the ceiling electrical box. These are typically located on the fixture's canopy or mounting plate. Unscrew these fasteners, supporting the fixture with one hand to prevent it from falling once the screws are removed. Once the fixture is detached from the ceiling, carefully lower it, exposing the wiring connections.
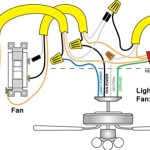
Examine the wiring connections. Typically, there will be three wires: a black (hot) wire, a white (neutral) wire, and a green or bare copper (ground) wire. Using wire strippers, carefully disconnect the wires by untwisting the wire connectors (wire nuts) counterclockwise. If the wires are connected using push-in connectors, use the appropriate release mechanism to detach the wires. Discard the old wire connectors. As each wire is disconnected, visually inspect the wire insulation for any damage or fraying. If the insulation is damaged, wrap the bare wire with electrical tape to provide insulation.
Once all wires are disconnected, carefully remove the old fixture completely. Inspect the mounting bracket attached to the ceiling electrical box. If the new fixture requires a different mounting bracket, remove the old one and install the new bracket according to the manufacturer's instructions. Ensure the new mounting bracket is securely attached to the electrical box.
Installing the New LED Flush Mount Fixture
With the old fixture removed and the mounting bracket installed, the final step is to install the new LED flush mount fixture. This process involves connecting the wiring and securing the fixture to the ceiling.
Begin by carefully connecting the wires from the new fixture to the corresponding wires in the ceiling electrical box. Using new wire connectors (wire nuts), connect the black wire from the fixture to the black wire from the electrical box. Twist the wires together clockwise and then screw on the wire connector until it is snug. Repeat this process for the white wires and the ground wires. Ensure the wire connections are secure and that no bare wire is exposed outside of the wire connector. If the new fixture has a push-in connector, insert the correct wire into the appropriate hole.
Tug gently on each wire to verify that the connection is secure. Properly connected wires are essential for safe and reliable operation of the fixture. After confirming the wiring connections are secure, carefully tuck the wires up into the electrical box. This helps to keep the wiring out of the way and prevents potential shorts.
Position the new fixture against the ceiling, aligning it with the mounting bracket. Secure the fixture to the mounting bracket using the screws or fasteners provided with the new fixture. Tighten the screws securely, but avoid over-tightening, which could damage the fixture or the ceiling. Ensure the fixture is flush against the ceiling and that there are no gaps or loose connections.
Finally, install the globe or diffuser covering the LED light source, following the manufacturer's instructions. This may involve screwing it into place, twisting it to lock it in, or snapping it into clips. Ensure the globe is securely attached to the fixture.
Testing and Final Checks
After installing the new LED flush mount fixture, it is essential to test its operation before completing the installation.
Return to the circuit breaker and flip the breaker back to the “ON” position. Observe the fixture to ensure it illuminates properly and that there are no flickering or other issues. If the fixture does not illuminate, immediately turn off the circuit breaker again and double-check the wiring connections. Ensure that all wires are securely connected and that the correct wires are matched.
If the fixture illuminates properly, allow it to run for several minutes to check for any unusual noises, smells, or excessive heat. If any of these issues are present, immediately turn off the circuit breaker and investigate the cause. Once the fixture is confirmed to be operating safely and correctly, the installation is complete.
Finally, clean up the work area, removing any tools, materials, and debris. Dispose of the old light fixture and any packing materials properly. A properly installed LED flush mount ceiling light fixture will provide years of reliable and energy-efficient lighting. Proper adhering to safety measures and following step-by-step instructions are highly recommended.

Drosbey 36w Dimmable Led Flush Mount Ceiling Light Fixture Review How To Install It

Led Flush Mount Ceiling Light Fixture 12 Inch 24w 3200lm 5000k Dayli Freeamzs

Dad Installs Color Changing Flush Mount Ceiling Led

Commercial Electric 11 In Adjust Color Temp Led Flush Mount Ceiling Light W Night Optional White And Brushed Nickel Trim 10 Pack 56583191 10pk The Home Depot

Commercial Electric 9 In White Oil Rubbed Broe Trims 800 Lumens Led Flush Mount Ceiling Light Fixture With Night Adjustable Cct 56582112 The Home Depot

Ge Premium 18 In Integrated Led Flush Mount Fixture Gun Metal 5 Colour Settings 32 W 93129696 Rona

Commercial Electric 11 In Adjust Color Temp Led Flush Mount Ceiling Light W Night Optional White And Brushed Nickel Trim 10 Pack 56583191 10pk The Home Depot

Lepro 24w 11 Inch Led Flush Mount Ceiling Light Fixture For Kitchen Bathroom Bedroom Porch Hallway Non Dimmable

How To Install Led Canless Recessed Lighting Upgrade Flush Mounted Lights Installing

Lepro 24w 13 Inch Led Flush Mount Ceiling Light Fixture For Kitchen Bathroom Bedroom Porch Hallway Non Dimmable
Related Posts