DIY Beadboard Ceiling Installation Over Popcorn: A Practical Guide
Many homeowners find themselves facing the challenge of outdated or unsightly popcorn ceilings. The textured finish, once a popular design choice, can now detract from a home's aesthetic and even pose health concerns due to potential asbestos content in older applications. While complete removal is an option, it can be a messy and labor-intensive process. A practical alternative is to install a beadboard ceiling directly over the existing popcorn texture. This method offers a decorative upgrade, conceals the unwanted texture, and avoids the dust and disruption associated with popcorn removal. This article provides a detailed, step-by-step guide to installing a beadboard ceiling over a popcorn ceiling, helping homeowners achieve a professional-looking result.
Preparing for Beadboard Installation
Proper preparation is crucial for a successful beadboard ceiling installation. This stage involves several essential steps, including assessing the existing popcorn ceiling, gathering necessary tools and materials, and ensuring the ceiling is structurally sound.
The first step is to thoroughly inspect the popcorn ceiling. Look for any signs of water damage, such as stains, discoloration, or sagging. Water damage indicates an underlying issue that must be resolved before proceeding with beadboard installation. Repair any leaks or structural problems to prevent future complications. If the popcorn ceiling is actively peeling or flaking, it should be stabilized. This can be achieved by applying a coat of primer specifically designed for adhering to textured surfaces. The primer will help to create a more stable base for the beadboard.
Next, determine whether the popcorn ceiling contains asbestos. Asbestos was a common additive in popcorn ceilings applied before the late 1970s. Disturbing asbestos-containing materials can release harmful fibers into the air, posing a serious health risk. If there is any doubt about the asbestos content, have a sample tested by a certified professional. If asbestos is present, it is strongly recommended to hire a qualified asbestos abatement contractor for removal or encapsulation.
Gather all the necessary tools and materials. This includes beadboard panels, furring strips (typically 1x3 lumber), construction adhesive, screws, a drill, a level, a measuring tape, a pencil, a circular saw or miter saw, a stud finder, safety glasses, a dust mask, and caulk. The quantity of materials will depend on the size of the ceiling area.
Carefully measure the ceiling area to determine the amount of beadboard and furring strips needed. Add an extra 10-15% to account for waste and cuts. Plan the layout of the beadboard panels, considering the direction of the planks and any existing light fixtures or architectural features. A well-planned layout will minimize waste and ensure a visually appealing finished product.
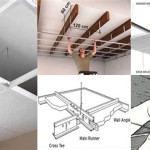
Installing Furring Strips
Furring strips provide a level and secure substrate for attaching the beadboard panels. Properly installed furring strips are essential for a professional-looking and long-lasting ceiling.
Use a stud finder to locate the ceiling joists. These are the structural members that support the ceiling. Mark the location of each joist with a pencil. The furring strips will be attached perpendicular to the joists, providing the necessary support for the beadboard.
Cut the furring strips to the desired length. The length will typically span the width or length of the room, depending on the direction the beadboard will run. Attach the furring strips to the ceiling joists using screws. Ensure the screws are long enough to penetrate the furring strip, the popcorn ceiling, and securely anchor into the joist. A minimum screw length of 2 1/2 inches is generally recommended.
Space the furring strips evenly across the ceiling. A standard spacing of 16 inches on center (OC) is typically sufficient. Closer spacing may be required if the beadboard panels are thin or if the ceiling is subject to heavy loads. Use a level to ensure that all furring strips are aligned and level. Shimming may be necessary to correct any unevenness in the existing ceiling. Uneven furring strips will result in an uneven beadboard ceiling.
At the perimeter of the ceiling, install furring strips flush against the walls. These strips will provide a nailing surface for the edges of the beadboard panels. Secure these perimeter strips to the wall studs or blocking as needed.
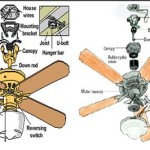
Consider running electrical wiring before attaching the beadboard if new light fixtures or recessed lighting are planned. Ensure all electrical work is performed by a qualified electrician and complies with local building codes. Running wiring after the beadboard is installed can be significantly more challenging and may require cutting into the finished ceiling.
Attaching the Beadboard Panels
With the furring strips securely in place, the next step is to attach the beadboard panels. This process involves careful cutting, fitting, and fastening to create a seamless and attractive ceiling.
Start by measuring and cutting the first beadboard panel to fit against the perimeter of the ceiling. Use a circular saw or miter saw for accurate and clean cuts. If the panel needs to be scribed to match an irregular wall, use a compass or profile gauge to transfer the shape onto the panel before cutting.
Apply construction adhesive to the back of the beadboard panel. Focus on applying the adhesive to the areas that will be in contact with the furring strips. In addition to adhesive, use screws to fasten the beadboard panel to the furring strips. Drive the screws through the panel and into the furring strips, ensuring they are countersunk so the screw heads are flush with the surface of the beadboard.
Install the remaining beadboard panels, working across the ceiling. Ensure that each panel is tightly fitted against the adjacent panel to create a seamless joint. Use a rubber mallet to gently tap the panels into place if necessary. Avoid using excessive force, as this can damage the beadboard.
When installing panels around light fixtures or other obstructions, carefully measure and cut the panels to fit. Use a jigsaw or hole saw for creating curved or irregular cuts. Leave a small gap around the fixture to allow for expansion and contraction.
For the final row of beadboard panels, it may be necessary to rip the panels to the desired width. Use a table saw or circular saw to make accurate and consistent cuts. Secure the final row of panels to the furring strips using adhesive and screws.
Finishing Touches
Once the beadboard panels are installed, a few finishing touches will enhance the overall appearance and durability of the ceiling.
Caulk all seams and gaps between the beadboard panels and the walls. Use a paintable caulk that matches the color of the beadboard. This will create a clean and professional look, while also preventing drafts and moisture from entering the ceiling cavity.
Fill any screw holes or imperfections with wood filler. Allow the filler to dry completely, then sand it smooth with fine-grit sandpaper. This will create a seamless surface for painting or staining.
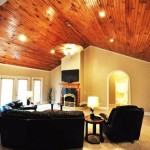
Paint or stain the beadboard ceiling to the desired color. Use a high-quality paint or stain that is specifically designed for interior wood surfaces. Apply multiple coats for even coverage and a durable finish. Consider using a primer before painting to improve adhesion and prevent bleed-through.
Install trim or molding around the perimeter of the ceiling to conceal any gaps and create a more finished look. Choose a trim style that complements the architectural style of the room. Miter the corners of the trim for a professional appearance.
Reinstall any light fixtures or other accessories that were removed during the installation process. Ensure that all electrical connections are properly made and comply with local building codes. Test the fixtures to ensure they are working correctly.

Diy Beadboard Ceiling Tutorial Easy And Inexpensive Custom Treatment

How To Cover Popcorn Ceiling With Beadboard Planks Diy Tutorial

Diy Beadboard Ceiling Tutorial Easy And Inexpensive Custom Treatment

How To Cover Popcorn Ceilings With Beadboard Ceiling Covering

Simple And Beautiful Beadboard Ceiling This Is How We Did It

Diy Beadboard Ceiling Tutorial Easy And Inexpensive Custom Treatment

One Room Challenge Week 5 Diy Ceiling Makeover

How To Cover Popcorn Ceiling With Beadboard Planks Diy Hometalk

How To Plank A Popcorn Ceiling

The Best Way To Cover Popcorn Ceilings With Beadboard Shoe Makes New
Related Posts