How To Install Beadboard Ceiling
Installing a beadboard ceiling can dramatically enhance the aesthetic appeal of a room, adding character and texture. This project, while achievable for a confident DIY enthusiast, requires careful planning, precise measurements, and a methodical approach. The following guide provides a comprehensive overview of the process, from initial preparation to the final finishing touches.
Before embarking on this project, it's crucial to assess the existing ceiling. Inspect for any signs of water damage, sagging, or other structural issues. Address any underlying problems before commencing beadboard installation. A sound and stable substrate is essential for a successful and long-lasting result. Furthermore, determine the desired orientation of the beadboard panels. Typically, they are installed with the planks running the length of the room, but consider the room's dimensions and visual flow when making this decision.
Gathering the necessary tools and materials is the next vital step. This includes beadboard panels (typically available in plywood or MDF), construction adhesive, a nail gun or hammer, finish nails, a measuring tape, a level, a stud finder, a pencil, a saw (circular, miter, or jigsaw), safety glasses, a dust mask, caulk, and paint or sealant. Having all these items readily available will streamline the installation process and prevent unnecessary delays.
Preparing the Ceiling Surface
Proper preparation of the existing ceiling is paramount. Begin by locating and marking ceiling joists using a stud finder. These joists will provide the necessary support for securing the beadboard panels. If the existing ceiling is plaster or drywall, ensure it is clean, dry, and free of loose debris. Scrape away any flaking paint or wallpaper. In some cases, it may be necessary to apply a skim coat of joint compound to create a smooth and even surface. Allow the joint compound to dry completely before proceeding.
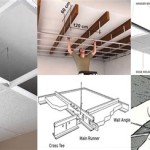
For ceilings with significant imperfections or damage, consider installing furring strips perpendicular to the joists. Furring strips are thin pieces of wood (typically 1x3 inches) that are attached to the ceiling joists to create a level plane for the beadboard. This is particularly important if the existing ceiling is uneven or bowed. When installing furring strips, use a level to ensure they are perfectly aligned. Shim the strips as needed to create a consistent surface. Space the furring strips according to the manufacturer's recommendations for the beadboard panels being used, typically 16 or 24 inches on center.
Priming the ceiling surface is highly recommended, especially if the existing ceiling is stained or has a porous surface. Primer helps to seal the surface, improve adhesion, and prevent bleed-through of stains. Use a high-quality primer specifically designed for interior ceilings. Apply the primer evenly, using a roller or brush. Allow the primer to dry completely before proceeding with beadboard installation.
Installing the Beadboard Panels
Begin by measuring the dimensions of the ceiling. Accurately measure the length and width of the room and transfer these measurements to the beadboard panels. Use a saw to cut the panels to the appropriate size. It is often advisable to cut the first row of panels slightly shorter than the measured length to allow for expansion and contraction. Remember to always wear safety glasses and a dust mask when cutting beadboard.
Apply construction adhesive to the back of the first beadboard panel, focusing on the areas that will be in contact with the ceiling joists or furring strips. Position the panel against the ceiling, aligning it with the wall and ensuring it is level. Secure the panel to the joists or furring strips using a nail gun or hammer and finish nails. Space the nails approximately 6 to 8 inches apart along the edges and in the field of the panel. Use a nail set to drive the nails slightly below the surface of the beadboard to prevent them from interfering with the finishing process.
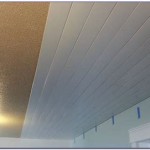
Continue installing the remaining beadboard panels, ensuring that each panel is tightly butted against the previous one. Use construction adhesive and finish nails to secure each panel in place. As you progress, check frequently to ensure that the panels are level and aligned. Use a level to make any necessary adjustments. For panels that require a more precise fit, use a jigsaw to cut around obstacles such as pipes or light fixtures. When cutting around these obstacles, leave a small gap (approximately 1/8 inch) to allow for expansion and contraction.
Finishing the Beadboard Ceiling
Once all the beadboard panels are installed, the next step is to conceal the seams and nail holes. Apply caulk to the seams between the panels and along the edges of the ceiling where it meets the walls. Use a paintable caulk specifically designed for interior use. Smooth the caulk with a damp cloth or sponge to create a seamless finish. Allow the caulk to dry completely before proceeding.
Fill the nail holes with wood filler using a putty knife. Overfill the holes slightly to allow for shrinkage. Allow the wood filler to dry completely before sanding it smooth with fine-grit sandpaper. Be careful not to sand the surrounding beadboard surface excessively. Wipe away any sanding dust with a damp cloth.
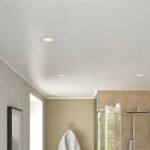
The final step is to paint or seal the beadboard ceiling. Choose a paint or sealant that is appropriate for the type of beadboard being used (plywood or MDF). Apply the paint or sealant evenly, using a roller or brush. Apply two coats of paint or sealant, allowing each coat to dry completely before applying the next. Consider using a semi-gloss or gloss finish for added durability and ease of cleaning. A primer may be required before painting for best results, especially if the beadboard is unprimed MDF. Ensure adequate ventilation during the painting process.
Addressing Common Challenges
One common challenge encountered during beadboard ceiling installation is dealing with uneven walls or ceilings. In such cases, it may be necessary to scribe the beadboard panels to match the contours of the wall or ceiling. Scribing involves tracing the shape of the wall or ceiling onto the panel and then cutting along the traced line. This creates a custom fit that minimizes gaps and ensures a professional-looking result.
Another challenge is cutting around obstacles such as pipes, light fixtures, or sprinkler heads. When cutting around these obstacles, it is crucial to measure accurately and use a jigsaw to make precise cuts. Consider using a template to help guide the saw and ensure a clean and accurate cut. To create a template, trace the shape of the obstacle onto a piece of cardboard and then use the template to transfer the shape onto the beadboard panel.
Working with large beadboard panels can also be challenging, especially for a solo installer. To make the process easier, consider using temporary supports to hold the panels in place while they are being secured with adhesive and nails. These supports can be as simple as lengths of lumber or specialized ceiling jacks. Enlisting the help of a friend or family member can also significantly simplify the installation process.

How To Install A Beadboard Ceiling Pine And Prospect Home

Diy Beadboard Ceiling Tutorial Easy And Inexpensive Custom Treatment

Diy Beadboard Ceiling Tutorial Easy And Inexpensive Custom Treatment

How To Install A Beadboard Ceiling Pine And Prospect Home

How To Install A Beadboard Paneled Ceiling The Kim Six Fix

Installing Bead Board Ceiling Sand And Sisal

How To Install Beadboard Panels On A Ceiling And Why We Ll Never Do It Again The Lake Land

How To Install A Wood Plank Ceiling Young House Love

Diy Beadboard Ceiling Tutorial Easy And Inexpensive Custom Treatment

Beadboard Ceiling What It Is And How To Install Yourself
Related Posts