How To Install Crown Molding on Angled Ceilings
Installing crown molding adds a touch of elegance and sophistication to any room. However, the process becomes more complex when dealing with angled ceilings, which require precise measurements and cuts to achieve a seamless finish. This article provides a comprehensive guide on how to successfully install crown molding on angled ceilings, addressing the specific challenges and techniques involved.
Before embarking on the project, it's crucial to understand the fundamental principles of crown molding installation. Crown molding is typically installed at the intersection of the wall and ceiling, covering the joint and creating a decorative transition. The molding's angled profile necessitates precise cuts at corners, allowing the pieces to meet seamlessly, even when the ceiling and wall are not perfectly perpendicular. Angled ceilings introduce an additional layer of complexity, as the angles at which the molding must be cut differ from standard 90-degree corners.
The primary difference between installing crown molding on a standard ceiling versus an angled ceiling lies in the angles required for the miter and bevel cuts. With a standard ceiling, the wall and ceiling meet at a 90-degree angle, simplifying the calculations for corner cuts. However, with an angled ceiling, the angle between the wall and ceiling is either greater or less than 90 degrees. This deviation from the norm necessitates a more involved process of determining the correct angles for each cut to ensure the molding pieces fit together correctly.
Understanding Compound Angles
The key to successfully installing crown molding on angled ceilings is understanding and accurately calculating compound angles. A compound angle is a combination of two angles: a miter angle and a bevel angle. The miter angle is the angle at which the blade of the miter saw needs to be set horizontally, while the bevel angle is the angle at which the saw blade needs to be tilted vertically. Together, these two angles create the complex cut needed to join the molding pieces seamlessly.
Several methods can be used to determine the correct compound angles. One common approach involves using a protractor and angle finder to measure the existing angles of the ceiling and walls. These measurements are then used in conjunction with a compound miter saw angle calculator (available online or as a mobile app) to calculate the miter and bevel settings. Another method involves using a specialized angle measuring tool designed specifically for crown molding. These tools typically provide a direct reading of the angles needed for cutting the molding.
It is important to emphasize the importance of accuracy during the measurement process. Even a small error in the initial angle measurements can lead to significant gaps or misalignments when the molding is installed. Therefore, taking multiple measurements and averaging them is a good practice. Furthermore, double-checking the calculator results against the measured angles is a wise precaution.
Essential Tools and Materials
Before starting the installation, gather the necessary tools and materials. Essential tools include a miter saw capable of making compound cuts (both miter and bevel angles), a measuring tape, a protractor or angle finder, a level, a stud finder, a pencil, a nail gun or hammer, and a caulk gun. The materials required include crown molding, nails or screws, wood glue, painter's caulk, and wood filler.
The choice of crown molding material depends on personal preference and the overall aesthetic of the room. Common options include wood, MDF (medium-density fiberboard), and polyurethane. Wood molding offers a classic look and can be stained or painted, but it is more susceptible to warping and cracking. MDF is a more affordable option that is less prone to warping, but it is less durable than wood and requires careful priming before painting. Polyurethane molding is lightweight, moisture-resistant, and easy to cut, making it a popular choice for DIYers. However, it can be more expensive than wood or MDF.
The type of fasteners used will depend on the material of the wall and ceiling. Nails are typically used for wood framing, while screws may be preferred for drywall or plaster. Using wood glue in conjunction with the fasteners will provide a stronger and more durable bond. Painter's caulk is used to fill any small gaps between the molding and the wall or ceiling, creating a seamless finish. Wood filler is used to fill any nail holes or imperfections in the molding.
The Installation Process: A Step-by-Step Guide
Once the tools and materials are gathered, the installation process can begin. The first step is to accurately measure the perimeter of the room, taking into account the angles of the ceiling and walls. This will allow you to calculate the total amount of crown molding needed. It is always advisable to purchase extra molding to account for mistakes and waste.
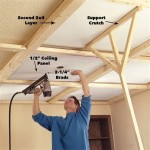
Next, locate the wall studs using a stud finder. Mark the stud locations on the wall, as these will serve as the anchoring points for the molding. It is crucial to secure the molding to the studs to ensure a strong and stable installation. If studs are not available in certain areas, consider using drywall anchors or construction adhesive to provide additional support.
Determine the proper spring angle of the crown molding, which is the angle at which the molding sits against the wall and ceiling. This is crucial for positioning the molding correctly on the miter saw. Most crown molding has a spring angle of either 45 or 52 degrees. This information can usually be found on the packaging or the manufacturer's website.
Using the calculated miter and bevel angles, make the first cut on a piece of crown molding. Test the fit of the cut piece against the corner of the angled ceiling. If the fit is not perfect, make small adjustments to the miter or bevel angles until the molding sits flush against the wall and ceiling. This iterative process of cutting and testing is crucial for achieving a professional-looking finish.
Once the first corner cut is perfected, repeat the process for the remaining corners. Remember that inside corners require opposite cuts compared to outside corners. It is also essential to account for the direction of the angle when cutting the molding. For example, a left inside corner will require a different cut than a right inside corner.
After all the corners have been cut and tested, begin installing the crown molding. Apply a bead of wood glue to the back of the molding and position it against the wall and ceiling, aligning it with the marked stud locations. Use a nail gun or hammer to secure the molding to the studs. Drive the nails or screws at a slight angle to ensure a secure hold.
Continue installing the molding around the perimeter of the room, ensuring that each piece is securely attached and that the corners meet seamlessly. If any gaps are present, use painter's caulk to fill them in. Smooth the caulk with a wet finger or a damp cloth to create a seamless finish. Allow the caulk to dry completely before painting.
Finally, use wood filler to fill any nail holes or imperfections in the molding. Sand the filler smooth using fine-grit sandpaper. Prime and paint the crown molding to match the color of the walls or ceiling. Apply multiple coats of paint for a durable and professional-looking finish.
Addressing Common Challenges
Installing crown molding on angled ceilings presents several potential challenges. One common challenge is dealing with uneven walls or ceilings. In older homes, walls and ceilings may not be perfectly level or plumb, which can make it difficult to achieve a seamless fit. In these cases, it may be necessary to use shims or other techniques to compensate for the unevenness.
Another challenge is dealing with vaulted or cathedral ceilings, which have complex angles and curves. Installing crown molding on these types of ceilings requires even more precise measurements and cuts. It may be necessary to create custom-made transition pieces to accommodate the varying angles.
Cutting crown molding upside down and backwards is a frequent source of confusion. Remember that the molding should be placed on the miter saw in the same orientation as it will be installed on the wall and ceiling. This requires visualizing the cut and adjusting the miter and bevel angles accordingly.
It is important to emphasize the significance of patience and attention to detail. Installing crown molding on angled ceilings is a challenging project that requires careful planning and execution. Rushing through the process can lead to mistakes and a less-than-satisfactory result.
Proper planning, accurate measurements, and careful execution are essential for achieving a professional-looking result when installing crown molding on angled ceilings. By understanding the principles of compound angles, using the right tools and materials, and following a step-by-step installation process, it is possible to transform any room with the elegance and sophistication of crown molding.

Crown Moulding On Angled Ceiling Sawdust Girl

Crown Molding On Angled Ceilings Makely

Installing Crown Moulding Part Two Canadian Woodworking

Crown Moulding On Angled Ceiling Sawdust Girl

Installing Crown Moulding On A Sloped Ceiling Doityourself Com Community Forums

How To Install Crown Molding On Vaulted Or Cathedral Ceilings The Joy Of Moldings

Installing Crown Molding Around A Cathedral Ceiling Fine Homebuilding

Crown Moulding On Angled Ceiling Sawdust Girl

Install Crown Molding Cathedral Vaulted Ceiling

Installing Crown Moulding On A Sloped Ceiling Doityourself Com Community Forums
Related Posts