How To Hang A Blanket Fort From The Ceiling
Constructing a blanket fort elevates childhood play and offers a cozy retreat for relaxation and entertainment. While traditional blanket forts often rely on furniture for support, suspending a fort from the ceiling introduces a new level of structural integrity and aesthetic appeal. This method allows for greater customization, creating more spacious and visually impressive forts. This article details a comprehensive guide on how to safely and effectively hang a blanket fort from the ceiling.
Planning and Preparation
Before initiating the construction process, careful planning is essential to ensure a safe and satisfying outcome. This stage involves assessing the ceiling's structural integrity, selecting suitable materials, and defining the fort's desired dimensions and design. Neglecting this preliminary step can lead to structural instability, material failure, or a fort that doesn't meet expectations.
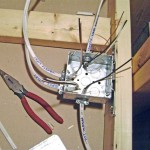
Assessing Ceiling Integrity: The first and foremost concern is the ceiling's ability to bear weight. Different ceiling types possess varying load-bearing capacities. Drywall alone is generally insufficient for supporting anything substantial. Ideally, one should anchor into ceiling joists, which are the supporting beams that provide structural strength. To identify joist locations, a stud finder is an invaluable tool. If a stud finder is unavailable, gently tapping on the ceiling can help locate the joists. A solid sound usually indicates a joist, while a hollow sound suggests empty space. Once a joist is located, mark its position clearly. Consider the age of the building; older structures may have weaker or damaged joists. If there is any doubt about the ceiling's ability to support the fort, consult with a professional contractor or structural engineer. Alternative methods, such using wall anchors rated for higher weight or distributing the load across multiple anchor points, can be considered based on professional advice.
Material Selection: The choice of materials significantly impacts the fort's durability and aesthetics. The anchoring system, blankets, and optional decorative elements require careful consideration.
Anchoring System: Several options exist for securing the fort to the ceiling. Screw-in hooks, eye bolts, or adhesive hooks designed for ceiling use are common choices. Screw-in hooks and eye bolts offer greater security when properly installed into joists, but require drilling. Adhesive hooks provide a less invasive option, but their weight capacity is generally lower. Regardless of the chosen method, it is crucial to select hardware rated for the anticipated weight of the blankets and any additional decorations. Overestimation of the weight is generally better than underestimation to provide a safety margin. Always ensure the chosen hooks or bolts are compatible with the ceiling material and designed for overhead applications.
Blankets and Fabric: Blankets form the primary structure of the fort. Lightweight blankets are preferable, as they reduce the strain on the ceiling anchors. Larger blankets provide more coverage and create a more enclosed space. Consider the fabric's texture, color, and light-filtering properties. Thicker, darker blankets will block more light, creating a darker, more private space. Lighter fabrics will allow more light to filter through. Sheets can be used as well but are often less durable than blankets.
Optional Decorations: String lights, decorative banners, and plush toys can enhance the fort's ambiance. However, these additions contribute to the overall weight, so it is important to factor them into the load-bearing calculations. Lightweight string lights are a popular choice, while heavier decorations should be minimized to avoid overloading the anchors.
Determining Dimensions and Design: The fort's dimensions should be appropriate for the available space and the intended use. Consider the desired height, width, and length. Sketching a rough design can help visualize the finished fort and identify any potential challenges. A larger fort requires more anchors and blankets, while a smaller fort may feel cramped. Account for the placement of furniture and other obstacles in the room. If specific shapes are desired, plan the anchor points accordingly.
Installation Process
The installation process involves securely attaching the anchors to the ceiling, connecting the blankets to the anchors, and adjusting the blankets to achieve the desired fort configuration. Precision and attention to detail are essential to ensure a stable and aesthetically pleasing structure.
Installing Anchors: Locate the marked joist positions identified during the planning phase. If using screw-in hooks or eye bolts, pre-drill pilot holes slightly smaller than the screw's diameter to ease installation and prevent splitting the wood. Carefully screw the hooks or bolts into the joists, ensuring they are securely fastened. If using adhesive hooks, clean the ceiling surface with rubbing alcohol to remove any dirt or grease. Apply the hooks according to the manufacturer's instructions, pressing them firmly against the ceiling for the recommended duration. Allow the adhesive to cure completely before hanging any weight. The number of anchors needed depends on the size and weight of the fort. A general guideline is to use at least four anchors for a small fort and six or more for a larger fort, spaced evenly to distribute the load.
Connecting Blankets: Once the anchors are in place, connect the blankets to the hooks or bolts. Several techniques can be used, including clips, rope, or simply draping the blankets over the anchors. Clips provide a secure and adjustable connection, allowing for easy repositioning of the blankets. Rope can be used to create loops or ties, providing a more flexible attachment method. Draping the blankets directly over the anchors is the simplest method, but it may not be as secure or adjustable.
Adjusting and Securing: After connecting the blankets, adjust their position to achieve the desired fort configuration. Ensure the blankets are evenly distributed and that no single anchor is bearing excessive weight. Reinforce any weak points with additional clips or ties. If the fort feels unstable, add more anchors or adjust the blanket arrangement. Consider using clamps or binder clips to secure the blankets to each other, creating a more enclosed space. Weights, such as books or small sandbags, can be placed along the bottom edges of the blankets to prevent them from billowing or shifting.
Safety Considerations and Maintenance
Safety is paramount when constructing and using a blanket fort suspended from the ceiling. Regular maintenance is crucial to ensuring the fort remains safe and structurally sound over time. These steps will prevent accidents and extend the lifespan of the fort.
Weight Limits: Adhere strictly to the weight limits of the chosen anchors and ceiling structure. Overloading the anchors can lead to their failure, causing the fort to collapse. Avoid placing heavy objects inside the fort or allowing excessive weight to be applied to the blankets.
Regular Inspections: Periodically inspect the anchors, blankets, and connections for signs of wear or damage. Check for loose hooks, frayed blankets, or weakened ties. Promptly repair or replace any damaged components to prevent accidents.
Safe Usage Guidelines: Establish clear guidelines for using the fort safely. Discourage climbing, jumping, or roughhousing inside or around the fort. Supervise young children to ensure they are using the fort responsibly. Ensure adequate ventilation to prevent stuffiness. Do not use candles or open flames inside the fort. Unplug any electrical devices when not in use.
Maintenance: Regularly clean the blankets to prevent the buildup of dust and allergens. Wash the blankets according to the manufacturer's instructions. Store the fort components in a dry, protected location when not in use to prevent damage from moisture or pests. Consider dismantling the fort periodically to allow for thorough cleaning and inspection of the ceiling and anchors.
By following these guidelines, individuals can create a safe, structurally sound, and enjoyable blanket fort suspended from the ceiling. The planning, installation, and maintenance steps are critical to achieving a successful outcome.

Fort Week Part 3 Building Tips Diy Blanket Build A Living Room

Make A Blanket Fort Using Command Hooks Lifeer

Fort Friday A Challenge All For The Boys Home Indoor Tents Bedroom

Cozy Retreat Create Your Own Grown Up Blanket Fort

How To Build The Best Blanket Fort Pretty Providence

Just Need A Couple Chairs And Ceiling Fan Blanket Fort Chair Decor

How To Hang Moving Blankets 9 Steps With Pictures Wikihow

Erin S Blanket Fort Building Furniture Tent Design

My Blanket Fort G The Jackie Blog

Blanket Forts For Grown Up Kids Ten Thousand Villages
Related Posts