DIY Tray Ceiling Ideas for Office Enhancement
Tray ceilings, also known as inverted or recessed ceilings, represent an architectural detail that can significantly enhance the aesthetic appeal and perceived spaciousness of a room. In an office setting, a well-executed tray ceiling can contribute to a more professional, welcoming, and even inspiring workspace. While professional installation can be costly, many DIY methods offer affordable and customizable alternatives. This article will explore several DIY tray ceiling ideas specifically tailored for office environments, focusing on design considerations, material options, and installation techniques.
The implementation of a tray ceiling is not merely a cosmetic upgrade. It can subtly alter the proportions of a room, creating the illusion of greater height and depth. This is particularly beneficial in offices where low ceilings can feel constricting and impact employee morale. Furthermore, the recessed nature of the tray ceiling cavity provides an opportunity for integrated lighting solutions, effectively controlling the ambience and reducing glare, a common issue in office environments.
Planning and Design Considerations
Before embarking on a DIY tray ceiling project, meticulous planning is crucial. This phase involves assessing the existing ceiling structure, determining the desired size and shape of the tray, and selecting appropriate materials. The dimensions of the room play a significant role in determining the optimal size of the tray. A general guideline is to ensure the tray's perimeter is proportionally sized to the overall room dimensions, avoiding an overly dominant or underwhelming effect.
The shape of the tray ceiling is another critical design element. While rectangular and square trays are the most common and easiest to construct, oval or custom-shaped trays can add a unique and sophisticated touch. However, these more complex shapes often necessitate specialized tools and skills, potentially increasing the project's difficulty and cost. The existing architectural style of the office should also influence the design choices. A modern office may benefit from clean lines and minimalist detailing, while a more traditional office may warrant more ornate molding and decorative elements.
Lighting considerations are paramount during the planning phase. The tray ceiling provides an ideal location for recessed lighting, accent lighting, or even indirect lighting. Careful consideration should be given to the placement and type of lighting fixtures to achieve the desired effect. Recessed can lights provide general illumination, while LED strip lights can create a soft, ambient glow. It is also important to factor in the existing electrical wiring and ensure that any new wiring complies with local building codes.
Material Choices and Budgeting
The choice of materials significantly impacts the cost, durability, and aesthetic outcome of the DIY tray ceiling project. Common materials include wood (such as MDF, plywood, or solid wood), drywall, and lightweight alternatives like foam molding. MDF (Medium-Density Fiberboard) is a cost-effective and versatile option, easy to cut and paint. Plywood offers greater structural strength but may require more preparation for a smooth finish. Solid wood provides a premium look and feel but is typically more expensive and requires specialized woodworking skills.
Drywall is often used for the recessed portion of the tray ceiling, providing a seamless and paintable surface. Lightweight foam molding is an increasingly popular alternative for the decorative trim, offering ease of installation and a wide range of styles. It is essential to select materials that are compatible with the existing ceiling structure. For example, if the existing ceiling is drywall, it is generally advisable to use drywall for the tray ceiling construction to ensure proper adhesion and prevent cracking.
Budgeting is a crucial aspect of any DIY project. Before purchasing materials, it is recommended to create a detailed list of all necessary items, including lumber, drywall, fasteners, paint, lighting fixtures, and any specialized tools. Obtain price quotes from multiple suppliers to ensure competitive pricing. Be prepared to allocate a contingency fund for unexpected expenses, such as additional materials or unforeseen structural issues. It is also important to factor in the cost of labor, even if you are performing the work yourself, as your time has inherent value.
Installation Techniques and Safety Precautions
The installation of a DIY tray ceiling typically involves several steps, including framing, drywalling, finishing, and lighting installation. Framing involves constructing a sturdy framework to support the tray ceiling structure. This framework is typically constructed from lumber and attached to the existing ceiling joists. It is crucial to ensure that the framework is level and properly aligned to prevent unevenness in the finished product.
Once the framework is in place, drywall can be installed to create the recessed portion of the tray. Drywall should be cut to size and attached to the framework using drywall screws. Joints between drywall sheets should be taped and mudded to create a seamless surface. Several coats of mud may be required to achieve a smooth finish. Sanding is also necessary to blend the mudded joints with the surrounding drywall.
Finishing involves painting or applying other decorative finishes to the tray ceiling. Before painting, the drywall should be primed to ensure proper adhesion of the paint. Multiple coats of paint may be required to achieve the desired color and coverage. Decorative molding can be installed around the perimeter of the tray to add visual interest and conceal any imperfections. The installation of lighting fixtures should be performed by a qualified electrician or someone with experience in electrical wiring. It is crucial to follow all applicable electrical codes and safety precautions to prevent electrical shocks or fire hazards.
Safety is paramount during all phases of the DIY tray ceiling project. Always wear appropriate personal protective equipment, including safety glasses, gloves, and a dust mask. Use a ladder that is stable and properly positioned. Avoid working alone and ensure that someone is nearby in case of an emergency. Be aware of the location of electrical wiring and plumbing before drilling or cutting into the ceiling. If you are unsure about any aspect of the installation process, consult with a qualified professional.
Specific DIY Tray Ceiling Ideas for Office Spaces
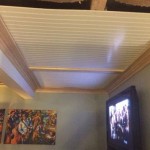
Several specific design ideas can be adapted for office tray ceilings, depending on the desired aesthetic and functionality. One popular approach is to incorporate indirect lighting using LED strip lights concealed within the tray. This creates a soft, ambient glow that is less harsh than direct lighting, reducing eye strain and improving employee comfort.
Another option is to use decorative molding to add visual interest to the tray ceiling. Crown molding, cove molding, or even simple trim can be used to create a variety of styles. The molding can be painted to match the ceiling color or a contrasting color to create a more dramatic effect. Consider using metallic paints or finishes for a modern and sophisticated look.
For offices with high ceilings, consider creating a tiered tray ceiling with multiple layers of recessed areas. This can create a sense of grandeur and make the room feel more spacious. Each tier can be illuminated with different types of lighting to create a dynamic and layered effect. It's important to consider the overall height of the finished tiers, ensuring that the completed structure doesn't feel overwhelming in the existing space.
Integrating Technology and Functionality
Modern offices often require the integration of technology, and a tray ceiling can provide a convenient location for concealing wiring and other equipment. Speakers, projectors, and other AV equipment can be discreetly mounted within the tray ceiling, minimizing clutter and creating a more streamlined appearance. Consider incorporating access panels or removable sections to facilitate maintenance and upgrades.
Acoustic considerations are also important in office environments. Installing sound-absorbing materials within the tray ceiling can help to reduce noise levels and improve speech intelligibility. Acoustic panels, mineral wool insulation, or even specialized acoustic foam can be used to dampen sound reflections and create a more comfortable working environment. These materials can be effectively concealed within the tray, preserving the aesthetic appeal while enhancing the functionality.
The careful selection of materials and the proper execution of the installation techniques are crucial for a successful DIY tray ceiling project. By considering the design considerations, material options, and safety precautions outlined in this article, office owners and managers can create a visually appealing and functional workspace that enhances employee productivity and well-being.

How To Make Your Tray Ceiling Feel Like Home Office Decor Design

Superb Tray Ceiling Designs For Your Living Spaces

What Is A Tray Ceiling And How To Install It At Home Foyr

Ceiling Decoration Ideas Diy For Ceilings Addicted 2 Decorating

50 Creative Trey Ceiling Ideas For Home Styles In 2024 Tray Double

15 Creative Ways To Illuminate Your Tray Ceiling Lightopia

Superb Tray Ceiling Designs For Your Living Spaces

Coffered Ceiling Installation Monks Home Improvements

10 Beautiful False Ceiling Tray Design For Your Home Homes

Remodeling Ideas That Make An Ordinary Home Feel High End Casali Companies
Related Posts