Can You Paint a Gold Ceiling Fan?
Painting a ceiling fan, even one with a metallic finish like gold, is entirely possible with the right preparation and materials. This article explores the process, considerations, and techniques involved in successfully painting a gold ceiling fan.
Key Considerations Before Painting
Several factors should be evaluated before embarking on this project. These considerations will help determine the feasibility and complexity of the painting process.
- Existing Finish: The current finish on the gold ceiling fan will significantly impact paint adhesion. Smooth, glossy finishes might require more thorough sanding or priming than textured or matte finishes.
- Material of the Fan: Different materials, such as metal, wood, or plastic, require specific paint types and preparation methods. Identify the fan's material to choose appropriate supplies.
- Desired Finish: Consider the desired final look. A matte, satin, or gloss finish will require different paint types. Metallic finishes can be achieved with specialty paints.
- Location of the Fan: Ceiling fans in bathrooms or kitchens might be exposed to more moisture and require a more durable, moisture-resistant paint.
Preparing the Ceiling Fan for Painting
Proper preparation is crucial for a successful and long-lasting paint job. It ensures proper paint adhesion and a smooth, professional finish.
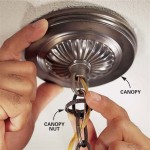
- Disassembly: Disassembling the fan is highly recommended. This allows for easier access to all parts and prevents accidental paint from getting on other surfaces. Take photos during disassembly to facilitate reassembly.
- Cleaning: Thoroughly clean all fan parts to remove dust, grease, and grime. A degreasing cleaner is recommended, especially for kitchen fans. Allow parts to dry completely.
- Sanding: Lightly sand all surfaces to be painted. This creates a slightly rough surface that promotes paint adhesion. Use fine-grit sandpaper and wipe away sanding dust with a tack cloth.
- Priming (Optional): If painting over a glossy finish or changing colors drastically, applying a primer is advisable. Choose a primer formulated for the fan's material and the desired paint type.
- Protecting the Work Area: Cover the work area with drop cloths or newspapers to protect surrounding surfaces from paint splatter.
Choosing the Right Paint
Selecting the correct type of paint is vital for a durable and attractive finish. Consider the fan's material and the desired aesthetic when making this decision.
- Metal Fans: Metal primer and paint designed for metal surfaces are ideal. Look for rust-inhibiting properties for added protection, especially in humid environments.
- Wood Fans: Use a high-quality acrylic latex or enamel paint suitable for wood. Choose a finish (matte, satin, or gloss) based on the desired look.
- Plastic Fans: Specialty plastic primer and paint are available for optimal adhesion. Standard acrylic latex paints can also work, but testing on a small inconspicuous area first is recommended.
- Metallic Finishes: Achieving a gold finish can be accomplished with metallic spray paint. Multiple light coats provide a smoother and more even finish than one heavy coat.
Painting the Ceiling Fan
With proper preparation and the right materials, the painting process becomes straightforward and manageable.
- Apply Thin Coats: Apply multiple thin coats of paint, allowing each coat to dry completely before applying the next. This prevents drips and ensures a smooth, even finish.
- Spray Painting: For a smoother, more professional finish, especially with metallic paints, spray painting is often preferred. Use even strokes and maintain a consistent distance from the surface.
- Brush Painting: For intricate details or smaller areas, brush painting can be more precise. Use a high-quality brush and apply the paint in smooth, even strokes.
- Drying Time: Allow ample drying time between coats and before reassembling the fan. Consult the paint manufacturer's instructions for recommended drying times.
Reassembling the Ceiling Fan
Once the paint is completely dry, the fan can be reassembled, completing the transformation.
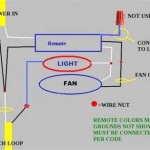
- Reverse Disassembly Steps: Carefully reassemble the fan, referring to the photos taken during disassembly. Ensure all connections are secure.
- Testing Functionality: After reassembly, test the fan's functionality to ensure all components are working correctly.
Maintaining the Painted Finish
Proper maintenance will help preserve the newly painted finish and extend its lifespan.
- Regular Cleaning: Dust the fan blades regularly to prevent buildup. Periodically clean with a damp cloth and mild detergent, avoiding abrasive cleaners.
- Touch-Ups: Minor scratches or chips can be touched up with the same paint used for the initial painting. Ensure proper surface preparation before applying touch-up paint.

Update A Ceiling Fan Using Spray Paint

Another Ceiling Fan Makeover And How Not To Paint A Nani S Notebook

How To Update A Ceiling Fan Without Removing It Savvy Apron

Another Ceiling Fan Makeover And How Not To Paint A Nani S Notebook

Golden Fan Better After Ceiling Makeover Painting Fans

Ceiling Fan Makeover 100 Room Challenge The Palette Muse

How To Paint A Ceiling With Gold Metallic

Diy Ceiling Fan Makeover Idea On A Budget

How To Paint A Diy Ceiling Fan Hometalk

Can Ceiling Fan Blades Be Stained Or Painted Life Should Cost Less
Related Posts