Replacing a ceiling fan switch is a relatively straightforward task, even for someone with limited DIY skills. With the right tools and a bit of patience, you can easily replace a broken or faulty switch and keep your ceiling fan running smoothly. Read on for a step-by-step guide on how to replace a ceiling fan switch.
Gathering the Tools You Need
Before you begin, make sure you have the right tools for the job. You will need:
- A flat-head and Phillips head screwdriver
- A wire stripper
- Needle-nose pliers
- Electrical tape
Turning Off Power to the Fan
The most important step in replacing a ceiling fan switch is to make sure that the power to the fan is turned off. The safest way to do this is to switch off the power to the whole house at the circuit breaker. Once the power is off, you can safely begin to work on the fan.
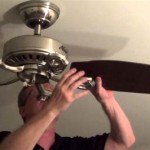
Removing the Old Switch
Now that the power is off, you can begin removing the old switch. First, use the flat-head screwdriver to unscrew the switch plate from the wall. Then, unscrew the screws that hold the switch in place. Once these screws are removed, you can carefully pull the switch out of the wall. Be careful not to pull too hard, since the wires may still be attached to the switch.
Stripping the Wires
Now that the switch is out, it’s time to strip the wires. Using the wire stripper, carefully strip away the insulation from the ends of the wires. Be careful not to damage the wires, as this could cause a short circuit. Once the insulation is removed, twist the exposed wires together until they are securely connected.
Attaching the New Switch
Now that the wires are connected, you can attach the new switch. Place the new switch in the wall and use the Phillips head screwdriver to secure it in place. Once the switch is in place, twist the wires onto the terminals on the switch. Make sure the connections are tight and secure. Finally, use electrical tape to insulate the connections.
Testing the Switch
Once the new switch is in place, it’s time to test it. Turn the power back on at the circuit breaker and then switch on the fan. If the fan works, then you’ve successfully replaced the switch. If not, double-check the connections and make sure everything is securely in place.
Conclusion
Replacing a ceiling fan switch is an easy task that can be done with the right tools and a bit of patience. By following the steps outlined above, you can easily replace a faulty switch and get your ceiling fan running smoothly again.


Related Posts