How To Remove Popcorn Ceiling Without Asbestos
Popcorn ceilings, officially known as acoustic ceilings, were widely popular from the 1950s through the 1980s. They were favored for their sound-dampening qualities and ability to hide imperfections on the ceiling surface. However, their dated appearance and tendency to collect dust have led many homeowners to remove them. Before undertaking this project, it is crucial to determine whether the popcorn ceiling contains asbestos. If the house was built before 1980, there is a risk of asbestos being present. If asbestos is suspected, professional testing and abatement are necessary. This article focuses on the process of removing popcorn ceilings that have been confirmed to be asbestos-free. Safety precautions are paramount, and proper preparation is essential for a successful removal.
The removal of a popcorn ceiling is a labor-intensive project, but it can be a manageable task for a DIY enthusiast with the proper tools, patience, and adherence to safety guidelines. The following steps outline the process, from preparation to cleanup, ensuring a smoother and more efficient removal.
Preparation is Key: Protecting Yourself and Your Space
Prior to commencing any removal work, thorough preparation is paramount. This involves protecting oneself from dust and debris, as well as safeguarding the surrounding environment. The steps outlined below are crucial for a clean and secure workspace.
Safety First: Personal protection is non-negotiable. Wear safety glasses to shield eyes from falling particles. A respirator mask, specifically an N95 or higher, is essential to prevent inhalation of dust and particles. Cover exposed skin with long sleeves, long pants, and gloves to minimize irritation. Consider wearing a disposable hooded suit for added protection during the removal process. This will not only protect your clothing but also minimize the spread of dust to other parts of the house.
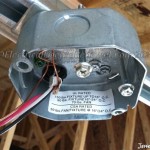
Room Preparation: The room must be properly prepared to minimize damage and facilitate cleanup. Remove all furniture from the room. If complete removal is impossible, cover the furniture with heavy-duty plastic sheeting. Cover the flooring with drop cloths, taping the edges securely to prevent dust and debris from seeping underneath. Turn off the electricity to the room at the breaker box to avoid any electrical hazards. Remove any light fixtures or ceiling fans, taking note of their wiring configurations before disconnecting them. Carefully cover any remaining electrical boxes with plastic sheeting and tape to prevent water from entering during the spraying process.
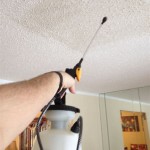
Tool Gathering: Gather all the necessary tools before starting the removal process. This includes a pump sprayer filled with water, a wide scraping tool (4-6 inches), a taping knife, joint compound, sandpaper (various grits), a ladder, a bucket, plastic sheeting, painter’s tape, safety glasses, a respirator mask, gloves, and work lights. Having all the tools readily available will streamline the process and prevent unnecessary delays.
The Removal Process: Scraping the Popcorn Texture
The removal process involves softening the popcorn texture with water and then carefully scraping it off the ceiling. This step requires patience and attention to detail to minimize damage to the underlying ceiling surface.
Water Application: Fill the pump sprayer with clean, lukewarm water. Mist a small section of the ceiling (approximately 4x4 feet) with water. Avoid over-saturating the area, as this can damage the drywall underneath. Allow the water to soak into the popcorn texture for about 15-20 minutes. This will soften the material, making it easier to scrape off. The soaking time may vary depending on the type of popcorn texture and the humidity levels. Experiment with small sections to determine the optimal soaking time.
Scraping Technique: Using a wide scraping tool, gently scrape the softened popcorn texture from the ceiling. Hold the scraper at a slight angle to avoid gouging the drywall. Apply consistent pressure and move the scraper in smooth, overlapping strokes. Collect the scraped material in a bucket placed directly beneath the work area. Work in manageable sections, ensuring that the popcorn texture is thoroughly soaked before attempting to scrape. Avoid scraping too aggressively, as this can damage the drywall paper, requiring more extensive repairs later.
Addressing Stubborn Areas: Some areas may be more difficult to scrape than others. If the popcorn texture is particularly stubborn, re-apply water and allow it to soak for a longer period. A taping knife can be used to carefully remove stubborn patches or corners. In cases where the popcorn texture is very thick or has been painted over, it may be necessary to use a specialized popcorn ceiling removal solution. These solutions are designed to penetrate the texture and loosen it from the ceiling surface.
Multiple Passes: Depending on the thickness and consistency of the popcorn texture, multiple passes with the scraper may be necessary to remove all residue. Inspect the ceiling carefully after each pass, identifying any areas that require further attention. Ensure that all loose material is removed before proceeding to the next section.
Repair and Finishing: Achieving a Smooth Surface
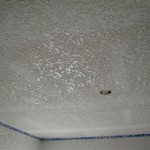
After the popcorn texture is removed, the ceiling surface will likely have imperfections, such as gouges, scratches, and uneven areas. Repairing these imperfections and applying a smooth finish are crucial for achieving a professional-looking result. The following steps outline the process of repairing and finishing the ceiling.
Inspection and Preparation: Once the scraping is complete, thoroughly inspect the ceiling surface for any damage. Identify any gouges, scratches, or uneven areas that require repair. Remove any loose debris or dust from the ceiling surface with a damp sponge or cloth. This will ensure proper adhesion of the joint compound. Allow the ceiling to dry completely before proceeding to the next step.
Applying Joint Compound: Using a taping knife, apply a thin coat of joint compound to the damaged areas. Feather the edges of the compound to blend seamlessly with the surrounding surface. Allow the first coat of compound to dry completely. This may take several hours or overnight, depending on the humidity levels. After the first coat is dry, sand the surface lightly with fine-grit sandpaper to remove any imperfections. Apply a second coat of joint compound, if necessary, to further smooth out the surface. Again, feather the edges and allow the compound to dry completely before sanding.
Sanding and Smoothing: Sand the entire ceiling surface with progressively finer grits of sandpaper to achieve a smooth, even finish. Start with a medium-grit sandpaper (120-grit) to remove any major imperfections, and then switch to a fine-grit sandpaper (220-grit) for the final smoothing. Wear a respirator mask during sanding to protect from dust inhalation. Sand in circular motions, applying even pressure to avoid creating uneven areas. Use a sanding pole to reach high areas of the ceiling. After sanding, remove all dust from the ceiling surface with a damp sponge or cloth. Allow the ceiling to dry completely before proceeding to painting.
Priming and Painting: Apply a coat of primer to the entire ceiling surface. Primer helps to seal the surface, improve paint adhesion, and prevent stains from bleeding through. Allow the primer to dry completely according to the manufacturer’s instructions. Once the primer is dry, apply two coats of high-quality ceiling paint. Use a roller with an extension pole to reach high areas of the ceiling. Allow each coat of paint to dry completely before applying the next coat. Ensure that the paint is specifically designed for ceilings, as these paints typically have a flatter finish and better hiding properties.
Cleanup and Restoration: After the painting is complete, remove the drop cloths and plastic sheeting. Carefully dispose of the scraped popcorn texture and any other debris. Clean the surrounding area thoroughly to remove any remaining dust or particles. Reinstall any light fixtures or ceiling fans that were removed during the preparation process. Restore the furniture to its original position and arrange the room as desired. Following these steps will ensure a clean and professional-looking result.
Proper ventilation is important throughout the process. Open windows and use fans to circulate air and remove dust particles. Regular breaks are also essential to avoid fatigue and maintain focus. This task is time-consuming and physically demanding, so don't hesitate to enlist help if needed.

How To Easily Remove Popcorn Ceilings This Old House

How To Remove Popcorn Ceilings Like A Pro No Mess Just Results Paul Ricalde

How To Remove Popcorn Ceilings Easily The Nifty Nester

The Joy Of Popcorn Ceiling Removal Centsational Style

The Genius New Way People Are Hiding Their Popcorn Ceilings

Removing A Popcorn Ceiling Diy Or Hire Pro Yelp

Cover Popcorn Ceilings Kanopi By Armstrong

Removing Popcorn Ceiling That Has Been Painted

Popcorn Ceiling Removal Diy Methods And Total Cost

How To A Cover Popcorn Ceiling Without Removing It Renoviso
Related Posts