How to Fix a Broken Ceiling Fan Light Chain
A broken ceiling fan light chain is a common household problem that can be frustrating. It can leave a homeowner without the ability to control the fan’s light, rendering it useless or requiring unsafe methods of operation, such as climbing to reach the light fixture directly. Fortunately, repairing a broken light chain is typically a simple and inexpensive task that most homeowners can accomplish with a few basic tools and a little patience. This article provides a step-by-step guide on how to diagnose the problem, gather the necessary materials, and perform the repair effectively, restoring full functionality to the ceiling fan.
Before embarking on any electrical repair, safety should be the primary concern. Turning off the power to the ceiling fan at the circuit breaker is critical to avoid electrical shock. Identifying the correct circuit breaker in the electrical panel is the first step. Typically, the circuit breaker will be labeled, but if it is not, a process of elimination may be necessary. After switching off the breaker, it is advisable to test the ceiling fan light with a non-contact voltage tester to ensure that no power is present. This simple precaution can prevent serious injury.
Once the power has been safely disconnected, a thorough examination of the broken light chain is required. The point of breakage will usually be obvious. It might be a broken link in the chain itself, a disconnection at the point where the chain attaches to the switch mechanism inside the fan’s light fixture, or a failure of the switch mechanism itself. Understanding the nature of the break is crucial for determining the appropriate repair strategy. If the chain is simply broken, a replacement chain or a connecting link might suffice. However, if the switch mechanism is faulty, a replacement switch will be necessary. Visual inspection should also include checking the condition of the other components, such as the wire connections within the light fixture, for any signs of damage or wear.
Identifying the Problem Area and Required Tools
The first step in fixing a broken ceiling fan light chain involves a careful diagnosis of the issue. This involves not only identifying where the chain is broken, but also determining the underlying cause of the breakage. Is it simply a broken link in the chain, or is the problem located within the switch mechanism inside the fan’s motor housing? A broken link is the easiest to fix, requiring only a replacement link or a short section of chain. However, a malfunctioning switch requires replacement of the entire switch, which is a slightly more involved process.
Start by visually inspecting the chain. Look for any obvious breaks or kinks. If the chain is broken near the switch, gently tug on the remaining chain to see if it moves freely. If it doesn't, the switch itself may be the problem. If the chain pulls out completely, it is likely detached from the switch. In this case, you will need to access the switch inside the light fixture housing to reattach it.
Once the source of the problem has been identified, gathering the correct tools and materials is the next crucial step. For a simple broken chain link, a pair of needle-nose pliers and a replacement chain link (or a small section of light chain) will suffice. For a more complex repair involving the switch mechanism, the following tools and materials will be needed:
- Screwdrivers (Phillips head and flathead, various sizes)
- Needle-nose pliers
- Wire strippers
- Wire connectors (wire nuts)
- Replacement ceiling fan light switch
- Electrical tape
- Safety glasses
- Work gloves
- A ladder or step stool to safely reach the fan
- A non-contact voltage tester to ensure power is off
Having all the necessary tools and materials readily available will streamline the repair process and minimize the risk of errors or delays.
Replacing a Broken Chain Link
The simplest scenario involves a broken chain link. This repair requires minimal tools and expertise. Assuming power is already disconnected from the circuit breaker, carefully examine the broken link. If it's simply bent open, attempt to close it using needle-nose pliers. Gently bend the link back into its original shape, ensuring that the opening is completely closed. However, if the link is severely damaged or broken entirely, it will need to be replaced.
To replace the broken link, use needle-nose pliers to open the link adjacent to the broken one. If a replacement link is available, simply insert it into the open link and close it securely using the pliers. If a replacement link is not readily available, a small section of light chain can be used. Cut a short piece of chain slightly longer than the original link. Open the end links of the new chain section and connect it to the existing chain, closing the links securely. Ensure that all links are properly closed to prevent the chain from breaking again.
Once the new link or chain section is in place, gently tug on the chain to test its strength. Ensure that the connection is secure and that the chain moves freely. If the chain feels weak or the connection is loose, re-examine the links and ensure they are properly closed. After confirming the repair is secure, restore power to the ceiling fan at the circuit breaker and test the light to ensure it is functioning correctly. If the light does not work, or if there are any other issues, turn the power back off and further diagnose the problem.
In some instances, the chain may break repeatedly at the same point. This can indicate excessive stress or friction at that location. To address this, try to slightly adjust the position of the chain or lubricate the area where the chain enters the switch mechanism with a small amount of silicone lubricant. This can help to reduce friction and prevent future breakage.
Replacing the Light Switch Mechanism
If the broken chain is connected to a malfunctioning switch, replacing the entire switch mechanism is necessary. This is a slightly more involved process but still manageable for most homeowners with basic electrical skills. As always, ensure the power to the ceiling fan is turned off at the circuit breaker before proceeding.
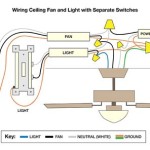
Begin by removing the light cover and any globes or shades to expose the wiring and the switch. Carefully examine the switch and note how it is connected to the fan's wiring. Typically, the switch will have two wires connected to it, one from the power source and one leading to the light fixture. Take a picture or draw a diagram of the wiring configuration to ensure that the new switch is connected correctly. This step is crucial to avoid incorrect wiring, which could damage the fan or create a safety hazard.
Using wire strippers, carefully disconnect the wires from the old switch. Use wire nuts to connect the wires from the ceiling fan to the new switch. Ensure each wire is securely connected to the corresponding wire from the fan, matching the wiring configuration that was documented earlier. The connections should be tight and secure to prevent loose wires, which can cause the light to flicker or fail to work altogether. Once the wires are connected, carefully tuck the wires and the wire nuts back into the light fixture housing, ensuring they are not pinched or damaged. Place the new switch into the housing carefully.
Reassemble the light fixture by replacing the light cover and any globes or shades that were removed. Restore power to the ceiling fan at the circuit breaker and test the light. If the light works correctly, the repair is complete. If the light still does not work, or if there are any other issues, turn the power back off and double-check the wiring connections. Ensure that all wires are securely connected and that the wiring configuration matches the original diagram. If the problem persists, it may be necessary to consult a qualified electrician.
When replacing the switch, consider upgrading to a more durable or feature-rich switch. For example, a dimmer switch can be installed to provide adjustable lighting levels, or a switch with a longer chain can be used for easier access. Ensure that the replacement switch is compatible with the ceiling fan's voltage and wattage requirements to prevent damage to the fan or the light fixture.
Preventative maintenance can help to prolong the life of the ceiling fan light switch. Periodically inspect the chain for signs of wear or damage and lubricate the switch mechanism with a small amount of silicone lubricant to reduce friction. Avoid pulling the chain too forcefully, as this can damage the switch mechanism over time. By following these simple tips, homeowners can minimize the risk of future problems and extend the lifespan of their ceiling fan light switch.

4 Ways To Replace A Ceiling Fan Pull Chain Switch Wikihow

Ceiling Fan Pull Switch Broken Chain Replace Fix Hampton Bay

4 Ways To Replace A Ceiling Fan Pull Chain Switch Wikihow

Fix A Snapped Fan Pull Chain At No Cost How To

How To Fix Replace A Ceiling Fan Pull Chain Switch

How To Easily Repair Or Replace Your Ceiling Fan Chain

Ceiling Fan Pull Chain Came Out Doityourself Com Community Forums

4 Ways To Replace A Ceiling Fan Pull Chain Switch Pulls

Ceiling Fan Light Repair Home Tutor

How To Repair Your Ceiling Fan If It Has A Broken Pull Chain For The Light Or Sd Switch Votd
Related Posts