Best Way to Insulate Basement Ceiling for Sound
Soundproofing a basement often involves addressing the ceiling, as it serves as a significant pathway for noise transmission between the basement and the floor above. Selecting the appropriate insulation method and materials is crucial for effectively mitigating unwanted sounds. The ideal approach depends on several factors, including the existing structure, budget constraints, and desired level of sound reduction.
Before embarking on any insulation project, it is imperative to identify the types of noise being targeted. Airborne noise, such as conversations or music, and impact noise, like footsteps or dropped objects, require different strategies. Airborne noise is best addressed by adding mass and damping to the ceiling assembly, while impact noise necessitates decoupling the ceiling from the joists to minimize vibrations.
Understanding Sound Transmission Mechanisms
Sound travels through structures via vibrations. When a sound source produces waves, these waves can cause surfaces to vibrate. These vibrations then propagate through connected materials, like walls and floors, transmitting the sound to other spaces. In the context of a basement ceiling, sound can travel directly through the drywall or subfloor, or it can flank around the ceiling through the surrounding walls and HVAC systems.
The effectiveness of soundproofing relies heavily on interrupting these vibration pathways. Mass, a physical barrier, absorbs and reflects sound waves, reducing their energy. Damping materials convert vibrational energy into heat, further minimizing sound transmission. Decoupling creates a physical break between surfaces, preventing vibrations from easily transferring from one area to another.
Different materials possess varying sound absorption and transmission characteristics. Dense materials, such as concrete or mass-loaded vinyl, are excellent at blocking airborne noise. Softer materials, like fiberglass or mineral wool, are better at absorbing sound energy. Understanding these properties is essential for selecting the most appropriate insulation for the specific soundproofing goals.
Effective Insulation Materials for Soundproofing
Several insulation materials can be used to enhance the soundproofing capabilities of a basement ceiling. Each material offers unique benefits and drawbacks regarding cost, ease of installation, and performance.
*Fiberglass Insulation:
A common and relatively inexpensive option, fiberglass batts or rolls can be installed between the joists. While they offer some sound absorption, their performance is limited compared to denser materials. To improve their effectiveness, consider using denser fiberglass batts or combining them with other soundproofing techniques. *Mineral Wool Insulation:
Also known as rockwool, mineral wool is significantly denser than fiberglass, providing superior sound absorption and fire resistance. It is a more effective choice for reducing airborne noise. Mineral wool is available in batts or rolls, similar to fiberglass, and is installed in the same way. *Spray Foam Insulation:
Spray foam, either open-cell or closed-cell, can fill cavities completely, creating an airtight seal. Closed-cell foam offers slightly better soundproofing due to its higher density. However, spray foam is typically more expensive than other options and requires professional installation. While it does help with sound dampening, it's not the best choice for dedicated sound *blocking* compared to mineral wool and resilient channels. *Acoustic Panels:
While not technically insulation, acoustic panels can be attached to the ceiling to absorb sound reflections within the basement. This reduces reverberation and improves the overall sound quality in the space. They are typically used in conjunction with other insulation methods. *Mass-Loaded Vinyl (MLV):
MLV is a dense, flexible material specifically designed to block sound. It can be attached to the ceiling joists or suspended below them to create a sound barrier. MLV is particularly effective at reducing airborne noise, but it can be relatively expensive and requires careful installation to avoid gaps or leaks.Step-by-Step Guide to Basement Ceiling Soundproofing
The following steps outline a comprehensive approach to soundproofing a basement ceiling, incorporating several key elements to maximize sound reduction. It's important to note that local building codes might influence aspects of the installation, so researching these beforehand is crucial.
1.Preparation:
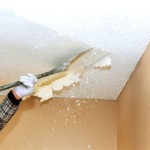
Clear the basement ceiling area and ensure that it is clean and free of any obstructions. Inspect the existing ceiling for any cracks or holes and seal them with acoustic caulk. This step is crucial for preventing sound leaks. Also, address any existing plumbing or electrical issues before proceeding. 2.Install Resilient Channels:
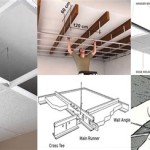
Resilient channels are metal strips that are attached to the ceiling joists and provide a decoupling effect. They reduce sound transmission by isolating the drywall from the joists. Attach the resilient channels perpendicular to the joists, spacing them according to the manufacturer's instructions. 3.Insulation Installation:
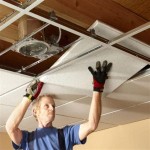
Install insulation between the joists, ensuring it fills the cavities completely. If using fiberglass or mineral wool batts, cut them to fit snugly between the joists. Be careful to avoid compressing the insulation, as this can reduce its effectiveness. If using spray foam, hire a professional installer to ensure proper application and ventilation. 4.Install Mass-Loaded Vinyl (Optional):
For enhanced soundproofing, install mass-loaded vinyl over the insulation. Attach the MLV to the resilient channels using screws or staples, overlapping the seams to create a continuous barrier. Acoustic sealant can further enhance the seal. 5.Drywall Installation:
Install drywall over the resilient channels, being careful not to screw the drywall directly into the joists. This is crucial to maintain the decoupling effect provided by the resilient channels. Use drywall screws specifically designed for resilient channels. 6.Seal Gaps and Cracks:
After the drywall is installed, use acoustic caulk to seal any gaps or cracks around the perimeter of the ceiling and around any penetrations, such as pipes or wires. This step is critical for preventing sound leaks. 7.Finishing Touches:
Apply drywall mud and tape to the seams and screw holes, sand smooth, and paint the ceiling. Consider using a sound-dampening paint for added sound absorption.Addressing Specific Sound Issues
Beyond the general soundproofing steps outlined above, addressing specific sound issues may require additional measures. For example, if impact noise is a particular concern, consider adding a layer of soundproofing underlayment to the floor above the basement. This will help to dampen vibrations and reduce the transmission of impact sounds.
If airborne noise is the primary issue, focus on adding mass and damping to the ceiling assembly. This can be achieved by using denser insulation materials, such as mineral wool or mass-loaded vinyl, and by adding an additional layer of drywall to the ceiling.
Flanking paths, such as sound traveling through walls or HVAC ducts, can also contribute to noise transmission. To address these issues, seal any gaps or cracks in the walls and ducts with acoustic caulk. Consider wrapping HVAC ducts with sound-absorbing material to reduce noise transmission.
Cost Considerations
The cost of soundproofing a basement ceiling can vary significantly depending on the materials used, the size of the ceiling, and whether professional installation is required. Fiberglass insulation is generally the least expensive option, while spray foam and mass-loaded vinyl are more costly. Hiring a professional installer will also add to the overall cost of the project.
Before starting a soundproofing project, it is essential to create a budget and research the cost of different materials and installation options. Consider prioritizing the most effective soundproofing measures within the budget constraints.
While professional installation guarantees better results, DIY installation can significantly reduce labor costs. With proper planning, research, and attention to detail, homeowners can successfully soundproof their basement ceilings.
Maintenance and Long-Term Performance
Once the soundproofing is complete, it is important to maintain the ceiling to ensure long-term performance. Regularly inspect the ceiling for any cracks or gaps and seal them with acoustic caulk. Avoid hanging heavy objects from the ceiling, as this can compromise the decoupling effect of the resilient channels.
Over time, insulation materials can settle or degrade, reducing their effectiveness. Periodically inspect the insulation and replace it if necessary. Proper maintenance will help to ensure that the basement ceiling remains soundproof for years to come.

Nova Basement Remodeling Soundproofing In

Soundproofing Ceilings How To Soundproof A Ceiling

Best Insulation For Soundproofing Your Ceiling Renoviso

Soundproofing A Ceiling Unfinished Basement Ideas Renovations

Soundproofing A Home Work Technical Details Two Teaching S

7 Ways To Soundproof A Ceiling That Really Work Insulation Sound Proofing

How To Soundproof A Basement Ceiling

Bungled Basement Soundproofing The Expert

What To Know About Soundproofing A Basement Ceiling

Soundproofing Basement Insulation Services In Denver Co
Related Posts