How to Take a Light Kit Off a Ceiling Fan
Removing a light kit from a ceiling fan is a common task undertaken for various reasons, including replacing a broken or outdated light fixture, simplifying the fan's aesthetic, or preparing the fan for installation in a space with limited headroom. While the process is generally straightforward, it's crucial to prioritize safety and follow a methodical approach to avoid electrical hazards or damage to the fan. This article provides a step-by-step guide on safely and effectively removing a light kit from a ceiling fan.
Before commencing any work, it is imperative to understand the basic components of a ceiling fan and how the light kit integrates with the overall assembly. The light kit is typically attached to the fan motor housing via screws, clips, or a combination of both. Electrical wiring connects the light kit to the fan's electrical system, allowing it to be controlled by a wall switch or remote control. Understanding these connections is essential for safely disconnecting the wiring without causing damage or creating a safety risk.
The primary tool requirements for this task are relatively simple. A screwdriver (usually Phillips head or flathead, depending on the screws used), a ladder for safe access, and a pair of wire strippers/cutters are essential. A voltage tester is strongly recommended to ensure the power is completely off before handling any wiring. Safety glasses are important to protect eyes from falling dust or debris. Work gloves are recommended for added grip and protection. Having these tools readily available will streamline the process and enhance safety.
Ensuring Safety First: Power Disconnection
The most critical aspect of removing a light kit from a ceiling fan is ensuring electrical safety. Failure to properly disconnect the power can result in severe electric shock or electrocution. Before commencing any work, the power to the ceiling fan must be completely shut off at the circuit breaker. Locate the circuit breaker that controls the ceiling fan's power supply within the electrical panel. Flip the switch to the "off" position. It is a good practice to tape a note on the breaker indicating that work is in progress to prevent someone from accidentally turning the breaker back on.
After switching off the breaker, it's crucial to verify that the power is indeed off. This is where a voltage tester comes in. Carefully touch the voltage tester to the wires within the light kit housing. If the tester indicates any voltage, double-check that the correct breaker has been switched off. In some cases, a ceiling fan may be connected to multiple circuits. Repeat the process of switching off breakers and testing until the voltage tester confirms that no power is present. Only when you are absolutely certain that the power is off should you proceed with any further steps.
It's also advisable to have someone else present while working on electrical projects, particularly when dealing with ceiling fans that may be located in difficult-to-reach areas. Having a second person available can provide assistance, monitor the area for safety, and act as a point of contact in case of an emergency.
Detaching the Light Kit
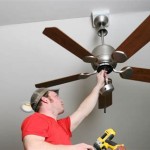
Once the power is safely disconnected, the physical removal of the light kit can begin. The specific steps involved will vary depending on the design of the ceiling fan and the type of light kit installed. However, the general procedure involves the following steps:
First, carefully examine the light kit to identify how it is attached to the fan motor housing. Most light kits are secured with screws, clips, or a combination of both. The location of these fasteners may vary depending on the model. Look for screws around the perimeter of the light kit or hidden beneath decorative covers. Some light kits may have clips that need to be released using a screwdriver or by hand.
Using the appropriate screwdriver, carefully remove all screws that secure the light kit to the fan motor housing. As you remove the screws, support the light kit with your other hand to prevent it from falling and causing damage. For light kits secured with clips, gently pry the clips open using a screwdriver or your fingers. Be careful not to break the clips or damage the surrounding components. Some clips may require a specific technique to release, so consult the fan's manual if available.
With the screws and clips removed, the light kit should now be detached from the fan motor housing. Gently lower the light kit, taking care not to strain the electrical wires that connect it to the fan. If the light kit is heavy, ask a helper to assist you with lowering it safely.
Disconnecting the Wiring
After detaching the light kit from the fan motor housing, the next step is to disconnect the electrical wiring. This involves carefully separating the wires that connect the light kit to the fan's electrical system. Before disconnecting any wires, it's a good idea to take a photograph of the wiring configuration. This will serve as a reference if you ever need to reconnect the light kit or install a new one. Pay attention to the colors of the wires and how they are connected.
Typically, the wires are connected using wire connectors (also known as wire nuts). These connectors are small plastic caps that twist onto the ends of the wires to create a secure electrical connection. To disconnect the wires, gently untwist the wire connectors. Some connectors may be tight, so you may need to use pliers to grip them firmly. As you untwist the connectors, be careful not to damage the wires.
Once the wire connectors are removed, separate the wires. In most cases, the wires will be color-coded: black (hot), white (neutral), and green or bare copper (ground). Separate the wires carefully, ensuring that they do not come into contact with each other or any metal parts of the fan. After separating the wires, use wire strippers to expose a small amount of bare wire on the ends of each wire. This will allow you to securely connect the wires to wire connectors later on (if needed for future use or if installing a cover plate).
After exposing the bare wire, cover each wire end with an individual wire connector. This is a crucial step to prevent accidental electrical shorts and ensure safety. Twist the wire connectors tightly onto the ends of the wires to create a secure and insulated connection. At this point, the light kit will be completely disconnected from the fan, and it is now safe to remove and store the light kit or dispose of it properly according to local regulations.
Once the light kit is removed and the wires are safely capped, it is necessary to address the opening in the fan motor housing where the light kit was attached. Leaving this opening exposed can create a safety hazard and allow dust and debris to enter the fan motor. The most common solution is to install a cover plate. These cover plates are designed to fit over the opening and provide a clean and finished look. Cover plates are usually available at hardware stores and home improvement centers. Select a cover plate that is compatible with your ceiling fan model and matches the fan's finish. Follow the manufacturer's instructions to install the cover plate securely.
By following these detailed steps, individuals can safely and effectively remove a light kit from a ceiling fan, enhancing the fan's appearance and functionality while prioritizing electrical safety.

How To Remove A Ceiling Fan Temecula Handyman

How To Remove A Ceiling Fan The Home Depot

Removing Light Kit From Ceiling Fan Tiktok Search

Removing Light Kit From Ceiling Fan Tiktok Search

Light Kit For Ball Ceiling Fan Ca Modern Home

Hunter Apex Led 52 Reversible Blade Ceiling Fan Costco

Hampton Bay Midili 44 In Indoor Led Gilded Espresso Dry Rated Ceiling Fan With 5 Reversible Blades Light Kit And Remote Control 68100 The Home Depot

Brisa 56 Inch 5 Blade Smart Ceiling Fan With Led Light Kit Remote Co

Espear 60 Inch 5 Blade Smart Ceiling Fan With Led Light Kit Remote

Ceiling Fans With Lights Led Small Large Hunter Fan
Related Posts