```html
Installing Ceiling Fans on Sloped Walls: A Comprehensive Guide
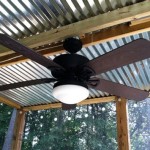
Installing a ceiling fan on a sloped ceiling presents a unique set of challenges compared to a standard, flat ceiling installation. The primary concern is ensuring the fan hangs level and operates safely. Without proper adaptation, a fan installed directly on a sloped ceiling will wobble, potentially causing damage to the fan, the ceiling structure, and posing a safety hazard. This article provides a detailed guide on how to successfully install a ceiling fan on a sloped wall, addressing the necessary preparations, tools, and techniques.
Before undertaking any electrical work, it's paramount to prioritize safety. This begins by switching off the power to the circuit at the breaker box. Verify the power is off using a non-contact voltage tester. Neglecting this step can lead to severe electrical shock. It is highly recommended to consult with a qualified electrician if unfamiliar with electrical wiring or any part of the installation process. Additionally, wearing appropriate safety glasses is crucial to protect the eyes from falling debris during the installation.
Key Point 1: Assessing the Slope and Selecting the Appropriate Mounting Hardware
The first step in this process entails evaluating the ceiling’s slope. This measurement, expressed as an angle in degrees, directly dictates the type of mounting hardware required. A shallow slope may only necessitate a sloped ceiling adapter, while steeper slopes often require a downrod specifically designed for angled installations. Accurately determining the slope is therefore a critical factor.
There are several methods to measure the ceiling slope. A simple method involves using a level and a protractor. Hold the level against the ceiling, aligning it horizontally. Then, use the protractor to measure the angle between the level and the ceiling. Alternatively, a digital level with angle measurement capabilities can provide a more precise reading. Another method relies on measuring the rise and run of the slope over a known distance. The arctangent of the rise divided by the run will yield the angle of the slope.
Once the slope is determined, the appropriate mounting hardware can be selected. For slopes up to a certain degree (typically around 15-20 degrees, but always consult the fan manufacturer's instructions), a standard sloped ceiling adapter may suffice. This adapter essentially provides a level base for the fan's mounting bracket. However, for steeper slopes, a longer downrod is necessary to ensure sufficient clearance between the fan blades and the ceiling. The length of the downrod will depend on the angle of the slope and the diameter of the fan blades. The goal is to achieve a minimum clearance as specified by the fan manufacturer to prevent blade strikes.
When selecting a downrod, ensure it is compatible with the specific ceiling fan model being installed. Downrods typically come in various lengths and finishes to match the fan's aesthetics. It is also important to verify that the downrod is rated to support the weight of the fan. Overloading the downrod can lead to failure and potential hazards.
Key Point 2: Preparing the Electrical Box and Wiring
The existing electrical box must be capable of supporting the weight and movement of the ceiling fan. Standard light fixture boxes are often not sufficient. If a standard box is present, it must be replaced with a fan-rated electrical box specifically designed to handle the dynamic load of a rotating fan.
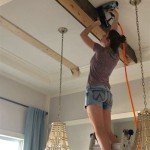
These fan-rated boxes are typically constructed from heavier gauge metal and are securely mounted to the ceiling joist using screws and bracing. Accessing the attic space above the ceiling provides the best opportunity to properly secure the box. Reinforcing with additional lumber is sometimes necessary to provide a solid mounting surface. Ensure the box is flush with the finished ceiling surface to avoid any gaps or unevenness when installing the fan.
Once the box is securely installed, the wiring needs to be inspected. Ensure the wiring is in good condition, free from damage or fraying. The standard wiring configuration includes a black (hot) wire, a white (neutral) wire, and a green or bare copper (ground) wire. If the wiring is old or damaged, it should be replaced by a qualified electrician. Connect the fan wiring to the house wiring using appropriately sized wire connectors, ensuring a secure and tight connection. Follow the fan manufacturer's wiring diagram precisely. Improper wiring can result in malfunction, electrical shock, or fire.
In some installations, a separate wire may be present for controlling a light kit on the fan. In this case, a multi-position switch may be required to independently control the fan and the light. Understanding the existing wiring configuration is key to ensuring the fan operates as intended.
Key Point 3: Installing the Mounting Bracket and Downrod Assembly
The mounting bracket is the interface between the electrical box and the fan itself. It usually attaches to the electrical box using screws. Ensure the bracket is securely fastened and level. If using a sloped ceiling adapter, install it onto the mounting bracket according to the manufacturer's instructions.
Next, assemble the downrod onto the fan motor housing. This typically involves sliding the downrod through the fan canopy and connecting the wiring from the fan motor to the wiring within the downrod. Secure the downrod to the motor housing using the provided hardware, ensuring it is properly tightened. Leave sufficient wire slack to make connections in the electrical box easier.
Carefully lift the fan motor assembly with the downrod attached and slide it into the mounting bracket. Many mounting brackets feature a ball-and-socket joint that allows the fan to hang freely and self-level. Ensure the ball is properly seated in the socket and that the safety cable (if provided) is securely attached to the ceiling joist. This safety cable provides an extra layer of security in case the downrod or mounting bracket fails.
Connect the wiring from the downrod to the house wiring in the electrical box, matching the colors carefully. Use wire connectors to ensure secure connections. Tuck the wires neatly into the electrical box, being careful not to pinch or damage them. Install the fan canopy over the mounting bracket, concealing the wiring and the electrical box. Secure the canopy with the provided screws.
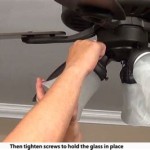
Finally, install the fan blades according to the manufacturer's instructions. Ensure all screws are tightened securely. Test the fan operation at different speeds to ensure it is running smoothly and without excessive wobbling. If wobbling is present, use the balancing kit provided with the fan to adjust the blade weights. This usually involves attaching small weights to the fan blades until the wobble is eliminated. If a light kit is included, install it according to the manufacturer's instructions and test its operation.
Throughout the entire installation process, consulting the fan manufacturer's instructions is crucial. These instructions provide specific details and recommendations for the particular fan model being installed. Deviating from these instructions can void the warranty and potentially create unsafe conditions.
Regular maintenance is important for ensuring long-term safe and efficient operation of the ceiling fan. This includes periodically checking the tightness of screws and connections, cleaning the fan blades to remove dust and debris, and lubricating the motor as needed. Addressing any issues promptly can prevent more serious problems from developing over time. Professional assistance should be sought for any electrical troubleshooting or repairs beyond the scope of basic maintenance.
```
Mounting Ceiling Fan On Sloped Home Improvement Stack Exchange

How To Choose A Ceiling Fan For Vaulted Ceilings Lightology

Ensuring Proper Ceiling Fan Installation With Vaulted Ceilings

Electrical Mount Ceiling Fan At The Peak Of A Sloped Home Improvement Stack Exchange

Vaulted Sloped Ceiling Adapter For Modern Fan Company Fans

How To Choose A Ceiling Fan For Vaulted Ceilings Lightology

How To Choose A Ceiling Fan For Vaulted Ceilings Lightology

Hunter Fans How To Install Your Ceiling Fan Cpo

Ceiling Fans For Vaulted Ceilings Downrod

Install Ceiling Fan On Sloped Simple Modern Handmade Home
Related Posts