Cover Popcorn Ceiling With Tiles: An Easy DIY Project for Home
Popcorn ceilings, a common feature in homes built from the mid-20th century until the 1980s, are often regarded as outdated and aesthetically unappealing. While removal is an option, it can be a messy and time-consuming process, potentially releasing asbestos fibers if the ceiling was installed before the late 1970s. Covering a popcorn ceiling with tiles presents a simpler, cleaner, and often more cost-effective alternative. This method allows homeowners to modernize their interiors without the extensive labor and potential health risks associated with popcorn ceiling removal.
This article will provide a detailed guide on how to cover a popcorn ceiling with tiles, transforming the room's appearance while encapsulating the existing texture. The process involves careful preparation, material selection, and precise installation, all of which will be explained in a step-by-step manner. By following these instructions, homeowners can achieve a professional-looking result, adding value and visual appeal to their residence.
Key Considerations Before Starting Your Tiling Project
Before embarking on the tiling project, several crucial factors must be evaluated to ensure its success. Neglecting these considerations can lead to unforeseen complications and unsatisfactory results. These factors encompass the structural integrity of the existing ceiling, the potential presence of asbestos, and the overall impact on the room's dimensions.
Firstly, assessing the ceiling's structural soundness is paramount. The added weight of the tiles and adhesive will place a significant load on the existing structure. If the ceiling shows signs of water damage, sagging, or cracking, it is essential to address these issues before proceeding. Consult with a qualified professional to evaluate the structural integrity and recommend necessary repairs. Ignoring pre-existing weaknesses can result in ceiling collapse, posing a serious safety hazard.
Secondly, determining whether the popcorn ceiling contains asbestos is absolutely crucial. Asbestos was a common component in building materials, including popcorn ceilings, prior to the late 1970s. Disturbing asbestos-containing materials can release harmful fibers into the air, leading to severe respiratory illnesses. If you suspect the presence of asbestos, it is imperative to have the ceiling professionally tested by a certified asbestos inspector. If asbestos is confirmed, removal or encapsulation should only be performed by licensed asbestos abatement professionals. Attempting to remove or cover an asbestos-containing ceiling without proper training and equipment is extremely dangerous and illegal in many jurisdictions. Covering with tiles can be a safe option if performed without disturbing the popcorn texture.
Thirdly, one must consider the impact of the added thickness on the room's overall dimensions. Adding tiles to the ceiling will reduce the room's height, albeit potentially only slightly. This can be particularly important in rooms with already low ceilings. Measure the existing ceiling height and factor in the thickness of the tiles and adhesive to determine the final ceiling height. Ensure that the reduction in height will not create any issues with door clearances, lighting fixtures, or overall room aesthetics. In very low rooms, consider thinner tile options or alternative methods of ceiling treatment.
Materials and Tools Required for Tiling a Popcorn Ceiling
The successful completion of this DIY project relies heavily on having the right tools and materials readily available. Choosing high-quality materials and using appropriate tools will not only simplify the process but also ensure a long-lasting and aesthetically pleasing outcome. The following is a comprehensive list of essential items:
Tiles: A variety of tile options are suitable for covering popcorn ceilings, including lightweight PVC tiles, polystyrene tiles, and even thin cork tiles. The choice depends on personal preference, budget, and the desired aesthetic. Consider factors such as weight, moisture resistance, ease of cutting, and fire rating when selecting tiles. Purchase slightly more tiles than needed to account for cuts and potential breakage.
Adhesive: Using a construction adhesive specifically designed for adhering tiles to ceilings is crucial. Ensure the adhesive is compatible with both the tiles and the existing popcorn ceiling texture. Some adhesives may require priming the ceiling surface before application. Read the manufacturer's instructions carefully and select an adhesive with strong initial grab and long-term bonding strength. Avoid using general-purpose adhesives, as they may not provide sufficient adhesion and can lead to tiles detaching from the ceiling.
Measuring Tools: Accurate measurements are essential for achieving a professional-looking result. A measuring tape, laser level, and straight edge are necessary for marking guidelines and ensuring tiles are aligned properly. A chalk line can be used to create straight, visible lines on the ceiling.
Cutting Tools: Depending on the type of tiles chosen, different cutting tools may be required. Utility knife for cutting lightweight PVC or polystyrene tiles. For thicker or more rigid tiles, a tile cutter or even a fine-toothed saw may be necessary. Always wear appropriate safety glasses when cutting tiles.
Application Tools: A caulking gun is required for applying the adhesive. Ensure the caulking gun is compatible with the adhesive cartridge. A notched trowel may be necessary for spreading the adhesive if recommended by the adhesive manufacturer. A sponge and bucket of water will be useful for cleaning up any adhesive spills or smudges.
Safety Equipment: Personal safety should always be a top priority. Safety glasses are essential for protecting the eyes from debris during cutting and installation. A dust mask or respirator should be worn, especially if there is any concern about asbestos. Gloves will protect hands from adhesive and sharp edges. A sturdy ladder or scaffolding is necessary for reaching the ceiling safely.
Step-by-Step Installation Guide for Ceiling Tiles
The installation process requires meticulous attention to detail and adherence to proper techniques. Following these steps will ensure a structurally sound and aesthetically pleasing finished product. The key to success lies in careful planning, accurate measurements, and patient execution.
Preparation: Begin by thoroughly cleaning the popcorn ceiling to remove any dust, dirt, or loose particles. This will improve the adhesion of the adhesive. Use a brush or vacuum cleaner with a soft brush attachment to avoid damaging the popcorn texture. If the ceiling is painted with glossy paint, lightly sand the surface to create a better bonding surface. Repair any cracks or imperfections in the ceiling before proceeding.
Planning and Layout: Before applying any adhesive, plan the layout of the tiles. Start by finding the center of the ceiling and marking it with chalk lines running perpendicular to each other. This will serve as a reference point for aligning the tiles. Dry-fit the tiles to determine the best placement and ensure that border tiles will be evenly sized. Avoid ending up with narrow strips of tile along the edges of the ceiling, as this can look unprofessional. Adjust the starting point if necessary to achieve a balanced layout.
Applying Adhesive: Apply the adhesive to the back of each tile according to the manufacturer's instructions. Typically, this involves applying a bead of adhesive around the perimeter of the tile and a few dots in the center. Avoid using excessive adhesive, as this can cause the tiles to slide or sag. Some adhesives may require a short waiting period before the tile is applied to the ceiling. Check the adhesive instructions for specific drying times.
Installing Tiles: Press each tile firmly against the popcorn ceiling, aligning it with the chalk lines. Apply even pressure to ensure good contact between the tile and the ceiling. Hold the tile in place for a few seconds to allow the adhesive to grab. Use a level to ensure that the tiles are properly aligned. If necessary, use shims or spacers to maintain consistent spacing between tiles. Work in small sections, applying adhesive to only a few tiles at a time to prevent the adhesive from drying out.
Cutting Tiles: When reaching the edges of the ceiling, measure and cut the tiles to fit using the appropriate cutting tool. Ensure the cuts are clean and precise for a professional appearance. Use a utility knife with a sharp blade for cutting lightweight tiles. For thicker tiles, a tile cutter or saw may be necessary. Always wear safety glasses when cutting tiles. If the edges of the ceiling are uneven, use a template to create accurate cuts.
Finishing Touches: Once all the tiles are installed, inspect the ceiling for any gaps or imperfections. Fill any gaps with caulk that matches the color of the tiles. Wipe away any excess adhesive or caulk with a damp sponge. Allow the adhesive to dry completely according to the manufacturer's instructions before painting or decorating the room. Consider adding decorative moldings or trim around the perimeter of the ceiling to conceal any uneven edges and create a more finished look. Proper ventilation during the drying process is essential.
By following these detailed instructions, homeowners can successfully transform their popcorn ceilings with tiles, creating a modern and visually appealing space while avoiding the mess and potential hazards of popcorn ceiling removal.

How To Cover Popcorn Ceiling 8 Creative Ways Making Maanita

How To Cover Popcorn Ceilings With Beadboard Step By Guide Shoe Makes New

Diffe Ways To Cover Popcorn Ceilings

How To Cover Popcorn Ceiling 8 Creative Ways Making Maanita

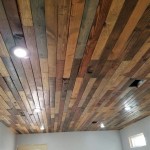
How To Plank A Popcorn Ceiling

Say Goodbye To Messy Popcorn Ceilings Diy Guide Covering With Glue Up Ceiling Tiles

How To Cover Popcorn Ceilings With Beadboard Step By Guide Shoe Makes New

Decorative Ideas To Cover Popcorn Ceilings Artsy Rule

8 Genius Ways To Cover A Popcorn Ceiling Without Removing It Bless Er House

Cover Popcorn Ceilings Armstrong Residential
Related Posts