How To Replace a Ceiling Fan In a Vaulted Ceiling
Replacing a ceiling fan, especially one situated on a vaulted ceiling, presents a unique set of challenges compared to a standard flat ceiling installation. The sloped angle requires specific mounting hardware and techniques to ensure stability and proper function. The following guide provides a comprehensive overview of the process, from preparation to the final check, emphasizing safety and adherence to electrical codes.
Before initiating any electrical work, ensure that the power supply to the circuit controlling the ceiling fan is completely disconnected. Locate the appropriate circuit breaker in the electrical panel and switch it to the "Off" position. To verify that the power is indeed off, use a non-contact voltage tester on the wires connected to the fan. This step is crucial to prevent electric shock.
Gather the necessary tools and materials. These typically include: a new ceiling fan designed for vaulted ceilings, a screwdriver set (including Phillips head and flathead), wire strippers, wire connectors (wire nuts), electrical tape, a ladder suitable for reaching the ceiling, a voltage tester, safety glasses, work gloves, and potentially a drill with appropriate drill bits depending on the mounting requirements.
Removing the Existing Ceiling Fan
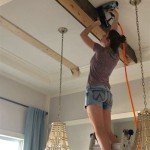
The initial step involves safely removing the existing ceiling fan. This should be approached methodically to avoid damage and prevent accidental falls.
Begin by removing the light fixture, if present. This usually involves unscrewing a globe or shade and then disconnecting the wiring. Carefully note the wire connections before disconnecting them, typically consisting of a white (neutral) wire, a black (hot) wire, and a green or bare copper (ground) wire. Use wire connectors to temporarily isolate the wires individually after disconnection to prevent accidental contact.
Next, detach the fan blades. These are usually attached with screws to the fan motor housing. Store the blades securely to prevent damage during the remaining removal process.
The motor housing is typically attached to a mounting bracket that is secured to the electrical junction box in the ceiling. Depending on the fan model, this may involve loosening screws, removing a securing pin, or rotating the fan housing to disengage it from the bracket. Again, support the fan housing while detaching it to prevent it from falling.
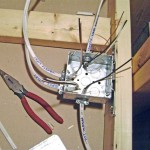
Once the fan housing is detached, carefully lower it, exposing the wiring connections to the junction box. Disconnect the wires, again noting the connections. Use wire connectors to temporarily isolate each wire. The existing mounting bracket should now be visible. Remove the screws securing the bracket to the junction box. Take note of the type of junction box used; it should be one rated for ceiling fan installation. If the existing junction box is not rated for ceiling fans, it will need replacing, which can involve additional steps including accessing the attic space.
Preparing for Installation of the New Fan
Before installing the new fan, verify that the electrical box is rated for the weight of the fan. This is typically indicated on the box itself. Ceiling fan-rated boxes are designed to withstand the dynamic forces created by the fan's rotation. If the existing box is not rated, it must be replaced with a fan-rated box. Replacing the electrical box can be a complex task and may require professional assistance.
Inspect the wiring. Ensure that the wires are in good condition, with no frayed or damaged insulation. If any damage is present, the wires should be replaced or repaired by a qualified electrician.
Many vaulted ceiling fan installations require a downrod, which is a metal extension that hangs the fan lower from the ceiling. The length of the downrod depends on the height of the ceiling and the desired fan height. Select a downrod of appropriate length to ensure adequate airflow and clearance. Follow the manufacturer’s instructions for attaching the downrod to the fan motor.
Many fans designed for vaulted ceilings come with a special mounting bracket that is angled to compensate for the slope of the ceiling. This ensures that the fan hangs vertically and operates correctly. If the new fan comes with such a bracket, install it securely to the junction box, using screws that are appropriate for the box and can adequately support the weight of the fan. Ensure the bracket is properly aligned with the slope of the ceiling.
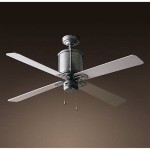
Installing the New Ceiling Fan
With the mounting bracket securely in place and the downrod attached to the fan motor, the next step is to carefully lift the fan motor and attach it to the bracket. This often involves aligning the downrod with a receiver on the bracket and then securing it with a locking pin or screws. Make sure the fan is securely attached before releasing it.
Connect the wiring. Match the wires from the fan to the wires from the electrical box. Typically, this involves connecting the white (neutral) wire from the fan to the white wire from the box, the black (hot) wire from the fan to the black wire from the box, and the green or bare copper (ground) wire from the fan to the corresponding ground wire in the box. Use wire connectors to securely join the wires. Wrap the wire connectors with electrical tape for added security and insulation.
Carefully tuck the wires into the junction box, ensuring that they are not pinched or damaged. Arrange them so that they do not interfere with the fan's operation.
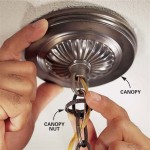
Attach the canopy, which is the decorative cover that conceals the wiring and mounting bracket. The canopy usually attaches to the bracket with screws or a twist-lock mechanism. Secure the canopy tightly to provide a finished look and protect the wiring.
Attach the fan blades. Each blade usually attaches to the motor housing with screws. Ensure that the blades are properly aligned and securely tightened. Follow the manufacturer's instructions for the correct blade orientation, as this can affect the fan's performance.
Install the light fixture, if applicable. Connect the light fixture wiring according to the manufacturer's instructions. This typically involves connecting the white (neutral) wire, the black (hot) wire, and the ground wire. Secure the light fixture to the fan motor housing.
Final Checks and Operation
Before restoring power, visually inspect all connections and components to ensure that everything is securely attached and properly aligned. Double-check that all screws are tightened and that no wires are exposed.
Restore power to the circuit by switching the circuit breaker back to the "On" position.
Test the fan's operation. Verify that the fan turns on and off without any unusual noises or vibrations. Test all speed settings. If the fan has a light fixture, test the light to ensure it is functioning correctly.
If the fan wobbles excessively, it may need balancing. Many ceiling fans come with a balancing kit that includes small weights that can be attached to the blades to correct imbalances. Follow the instructions that come with the balancing kit to balance the fan.
If any problems arise during installation or operation, such as sparks, unusual noises, or excessive wobbling, immediately turn off the power and consult a qualified electrician. Attempting to troubleshoot complex electrical issues without proper knowledge and training can be dangerous.
Dispose of the old ceiling fan responsibly. Many recycling centers accept electrical appliances. Check with local recycling facilities for instructions on proper disposal.
Keep the manufacturer's instructions for the new ceiling fan in a safe place for future reference. These instructions contain valuable information about maintenance, troubleshooting, and warranty information.

Ensuring Proper Ceiling Fan Installation With Vaulted Ceilings

How To Install Vaulted Ceiling Fan

How To Install A Ceiling Fan On Sloped Lemon Thistle

How To Choose A Ceiling Fan For Vaulted Ceilings Lightology

How To Choose A Ceiling Fan For Vaulted Ceilings Lightology

How To Install A Ceiling Fan On Sloped Lemon Thistle

How To Install A Ceiling Fan On Sloped Lemon Thistle

How To Install A Ceiling Fan On Sloped Ehow

How To Install A Ceiling Fan On Cathedral Ask This Old House

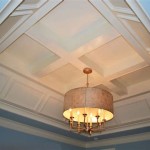
Image Result For How To Install A Fan On Vaulted Ceiling Beams Treatments
Related Posts