Board and Batten Ceiling: A Comprehensive Guide to Designing
Board and batten ceilings offer a distinctive architectural detail, adding texture, dimension, and visual interest to any room. This design element, traditionally used for exterior siding, has gained popularity in interior design, particularly for ceilings, due to its versatility and aesthetic appeal. This article aims to provide a comprehensive guide to designing with board and batten ceilings, covering various aspects from design considerations and material selection to installation techniques and stylistic applications.
Board and batten ceilings are characterized by vertical boards (the boards) spaced evenly apart, with narrower strips of wood (the battens) covering the seams where the boards meet. The resulting pattern creates a visually engaging surface that can complement a wide variety of interior design styles, from rustic farmhouse to modern minimalist.
Understanding the Design Principles of Board and Batten Ceilings
The successful implementation of a board and batten ceiling relies on a thorough understanding of its design principles. Key considerations include board and batten dimensions, spacing between boards, orientation, and the overall impact on the room's proportions and lighting.
Board and Batten Dimensions: The width and thickness of the boards and battens significantly influence the aesthetic of the ceiling. Wider boards create a more pronounced and traditional look, while narrower boards offer a more subtle and modern feel. Common board widths range from 4 to 8 inches, while battens typically measure 1 to 3 inches wide. The thickness of both boards and battens should be sufficient to ensure structural stability and prevent warping. A common thickness is ¾ inch, but can be adjusted depending on span and material.
Spacing Between Boards: The spacing between the boards is a critical design element that affects the overall visual impact. Wider spacing emphasizes the individual boards and creates a more open and airy feel, while narrower spacing results in a busier and more textured surface. The optimal spacing depends on the board width, ceiling height, and desired aesthetic. A common range for spacing is between 4 and 8 inches.
Orientation: While vertical orientation is the most common for board and batten, the boards can also be installed horizontally or diagonally to create unique and eye-catching designs. Horizontal boards can visually widen a narrow room, while diagonal boards add a sense of dynamism and movement. The chosen orientation should complement the room's dimensions and overall design scheme.
Impact on Proportions and Lighting: Board and batten ceilings can visually alter the perceived proportions of a room. Vertical boards can make a low ceiling appear higher, while horizontal boards can make a narrow room seem wider. The texture and depth of the board and batten pattern also affect the way light is reflected and distributed within the room. It's important to consider the placement of lighting fixtures and the overall lighting scheme to ensure that the board and batten ceiling enhances the room's ambiance.
Material Selection for Board and Batten Ceilings
The choice of material is a crucial factor in determining the appearance, durability, and cost of a board and batten ceiling. Common materials include wood, MDF (Medium-Density Fiberboard), and PVC (Polyvinyl Chloride). Each material offers distinct advantages and disadvantages in terms of aesthetics, cost, maintenance, and installation.
Wood: Wood offers a natural and authentic look, with a wide variety of species available to suit different aesthetic preferences and budgets. Pine, cedar, and oak are popular choices for board and batten ceilings. Wood provides a warm and inviting feel and can be stained or painted to match the interior décor. However, wood is susceptible to moisture damage and requires proper sealing and maintenance to prevent warping, cracking, and rot. Solid wood is generally more expensive than MDF and PVC.
MDF (Medium-Density Fiberboard): MDF is a manufactured wood product made from wood fibers and resin. It is a cost-effective alternative to solid wood, offering a smooth and uniform surface that is ideal for painting. MDF is less prone to warping and cracking than solid wood, but it is also more susceptible to moisture damage. MDF is a good choice for board and batten ceilings in dry environments, but it should be sealed properly to prevent moisture absorption.
PVC (Polyvinyl Chloride): PVC is a synthetic plastic material that is waterproof, durable, and low-maintenance. PVC board and batten are resistant to moisture, rot, and insects, making them a suitable option for bathrooms, kitchens, and other areas exposed to humidity. PVC is also lightweight and easy to install. However, PVC lacks the natural beauty of wood and may not be suitable for all design styles. It is also generally more expensive than MDF.
When selecting materials, it is also essential to consider the potential for expansion and contraction due to temperature and humidity changes. This is particularly important for wood, which can expand and contract significantly with changes in moisture content. Leaving small gaps between the boards and battens can help accommodate this movement and prevent warping or buckling.
Installation Techniques for Board and Batten Ceilings
The installation of a board and batten ceiling requires careful planning and execution to ensure a professional and long-lasting result. The process typically involves preparing the ceiling surface, installing the boards, attaching the battens, and finishing the surface. Safety precautions should be observed throughout the installation process, including wearing appropriate protective gear and using power tools safely.
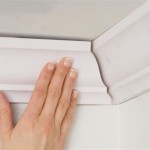
Preparing the Ceiling Surface: Before installing the board and batten, the existing ceiling surface must be clean, level, and structurally sound. Any loose paint, wallpaper, or debris should be removed. If the ceiling is uneven, it may be necessary to install furring strips to create a level surface. Furring strips are typically installed perpendicular to the direction of the boards, providing a solid base for attachment.
Installing the Boards: The boards are typically attached to the ceiling using nails, screws, or construction adhesive. The first board should be installed along a straight line, ensuring that it is aligned with the room's dimensions. Subsequent boards should be installed parallel to the first board, maintaining the desired spacing between them. A level and measuring tape should be used to ensure that the boards are straight and evenly spaced. If using nails or screws, countersink the fasteners and fill the holes with wood filler.
Attaching the Battens: Once the boards are installed, the battens are attached over the seams where the boards meet. The battens should be centered over the seams and securely fastened to the boards. Nails, screws, or construction adhesive can be used to attach the battens. Again, countersinking and filling fastener holes are recommended for a smooth finish.
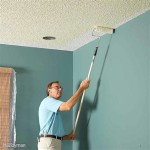
Finishing the Surface: After the boards and battens are installed, the surface can be finished with paint, stain, or a clear sealant. If painting, apply a primer coat to ensure proper adhesion and coverage. Apply multiple coats of paint, allowing each coat to dry completely before applying the next. If staining, choose a stain color that complements the interior décor. Apply the stain evenly and wipe off any excess. A clear sealant can be applied to protect the surface from moisture and wear. Proper ventilation is crucial when applying paints, stains, and sealants.
Careful consideration should be given to the placement of electrical wiring and lighting fixtures during the installation process. Wiring should be properly concealed and protected, and lighting fixtures should be securely mounted to the ceiling structure.
The structural integrity of the existing ceiling should be evaluated before installing a board and batten ceiling. If the ceiling is weak or damaged, it may be necessary to reinforce it before adding the additional weight of the board and batten.
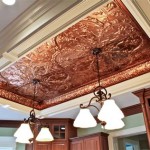
Stylistic Applications of Board and Batten Ceilings
Board and batten ceilings are versatile and can be adapted to a wide range of interior design styles. From traditional farmhouse to contemporary minimalist, board and batten ceilings can add character and visual interest to any space. The key is to choose the right materials, dimensions, and finishes to complement the overall design scheme.
Farmhouse Style: In farmhouse-style interiors, board and batten ceilings evoke a sense of rustic charm and authenticity. Wide boards with a natural wood finish or a whitewashed paint create a warm and inviting atmosphere. Exposed beams and vintage lighting fixtures can further enhance the farmhouse aesthetic.
Modern Minimalist: In modern minimalist interiors, board and batten ceilings can add subtle texture and dimension without overwhelming the space. Narrow boards with a clean, white paint or a light gray stain create a sleek and understated look. Simple, recessed lighting fixtures complement the minimalist aesthetic.
Coastal Style: In coastal-style interiors, board and batten ceilings evoke a sense of breezy relaxation and seaside charm. Light-colored wood or painted finishes in shades of white, blue, or gray create a calming and refreshing atmosphere. Shiplap walls, nautical accents, and natural fiber rugs further enhance the coastal aesthetic.
Transitional Style: Transitional style blends traditional and modern elements, creating a balanced and sophisticated look. Board and batten ceilings in transitional interiors can be adapted to suit a variety of design preferences. A combination of wide and narrow boards with a neutral paint color or a subtle stain can create a timeless and elegant look.
The use of color plays a significant role in the stylistic impact of a board and batten ceiling. Light colors tend to brighten a space and make it feel larger, while dark colors add depth and create a more intimate atmosphere. The choice of color should complement the wall color, flooring, and furniture.

Floor To Ceiling Board And Batten Micheala Diane Designs

Diy Board And Batten Accent Wall Angela Marie Made

Diy Board And Batten Walls Jenna Sue Design

Board And Batten Tutorial Love Grows Wild

Diy Board And Batten Accent Wall Angela Marie Made

Board And Batten Tutorial Love Grows Wild

The Est And Easiest Diy Board Batten Part One

Diy Board And Batten Wall

Board And Batten Dining Room Progress Diy Playbook

3 Ways To Use Board And Batten Siding On Exteriors Diamond Kote System
Related Posts