How to Install Wood Beadboard Ceiling
A wood beadboard ceiling can add a touch of rustic charm and elegance to any room. It is a popular choice for kitchens, bathrooms, and bedrooms, and can even be used in living rooms and hallways. Installing a wood beadboard ceiling can be a DIY project for those with basic carpentry skills. This article will guide you through the process, providing step-by-step instructions for a successful installation.
Prepare the Ceiling
Before installing beadboard, it is essential to prepare the ceiling properly. Start by removing any existing fixtures, including light fixtures, smoke detectors, or ceiling fans. Next, inspect the ceiling for any cracks, holes, or uneven surfaces. Repair any damage using patching compound or drywall screws. Ensure the ceiling is smooth and level for a seamless beadboard installation.
After repairs, apply a primer to the ceiling. This will help the beadboard adhere better and create a more uniform finish. Allow the primer to dry completely before moving on to the next step. For best results, choose a primer specifically designed for wood surfaces.
Install Furring Strips
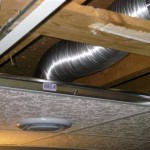
Installing furring strips creates a level surface for the beadboard and provides a solid base for attaching it to the ceiling. The furring strips should be attached to the joists, which are the structural beams that support the ceiling. Make sure the furring strips are level and plumb to ensure the beadboard is installed evenly.
To install the furring strips, use screws or nails long enough to penetrate through the strips and into the joists. Spacing between the strips will dictate the look of the beadboard. For a more traditional look, use a spacing of 16 inches on center. Alternatively, wider spacing can create a more modern aesthetic. Consider the desired effect and choose the spacing accordingly.
Installing the Beadboard
With the furring strips in place, you are ready to install the beadboard panels. These panels are usually sold in 4x8 foot sheets, which are easy to handle and install. Before installing the panels, measure the ceiling and cut the beadboard to size. This allows for a more precise fit and avoids unnecessary waste. Start installing the panels from one corner of the ceiling, working towards the opposite corner.
Attach the beadboard to the furring strips using construction adhesive and finishing nails. Apply a generous amount of adhesive to the back of each panel and nail it into place. Use a nail gun for a fast and efficient installation. For a more traditional look, use finishing nails and a hammer. Be sure to drive the nails slightly below the surface of the wood and cover the holes with wood filler. Once the first row is installed, continue working across the ceiling, ensuring each panel is flush with the previous one. As you reach the end of each row, carefully trim the panels to fit the remaining space.
Finishing Touches
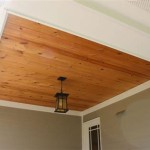
Once the beadboard is installed, it’s time to apply the finishing touches. The beadboard can be painted or stained to match the desired aesthetic. If painting, apply a primer first for better adhesion and coverage. Allow each coat of paint to dry completely before applying the next. If staining, choose a stain that complements the wood’s natural color and grain. Apply the stain evenly, wiping away excess with a clean cloth. This will enhance the wood’s beauty and protect it from moisture and scratches.
Finally, reinstall any removed fixtures, such as light fixtures, smoke detectors, and ceiling fans. Ensure all wiring is properly connected and the fixtures are securely fastened to the ceiling. Take a step back and admire your newly installed wood beadboard ceiling.
Tips for Success
Here are some additional tips to ensure a successful beadboard installation:
- Use a level to ensure the furring strips are installed straight and the panels are aligned properly.
- Pre-drill pilot holes for nails to prevent splitting the beadboard.
- Avoid using a lot of pressure when driving nails to prevent the beadboard from bending or buckling.
- Clean up any excess adhesive or sawdust before painting or staining.
- Allow the beadboard to acclimate to the room temperature for at least 24 hours before installation.
By following these steps and tips, you can install a wood beadboard ceiling that will enhance the look and feel of any room in your home. Remember to prioritize safety and take your time to ensure a quality installation.

How To Install A Beadboard Ceiling Pine And Prospect Home

How To Install A Wood Plank Ceiling Young House Love

Diy Beadboard Ceiling Tutorial Easy And Inexpensive Custom Treatment

How To Install A Beadboard Ceiling Pine And Prospect Home

How To Install A Wood Plank Ceiling Young House Love

How To Install Beadboard Panels On A Ceiling And Why We Ll Never Do It Again The Lake Land

We Added Beadboard To Our Bedroom Ceiling Here S How Chris Loves Julia

How To Install Beadboard Panels On A Ceiling And Why We Ll Never Do It Again The Lake Land

Installing Bead Board Ceiling Sand And Sisal

Beadboard Ceiling For The Downstairs Hallway Blog Homeandawaywithlisa
Related Posts