How to Cut Ceiling Tiles for Recessed Lighting
Recessed lighting, often referred to as "can" lighting, provides a sleek and modern aesthetic while offering efficient and focused illumination. Installing recessed lights in a drop ceiling, typically built with acoustic ceiling tiles, requires precise cutting of the tiles to accommodate the fixtures. This process may seem daunting at first, but with the right tools and technique, it can be accomplished with accuracy and ease.
Essential Tools and Materials
Before starting the cutting process, gather the necessary tools and materials to ensure a smooth and successful installation. The following list outlines the essential items:
- Utility Knife: A sharp utility knife with replaceable blades is essential for precise cutting of the ceiling tiles.
- Measuring Tape: A reliable measuring tape is crucial for accurately measuring the dimensions of the recessed light fixture and marking the tile.
- Pencil: A pencil is used to mark the cutting lines on the ceiling tile, ensuring precise alignment.
- Level: A level is essential for ensuring that the recessed light fixture is installed straight and even in the ceiling.
- Safety Glasses: Protective eyewear is crucial to shield the eyes from flying debris during the cutting process.
- Dust Mask: Wearing a dust mask helps prevent inhaling dust and particles generated while cutting the ceiling tiles.
- Recessed Lighting Fixture: The specific recessed light fixture chosen will determine the size and shape of the opening needed in the ceiling tile.
- Electrical Wire: Suitable electrical wire for connecting the recessed light fixture to the power source is essential.
- Wire Connectors: Wire connectors, commonly known as wire nuts, ensure secure and reliable connections between the electrical wires.
Cutting the Ceiling Tile: Steps and Techniques
Once the tools and materials are gathered, follow these steps to cut the ceiling tile for the recessed light fixture:
- Determine the Cutting Dimensions: Carefully measure the recessed light fixture's dimensions, including the width and length of the mounting plate and the overall diameter of the fixture. Transfer these measurements to the ceiling tile using a pencil, ensuring accuracy and precision.
- Mark the Cutting Lines: Use the pencil to draw clear and distinct cutting lines on the ceiling tile based on the measurements obtained from the fixture. Ensure the lines are perpendicular and aligned correctly.
- Score the Tile: With the utility knife, firmly score along the cutting lines, applying consistent pressure. Scoring the tile creates a weakened area, making it easier to break cleanly along the marked lines.
- Break the Tile: Carefully break the tile along the scored lines, applying gentle pressure with your thumbs. This method reduces the risk of chipping or cracking the tile.
- Clean Up: Once the tile is cut, use a damp cloth or vacuum cleaner to remove any debris or dust. Ensure the cut edges are smooth and free of rough spots to ensure a clean and professional finish.
Tips for Accurate Cutting and Installation
While the above steps outline the general procedure for cutting ceiling tiles, consider these additional tips for a successful installation:
- Use a Sharp Blade: A sharp utility knife blade ensures precise cutting, minimizing chipping or jagged edges. Replace the blade if it becomes dull or worn.
- Cut from the Back Side: When scoring the tile, it is recommended to cut from the back side of the tile. This helps prevent damaging the visible surface during the scoring and breaking process.
- Practice on Scrap Tile: Before cutting the actual ceiling tile, practice on a spare tile to familiarize yourself with the cutting technique and ensure proper alignment.
- Check for Interference: Before cutting the tile, ensure there are no electrical wires, plumbing pipes, or other obstructions in the area where the fixture will be installed.
- Use a Level: To ensure the recessed light fixture is installed level and straight, use a level to guide the fixture’s placement during installation.
- Secure the Fixture: Once the fixture is in place, secure it properly to the ceiling joist using appropriate hardware. Consult the fixture's installation instructions for specific guidance.
- Connect the Wires: Connect the electrical wires from the recessed light fixture to the existing wiring using the wire connectors. Ensure all connections are secure and properly insulated.
- Test the Fixture: After completing the electrical connections, test the fixture to ensure it is functioning correctly. Observe for proper illumination and absence of any flickering or humming sounds.

How To Cut Ceiling Tiles

How To Install Recessed Lights In A Drop Ceiling Temecula Handyman

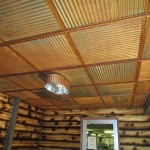
Light Installation In A Ceiling Tile

How To Install Recessed Lighting With Ceilume Ceiling Tiles

Diy Recessed Lighting Installation In A Drop Ceiling Tiles Part 3 Super Nova Adventures

Cut Hole For Recessed Light Easy No Mess Tile Ceiling Fnf589

How To Install Drop Ceiling Tiles Ceilume

Drop Ceiling Tiles Installation Tips Diy Family Handyman

Drop Ceiling Installation How To Install A Homeserve Usa

Install Recessed Lighting
Related Posts