How to Change Lights in a Drop Ceiling
Drop ceilings, also known as suspended ceilings, are a common feature in many commercial and residential spaces. They offer a variety of benefits, including ease of access to utilities, sound absorption, and aesthetic appeal. However, one of the most frequent tasks associated with drop ceilings is changing the lights. Replacing bulbs, fixtures, or even adding new lighting can be a simple process with the right knowledge and tools.
This article will guide you through the steps involved in changing lights in a drop ceiling, covering the necessary tools, safety precautions, and specific considerations depending on the type of light fixture.
1. Gather the Necessary Tools and Materials
Before starting any work, ensure you have the following tools and materials readily available:
- Ladder: A sturdy step ladder or an extension ladder is essential for reaching the ceiling tiles.
- Screwdriver: A variety of screwdrivers will be needed for various screws in the fixture, including Phillips and flathead.
- Wire cutters: These are necessary for cutting any wires if you're replacing the entire fixture.
- Wire strippers: These tools are used to expose the wire ends for proper connection.
- Voltage tester: This is crucial for verifying that the power is off at the breaker before working on the wiring.
- New light bulb or fixture: Ensure you have the correct replacement bulb or fixture in advance. Note the wattage and bulb type if replacing a bulb, and the size and mounting type if replacing a fixture.
- Safety glasses: Always wear eye protection when working with sharp objects or potential debris.
- Gloves: Protect your hands from any sharp edges or potential electrical shock.
2. Safety First: Power Off the Circuit
The most important step is to ensure the power is off to the circuit that supplies the light fixture. This is crucial for preventing electrical shock and ensuring a safe work environment.
- Locate the circuit breaker that controls the lighting circuit. This can usually be found in your electrical panel. Reference the circuit breaker panel labels or use a voltage tester to confirm the correct breaker.
- Switch off the breaker. You can test the power is off using a voltage tester. Make sure the tester doesn't detect any electrical current before touching the fixture.
3. Accessing the Light Fixture
The process of accessing the light fixture will vary depending on the ceiling tile type and fixture design.
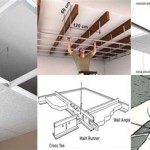
3.1. Removing the Ceiling Tile
For most drop ceilings, you will need to remove the tile directly above the light fixture.
- Locate the ceiling tile: Identify the ceiling tile covering the light fixture.
- Press the tile's edges: Carefully press the edges of the tile inward, releasing the clips that hold it in place.
- Gently lift the tile: Once the clips are released, gently lift the tile downwards and set it aside.
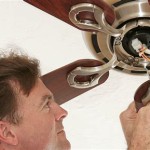
3.2 Accessing the Fixture
Once the ceiling tile is removed, the light fixture should be accessible. If the fixture is recessed, there might be a small access panel or cover that needs to be removed first.
4. Replacing the Light Bulb or Fixture
This step involves the actual replacement of the light bulb or the entire fixture:
4.1. Replacing a Light Bulb
- Unscrew the old bulb: Carefully turn the old bulb counter-clockwise until it detaches from the socket.
- Install the new bulb: Align the new bulb with the socket and screw it in clockwise until it is securely tightened.
- Replace the ceiling tile: Gently lift the tile back into place, ensuring it clicks securely into the surrounding frame.
4.2. Replacing a Light Fixture
Replacing the entire light fixture involves a more involved process:
- Disconnect the wiring: Carefully detach the wires connecting the old fixture to the electrical supply. Note the wire colors as you disconnect them – typically, black wires connect to black wires, white wires to white wires, and ground wires (usually green or bare copper) to the fixture's grounding terminal.
- Remove the old fixture: Once the wires are disconnected, carefully remove the old fixture from its mounting bracket.
- Mount the new fixture: Attach the new fixture to the mounting bracket. This may involve screws or clips, depending on the fixture design.
- Reconnect the wiring: Connect the wires from the new fixture to the electrical supply, matching the wire colors as noted earlier. Be careful to connect the wires securely and avoid any loose connections.
- Test the fixture: Turn the breaker back on and test the new fixture to confirm it is working correctly and all connections are secure.
- Replace the ceiling tile: Gently lift the tile back into place, ensuring it clicks securely into the surrounding frame.
5. Final Steps: Clean Up and Restore Power
Once the light bulb or fixture has been replaced, you can conclude the process by cleaning up the work area and restoring power to the circuit.
- Clean up: Collect any debris or loose screws and dispose of them properly.
- Remove safety equipment: Carefully remove safety glasses and gloves, ensuring you leave the work area free of obstacles.
- Restore power: Turn the breaker back on in the electrical panel, allowing power to flow to the light fixture.
Remember to follow all safety precautions, use appropriate tools, and consult with a qualified electrician if you encounter any difficulties or have any doubts about safety or procedures.

How To Change Downlights Or Recessed Lights In False Ceiling Electrician Singapore Recommended Services

3 Ways To Retrofit Drop Ceiling Lighting Earthtronics

Replacing Drop Ceiling Tiles

How To Install Recessed Lights In A Drop Ceiling Temecula Handyman

Diy A Dropped Ceiling Light Box

How To Change Downlights Or Recessed Lights In False Ceiling Everyworks Singapore 1 Handyman Plumber Electrician Aircon Servicing

How To Replace Recessed Lighting Drop Ceiling Dropped Installing

Diy A Dropped Ceiling Light Box

How To Position Your Led Strip Lights

5 Drop Ceiling Lighting Ideas
Related Posts