How to Replace a Light Bulb in a Hunter Ceiling Fan with a Remote
Replacing a light bulb in a Hunter ceiling fan with a remote control might seem straightforward, but certain nuances can simplify the process and ensure safety. This article provides a comprehensive guide to replacing the light bulb in your Hunter ceiling fan, covering various models and common issues.
Preparing for Light Bulb Replacement
Before beginning the replacement process, gathering the necessary tools and taking safety precautions is crucial. This preparation ensures a smooth and safe experience.
1.
Turn off the power:
The most crucial step is to disconnect the power to the ceiling fan. Turn off the wall switch controlling the fan and, for added safety, turn off the breaker at the electrical panel. This precaution prevents accidental electrocution. 2.Gather necessary tools:
Having the correct tools readily available streamlines the process. Typically, a ladder, a replacement light bulb compatible with the Hunter fan model, and possibly gloves are needed. Some fixtures might require a screwdriver for removing the light kit cover. Having these items on hand avoids interruptions during the process. 3.Identify the bulb type:
Hunter ceiling fans utilize various bulb types, including incandescent, halogen, CFL, and LED. Refer to the fan's manual or look for markings on the existing bulb to determine the correct replacement type. Using the wrong bulb type can lead to incompatibility issues or even damage the fixture. 4.Allow the bulb to cool:
If the bulb was recently on, allow it sufficient time to cool down before handling. Hot bulbs can cause burns. Depending on the bulb type, the cooling period can vary. 5.Prepare the area:
Ensure the area beneath the ceiling fan is clear of obstructions and furniture. This provides a safe and stable working environment and prevents accidents.Accessing the Light Bulb
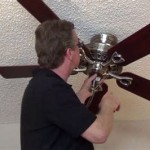
Accessing the light bulb in a Hunter ceiling fan varies depending on the specific model. This section outlines the common methods for accessing the light bulb.
1.
Removing the light kit cover:
Many Hunter ceiling fans have a light kit cover, often made of glass or plastic. This cover may be secured by screws, clips, or a twist-lock mechanism. Carefully examine the cover to determine the method of attachment. Using the appropriate tool, gently detach the cover and set it aside in a safe place. 2.Dealing with globes and shades:
Some models incorporate globes or shades surrounding the light bulb. These may need to be removed to access the bulb. Identify the method of attachment, which might involve unscrewing a finial, releasing clips, or gently pulling the globe downwards. Once removed, store these components safely to avoid damage. 3.Accessing bulbs within enclosed fixtures:
Certain Hunter fan models have enclosed fixtures. These might require specific steps to access the bulb, often detailed in the user manual. Consult the manual for guidance or contact Hunter customer support for assistance.Replacing the Light Bulb
Once the light bulb is accessible, the replacement process is typically straightforward. This section details the steps involved in changing the bulb.
1.
Removing the old bulb:
Carefully grasp the old bulb and rotate it counterclockwise to loosen it from the socket. If the bulb is resistant, try using a rubber grip or a cloth for better traction. Avoid excessive force, which could damage the socket. 2.Installing the new bulb:
Align the pins on the new bulb with the socket and gently rotate it clockwise until secure. Ensure the bulb is firmly seated in the socket. 3.Avoiding over-tightening:
Do not over-tighten the bulb. This can damage the socket or the bulb itself. A snug fit is sufficient.Reassembling the Fixture
After replacing the bulb, it's crucial to reassemble the fixture correctly. This section describes the reassembly process.
1.
Reattaching the light kit cover:
Align the light kit cover with its mounting points and secure it using the screws, clips, or twist-lock mechanism. Ensure the cover is properly secured to prevent it from falling or rattling. 2.Replacing globes and shades:
If globes or shades were removed, carefully reattach them, ensuring they are securely in place. 3.Restoring power:
Once the fixture is fully reassembled, restore power to the ceiling fan by turning the wall switch back on and then the breaker at the electrical panel.Troubleshooting
Occasionally, issues might arise during the bulb replacement process. This section addresses some common problems and their solutions.
1.
Bulb not working:
If the new bulb doesn't light up, double-check that the power is restored and the bulb is properly seated in the socket. Try a different bulb to rule out a faulty bulb. 2.Difficulty removing the old bulb:
If the old bulb is stuck, try using a rubber grip or pliers with rubber padding. If still unable to remove the bulb, consult a qualified electrician. 3.Loose connections:
If the light flickers or doesn't work consistently, check for loose connections in the wiring or the socket. Tighten any loose connections or consult an electrician if necessary.Safety Considerations
Safety should always be a priority when working with electrical fixtures. This section highlights essential safety precautions.
1.
Always disconnect power:
Ensure the power is off before starting any work on the ceiling fan. 2.Use a stable ladder:
Use a sturdy ladder that is appropriately sized for the task. 3.Avoid touching hot bulbs:
Allow bulbs to cool completely before handling them. 4.Consult a qualified electrician:
If unsure about any aspect of the process, consult a qualified electrician. Attempting repairs beyond one's expertise can be dangerous.
How To Remove A Light Kit From Your Hunter Ceiling Fan 5x Series Model Fans

How To Replace An Led Ceiling Fan Light Bulb

How To Change Ceiling Fan Light Bulb

Ceiling Fan Glass Cover Removal Light Bulb Dome

How To Remove Dome Globe Glass Light Replacement On Hampton Bay Ceiling Fan Windward Ii

How To Fix Hunter Fan Light Not Working With Remote

How To Remove A Ceiling Fan Hunter

Universal Ceiling Fan Remote Control Kit Replacement For Hampton Bay Harbor Breeze Hunter Compatible With Uc7078t Uc7067rc Chq7078t L3h2010fanhd Hd6 28r Up Down Light Dimmable Yahoo Ping

How To Install The Contempo Ii By Hunter Fan Company

How To Install A Hunter Avia Ii Led 52 Ceiling Fan With Remote On Double Switch Ceilingfan
Related Posts