How To Install A Ceiling Fan Remote
Installing a ceiling fan remote control offers convenience and accessibility for controlling fan speed and lighting. This guide provides a comprehensive, step-by-step approach to installing a ceiling fan remote control, suitable for most standard ceiling fans. However, consulting the manufacturer's specific instructions for both the fan and remote is always recommended.
Safety Precautions: Electrical work always poses potential hazards. Before beginning any electrical work, turning off the power at the breaker box is crucial. This prevents electrical shocks and ensures safety throughout the installation process. Using a voltage tester to confirm power disconnection before proceeding is also advisable.
Tools and Materials: Gathering necessary tools and materials beforehand streamlines the installation process. Typically, this includes the remote control kit, a voltage tester, wire strippers/cutters, electrical tape, a screwdriver, and potentially wire connectors depending on the specific setup.
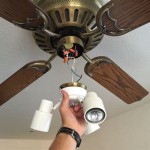
Removing the Existing Canopy: The canopy is the decorative cover where the fan attaches to the ceiling. Carefully remove the existing canopy to access the fan's wiring. This typically involves unscrewing several screws. Keep track of all screws and small parts to ensure proper reassembly later.
Identifying the Receiver Unit: The remote kit includes a receiver unit that needs to be installed inside the fan's housing. This unit receives signals from the remote and controls the fan's functions. Familiarize yourself with the receiver unit and its wiring before proceeding.
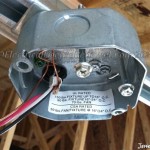
Wiring the Receiver: The receiver unit's wiring needs to be connected to the fan's existing wiring. This usually involves connecting wires with corresponding colors. However, consulting the wiring diagrams provided with both the fan and the remote kit is essential, as wiring configurations can vary. Use wire connectors to secure the connections and electrical tape to further insulate them.
Installing the Receiver Unit: Once the wiring is complete, carefully tuck the receiver unit inside the fan's housing, ensuring it doesn't interfere with the fan's operation. Secure the receiver unit firmly within the housing to prevent it from rattling or moving during operation.
Preparing the Remote Control: The remote control typically requires batteries. Install the batteries according to the remote manufacturer's instructions. Some remotes may also require pairing or syncing with the receiver unit. Follow the provided instructions for this process.
Testing the Remote Control: After completing the wiring and installing the receiver unit, restore power to the circuit breaker. Test all the remote's functions, including fan speed control and light operation, to ensure everything is working correctly.
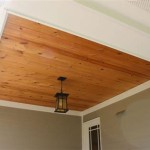
Reattaching the Canopy: Once the remote functions correctly, reattach the canopy to the fan housing. Ensure all screws are tightened securely and the canopy sits flush against the ceiling.
Dip Switch Settings (If Applicable): Some remote kits and ceiling fans utilize dip switches for frequency matching. Refer to both the fan and remote control instructions to determine the correct dip switch settings. Incorrect settings may prevent the remote from functioning correctly.
Troubleshooting: If the remote control doesn't function properly, double-check all wiring connections and dip switch settings. Consult the troubleshooting section of the remote control manual for specific issues. If the problem persists, consulting a qualified electrician may be necessary.
Wall Cradle (Optional): Many remote kits include a wall cradle for convenient storage of the remote when not in use. Install the wall cradle in a desired location according to the manufacturer's instructions.
Cleaning and Maintenance: Clean the remote control periodically using a soft, dry cloth. Avoid using harsh chemicals or abrasive cleaners, as these can damage the remote's finish. Regularly check the fan's operation and the remote's responsiveness to ensure optimal performance.
Remote Battery Replacement: Remote control batteries will eventually need replacement. Consult the remote's instructions for the correct battery type and replacement procedure. Promptly replace depleted batteries to avoid interruption of fan operation.
Advanced Features: Some advanced remote control kits offer features like dimming, timer functions, and reverse functionality. Familiarize yourself with your specific remote's features and how to utilize them by referencing the provided instructions.
Compatibility: While most remote kits are designed for universal compatibility, confirming compatibility with your specific ceiling fan model is essential before purchasing. This ensures seamless integration and avoids potential compatibility issues during installation.
Alternative Mounting Options: While most canopies accommodate the receiver unit internally, some installations may require alternative mounting options. Consider external mounting solutions if space within the canopy is limited, ensuring the receiver unit is securely fastened and protected.

How To Wire A Ceiling Fan Control Using Dimmer Switch

How To Install A Ceiling Fan Remote Diy Family Handyman

Lighting How To Wire A Hunter Remote Ceiling Fan Exeter And Utilize Both Wall Switches Home Improvement Stack Exchange

How To Wire A Ceiling Fan With Remote Receiver

How To Wire A Ceiling Fan Control Using Dimmer Switch

Install Ceiling Fan With Light And Remote A Comprehensive Guide Pensber

How To Install A Ceiling Fan Remote Control

How To Install A Ceiling Fan Remote Diy Family Handyman

Electrical Ceiling Fan Wiring With Remote Control 2 Wall Switches Home Improvement Stack Exchange

In Wall Ceiling Fan Remote Control How To Install Light Switch
Related Posts