How To Install a Hampton Bay Ceiling Fan Remote Control
Installing a Hampton Bay ceiling fan remote control can significantly enhance convenience and control over a ceiling fan's operation. This guide provides a comprehensive walkthrough of the installation process, covering various scenarios and offering troubleshooting tips.
Before beginning the installation, gathering the necessary tools and materials is crucial. Typically, this includes the remote control unit, the receiver unit, wire connectors, electrical tape, a screwdriver, and possibly a ladder depending on the ceiling height. Always ensure the power supply to the ceiling fan is switched off at the breaker box before commencing any electrical work.
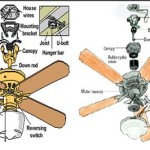
The first step involves accessing the ceiling fan's wiring compartment. This usually requires removing the fan's light fixture or a canopy covering the electrical connections. Once accessed, the existing wiring configuration needs to be identified. Most Hampton Bay fans utilize a standardized wiring scheme, often employing wires coded with specific colors for different functions, such as black for the fan motor, blue for the light, and white for the neutral connection. Consulting the fan's original installation manual can provide further clarification on the wiring layout.
The receiver unit, which acts as the intermediary between the remote and the fan, needs to be connected to the fan's wiring. This typically involves connecting the receiver's wires to the corresponding wires from the fan, using the provided wire connectors. The receiver often includes labeled wires matching the standard color codes, simplifying the connection process. Securely fastening the wire connectors is vital to ensure a reliable electrical connection.
After the receiver's wiring is complete, the unit needs to be carefully positioned within the fan's housing. Depending on the model, the receiver might fit within the existing canopy or require a slight modification to accommodate its size. Ensuring the receiver doesn't interfere with the fan's rotation or other components is essential.
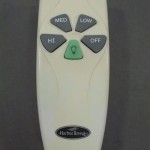
Next, the remote control needs to be paired with the receiver. This process typically involves setting the dip switches on both the remote and the receiver to the same configuration. The dip switches are small toggles located inside the battery compartments of both units. The specific dip switch configuration might be pre-set, or users may need to select a unique combination to avoid interference with other remote-controlled devices in the vicinity. The remote control's instruction manual will provide detailed guidance on setting the dip switches.
Once the pairing process is complete, the batteries can be inserted into the remote control. Testing the remote's functionality by operating the fan and light is the next step. Verify that the fan responds correctly to the commands from the remote, such as speed adjustments, light control, and on/off functions.
After confirming the remote's proper operation, the final step involves reassembling the fan's housing and light fixture. Ensure all components are securely fastened and that no wires are pinched or exposed. Restoring power to the circuit breaker will complete the installation process.
Several variations in the installation process may occur depending on the specific Hampton Bay fan model and the type of remote control being installed. Some fans might come with a pre-installed receiver, simplifying the process considerably. Others might require adapting the wiring to accommodate older fan models. Consulting the provided instruction manuals for both the fan and the remote is always recommended to address specific model requirements.
Troubleshooting potential issues is often a part of the installation process. If the remote doesn't function correctly, verifying the batteries' proper installation and the dip switch settings is the first step. Checking the wiring connections for tightness and correctness can also resolve many issues. If problems persist, consulting the troubleshooting section of the remote's instruction manual can offer further guidance.
Different Hampton Bay remote models offer varying functionalities. Some remotes might include features such as dimming capabilities for the light, multiple fan speed settings, and even programmable timers. Familiarizing oneself with the specific features of the installed remote control will allow for optimal utilization.
Safety precautions are paramount throughout the installation process. Always ensure the power supply is disconnected before working with any electrical wiring. If any uncertainty arises during the installation, consulting a qualified electrician is advisable. Proper installation ensures safe and reliable operation of the ceiling fan and remote control.
Maintaining the remote control and the receiver unit contributes to their longevity. Regularly checking and replacing the remote's batteries will prevent operational disruptions. Keeping the receiver unit clean and free from dust accumulation can also help prevent malfunctions.
Understanding the specific model of the Hampton Bay ceiling fan and the remote control being installed is crucial for a successful installation. Utilizing the provided instruction manuals, following the step-by-step procedures carefully, and adhering to safety precautions will ensure the installation process proceeds smoothly and results in a fully functional and convenient ceiling fan control system.

Troubleshooting Your Remote Controls Step By Hampton Bay Ceiling Fans Lighting

How To Install The Universal Wink Ceiling Fan Remote Control

How To Remove Replace A Hampton Bay Universal Ceiling Fan Remote

Troubleshooting Your Remote Controls Step By Hampton Bay Ceiling Fans Lighting

Troubleshooting Your Remote Controls Step By Hampton Bay Ceiling Fans Lighting

How To Install A Ceiling Fan With Light And Remote Hampton Bay Installation

Hampton Bay Ceiling Fan Remote Control Removal

Hampton Bay Zigbee Ceiling Fan Light Controller Installation Howto Projects Stories Smartthings Community

Troubleshooting Your Remote Controls Step By Hampton Bay Ceiling Fans Lighting

Converting An Existing Ceiling Fan To A Remote Control
Related Posts