How to Replace a Fluorescent Light Fixture in a Drop Ceiling
Fluorescent light fixtures are a common sight in offices, schools, and other commercial buildings. They provide bright, even lighting that is ideal for task work. However, over time, fluorescent light fixtures can begin to fail. The bulbs may burn out, the ballast may go bad, or the fixture itself may become damaged. If you find yourself in need of replacing a fluorescent light fixture in a drop ceiling, don't worry. It's a relatively simple task that can be completed in a few minutes.
Materials You Will Need:
- New fluorescent light fixture
- New fluorescent bulbs
- Screwdriver
- Wire cutters
- Electrical tape
Instructions:
1. Safety First: Before you begin, make sure that the power to the light fixture is turned off. You can do this by flipping the breaker that controls the fixture or by removing the fuse. Once the power is off, you can proceed to the next step.
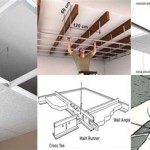
2. Remove the Old Fixture: Locate the two screws that hold the old fixture in place and remove them. Once the screws are removed, carefully pull the fixture down from the ceiling. Be careful not to damage the ceiling tiles.
3. Disconnect the Wires: Once the fixture is down, you will need to disconnect the wires that are connected to it. Use a screwdriver to loosen the screws that hold the wires in place, and then pull the wires away from the fixture. Be careful not to touch the bare wires, as this could cause an electrical shock.
4. Install the New Fixture: Take the new fixture and align it with the holes in the ceiling tiles. Carefully push the fixture up into the ceiling until it is flush with the tiles. Once the fixture is in place, secure it with the screws that you removed earlier.
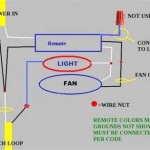
5. Connect the Wires: Next, you will need to connect the wires to the new fixture. Match the color of the wires on the fixture to the color of the wires on the ceiling. Twist the wires together and then secure them with electrical tape. Make sure that the connections are tight, but do not overtighten them.
6. Install the Bulbs: Once the wires are connected, you can install the new fluorescent bulbs. To do this, simply push the bulbs into the sockets on the fixture. Make sure that the bulbs are securely seated.
7. Turn on the Power: Once the bulbs are installed, you can turn on the power to the fixture. Flip the breaker that controls the fixture or insert the fuse. The new fixture should now be working.
Replacing a fluorescent light fixture in a drop ceiling is a simple task that can be completed in a few minutes. By following these instructions, you can save yourself the cost of hiring an electrician.

Converting Drop Ceiling Fluorescent Light To Led 12 Steps With Pictures Instructables

How To Replace An Old Fluorescent Light Fixture Young House Love

How To Replace An Old Fluorescent Light Fixture Young House Love

How To Remove A Drop Ceiling 1905 Farmhouse

How To Replace An Old Fluorescent Light Fixture Young House Love

3 Ways To Retrofit Drop Ceiling Lighting Earthtronics

How To Remove Fluorescent Ceiling Light Box

Converting Drop Ceiling Fluorescent Light To Led 12 Steps With Pictures Instructables

Kitchen Florescent Light Box Makeover With Track Lighting On A Budget

How To Remove A Drop Ceiling 1905 Farmhouse
Related Posts