How to Install a Remote Ceiling Fan
Installing a ceiling fan with a remote control is more complex than installing a non-remote fan, but it is still a task that most DIYers can handle. With a bit of care and attention to detail, you can have your new remote-controlled ceiling fan up and running in no time.
Required Tools and Materials
* Screwdriver * Electrical tape * Wire cutters * Drill * Ladder * Ceiling fan * Remote control * BatteriesStep-by-Step Installation Guide
1. Safety FirstBefore you begin, turn off the power to the circuit that will be powering the fan. You can do this by flipping the appropriate breaker in your electrical panel.
2. Mount the Fan BracketThe first step is to mount the fan bracket to the ceiling joists. The fan bracket is typically included with the fan. Use the screws provided to secure the bracket to the joists. Make sure the bracket is level and centered over the area where you want to hang the fan.
3. Wire the FanNext, you need to wire the fan. Most fans have three wires: black, white, and green. The black wire is the hot wire, the white wire is the neutral wire, and the green wire is the ground wire. Connect the black wire from the fan to the black wire from the ceiling, the white wire from the fan to the white wire from the ceiling, and the green wire from the fan to the green wire from the ceiling.
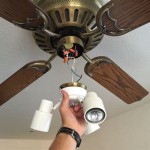
4. Install the Fan MotorOnce the fan is wired, you can install the fan motor. The fan motor is typically attached to the fan bracket with screws. Once the motor is in place, you can attach the fan blades.
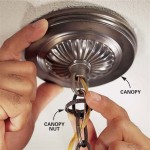
5. Install the Light FixtureIf your fan comes with a light fixture, you will need to install it now. The light fixture is typically attached to the fan motor with screws. Once the light fixture is in place, you can install the light bulbs.
6. Install the Remote ControlThe final step is to install the remote control. The remote control is typically powered by batteries. Install the batteries in the remote control, and then follow the instructions that came with the fan to pair the remote control with the fan.
7. Test the FanOnce the remote control is paired with the fan, you can test the fan. Turn on the power to the circuit, and then use the remote control to turn on the fan. Make sure the fan is running smoothly and that the light fixture is working properly.
Additional Tips
* When choosing a ceiling fan, make sure to select a fan that is the right size for your room. A fan that is too small will not circulate enough air, and a fan that is too large will be noisy and inefficient. * Be sure to install the fan at the correct height. The fan should be high enough so that the blades are at least 7 feet off the floor. * If you are not comfortable installing the fan yourself, you can hire an electrician to do it for you.
Lighting How To Wire A Hunter Remote Ceiling Fan Exeter And Utilize Both Wall Switches Home Improvement Stack Exchange

Install Ceiling Fan With Light And Remote A Comprehensive Guide Pensber

How To Wire A Ceiling Fan Control Using Dimmer Switch

How To Install A Ceiling Fan With Remote Control

Can I Control A Ceiling Fan W Remote Only Connected Things Smartthings Community

How To Wire A Ceiling Fan With Remote Receiver

Converting An Existing Ceiling Fan To A Remote Control

Remote Control Ceiling Fan Wiring Diagram And Connection

Installing Hunter Remote Control Wall Unit To Fan Diy Home Improvement Forum

How To Install A Ceiling Fan Remote Diy Family Handyman
Related Posts